

Eco House Thailand
YouTube.com/EcoHouseThailand
Mastodon @EcoHouseThailand@mastodon.eco
The story of how I am building an Off-Grid home in Thailand.
To put the build in context it is best to start by reading the section that explains my initial Design Ideas There are also sections on how I manage Water and grow food.
 The site is on the edge of the family’s village was a field of teak trees. It is 1 Rai (1,600 m2) and cost ฿650,000. The price is a bit high, but it is perfect location for us, as it faces onto a road and has an electricity pole 10m away. Cutting the Chanote (land title) to give us 1 Rai cost ฿20,000 + ฿10,000 for an express service. I have a 30 year lease on the land and my name is on the title papers.

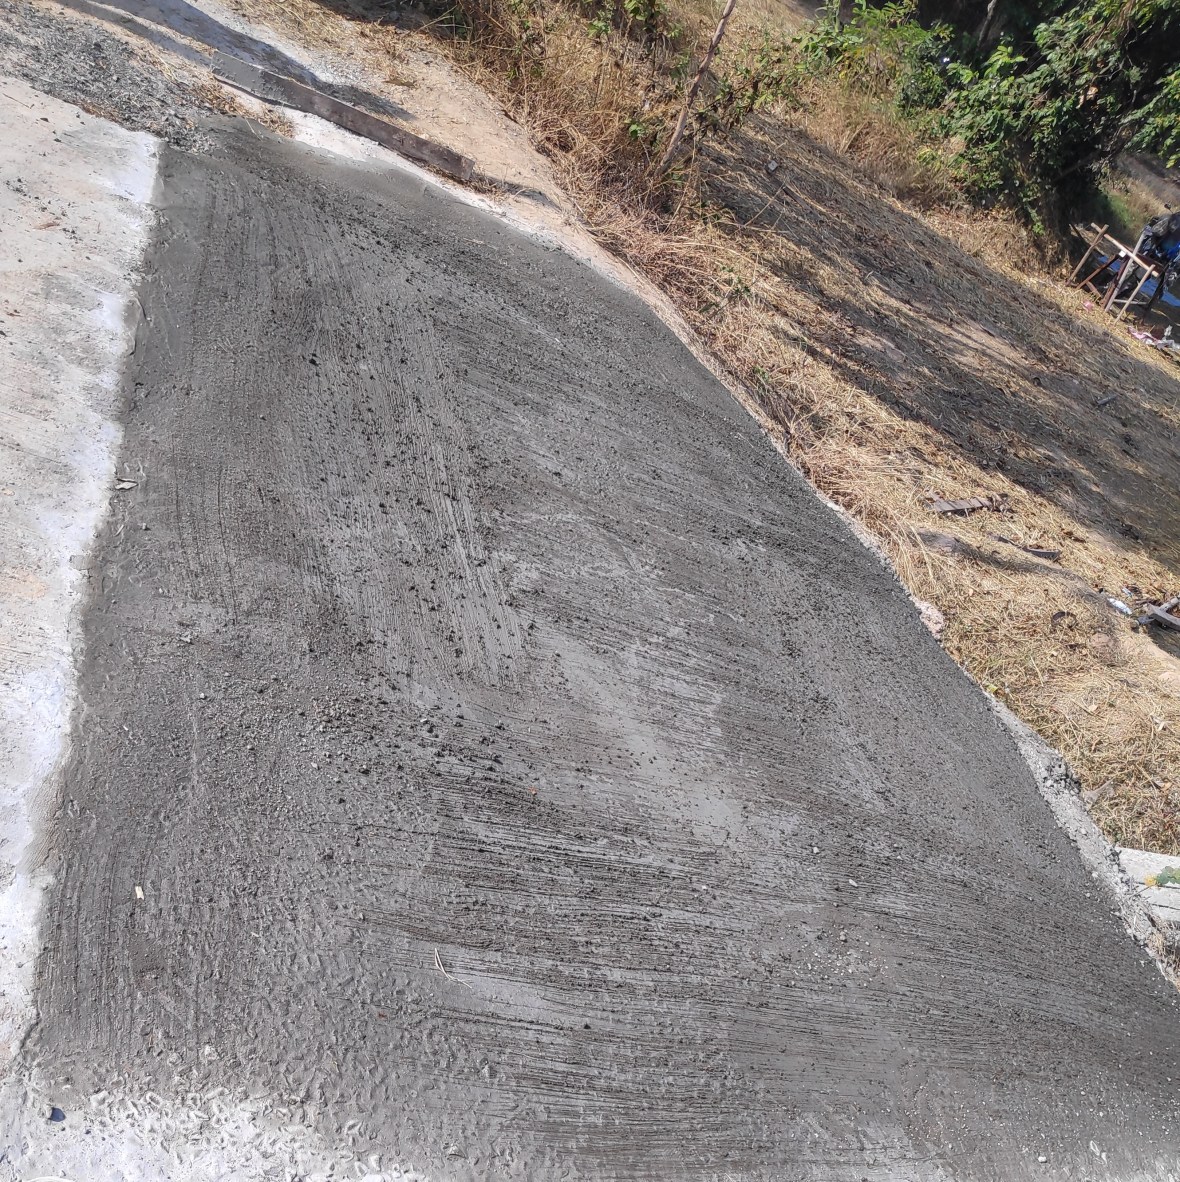
 The Land where we planned to build was raised up by 1.5m with heavy clay soil to avoid flooding and cost ฿380 per truck with 150 trucks cost ฿57,000. The soil was left for a year to sit through a rainy season to compact.
 No power on site, so a trip to PEA (Provincial Electricity Authority) is required to set up a temporary meter.
 At PEA identifying the closest electrical post to our land, which in our case is about 5m away. Each post has a unique number on the post and in the PEA system – quite impressed. ฿6,000 deposit paid for the temporary meter.
 Our builder Khun Own, had to climb the post to make the connection, all PEA had to do was fit the temporary meter.
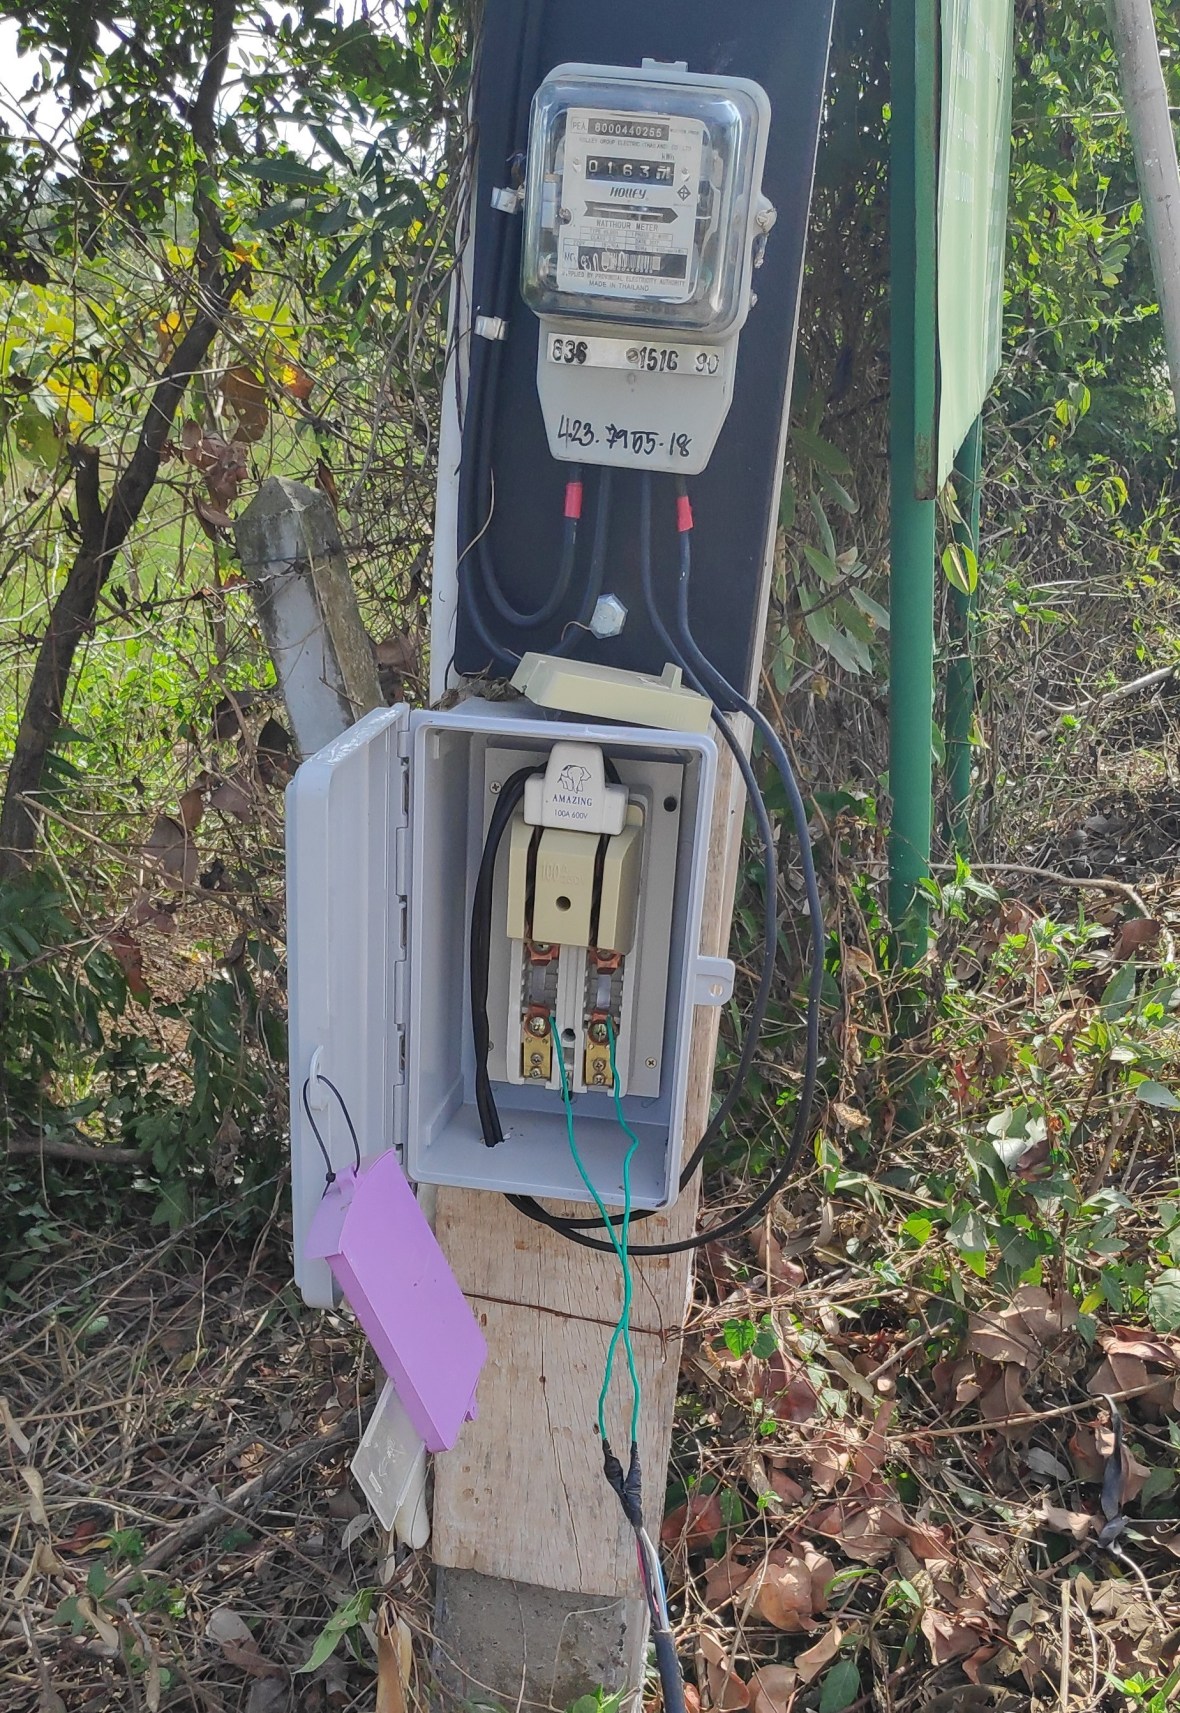 Power connected!

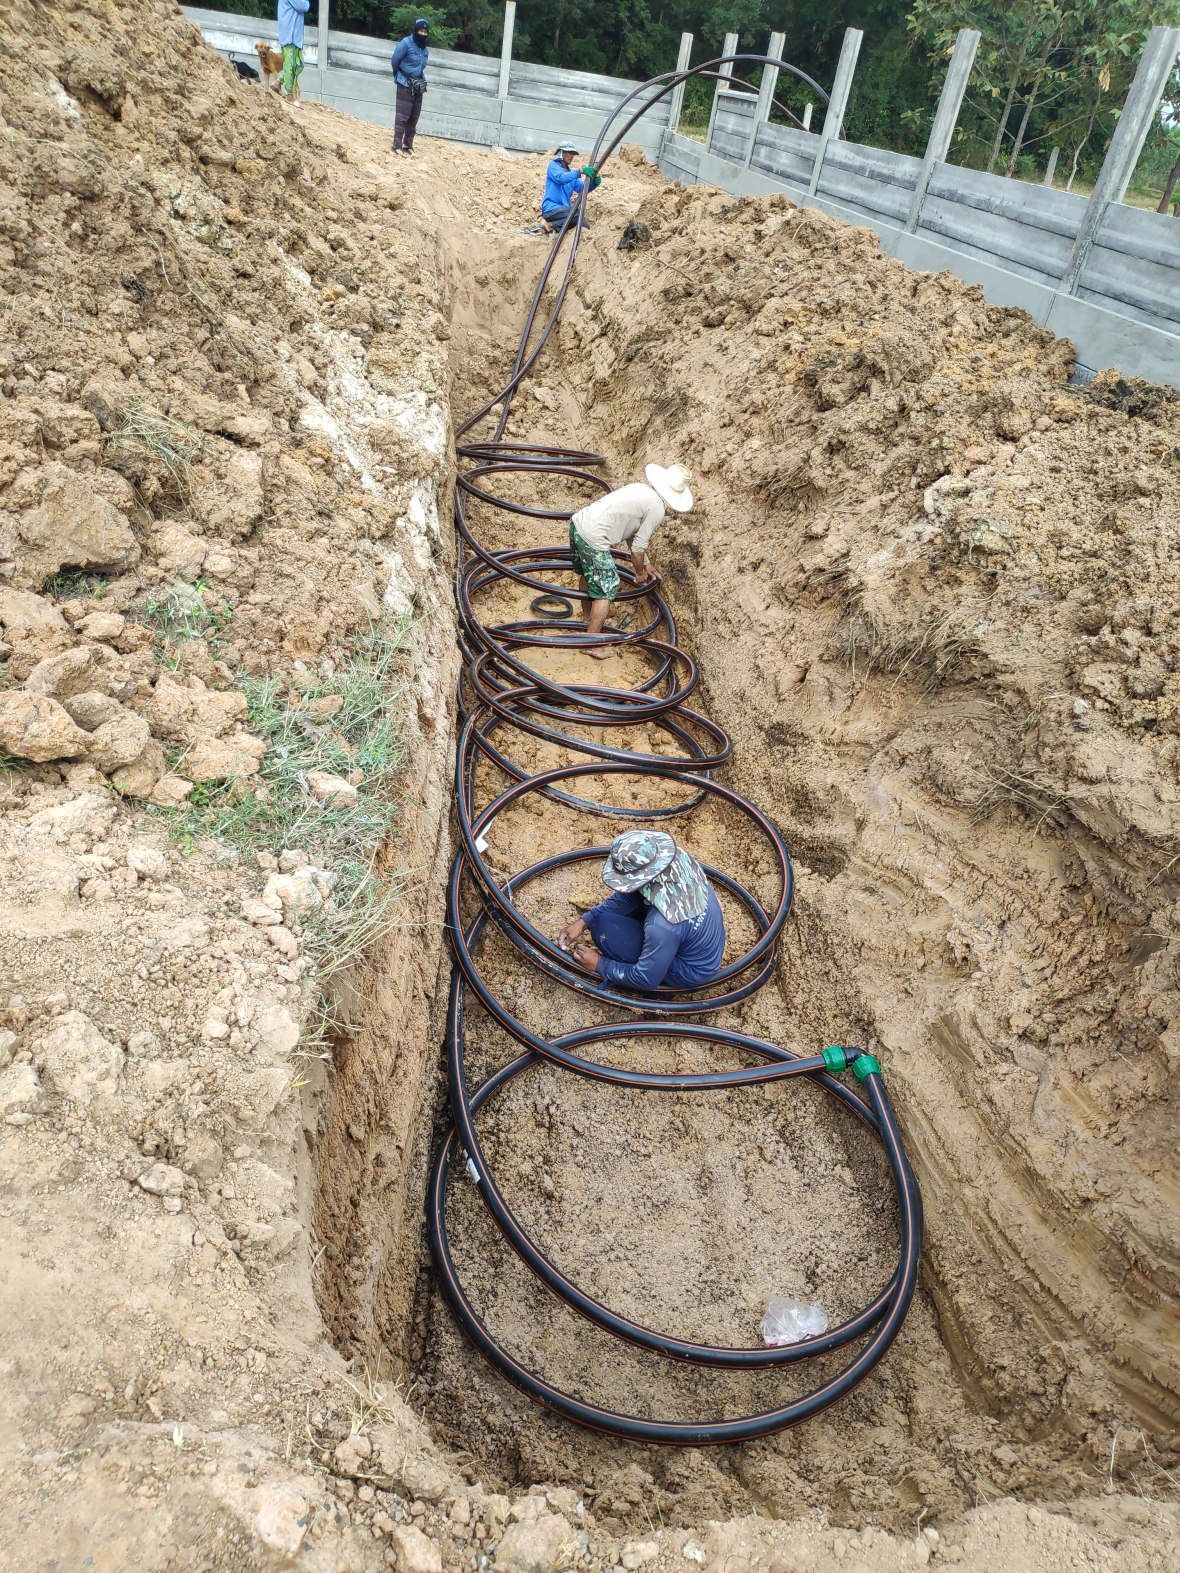 Fitting geothermal. 30minutes with the digger gave me a 3m deep trench which cost me ฿750. 100m of pipe cost ฿3,600.
 Below 2m the ground is much cooler than at the surface. Air will travel for 100m in this cool soil before it is introduced into the Energy Recovery Ventilator in the house. My Thai neighbors don’t know what to make of it or the fact that most of my windows are sealed shut.
Main Build:
I couldn’t find a Thai architect who shared my vision. Before I met each one, I sent them a copy of my detailed design ideas, which they did not look at. In the end I employed an engineer who took my designs and put them into a form that was acceptable to the Government Office that approves home builds, cost ฿20,000, with ฿1,000 for government approval to build.
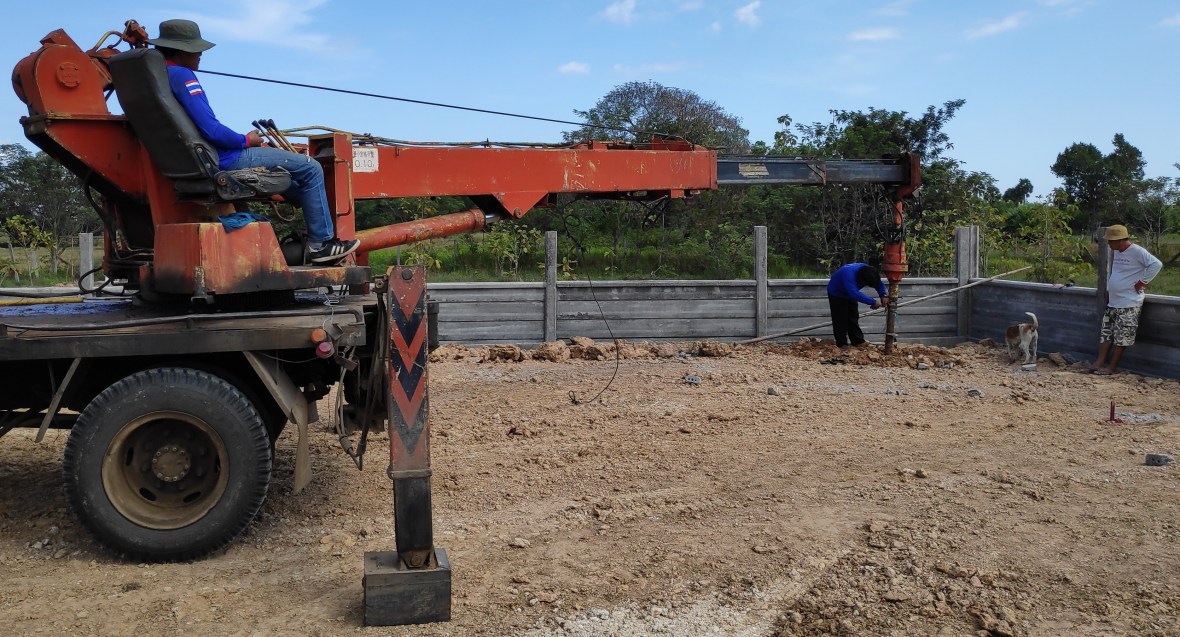
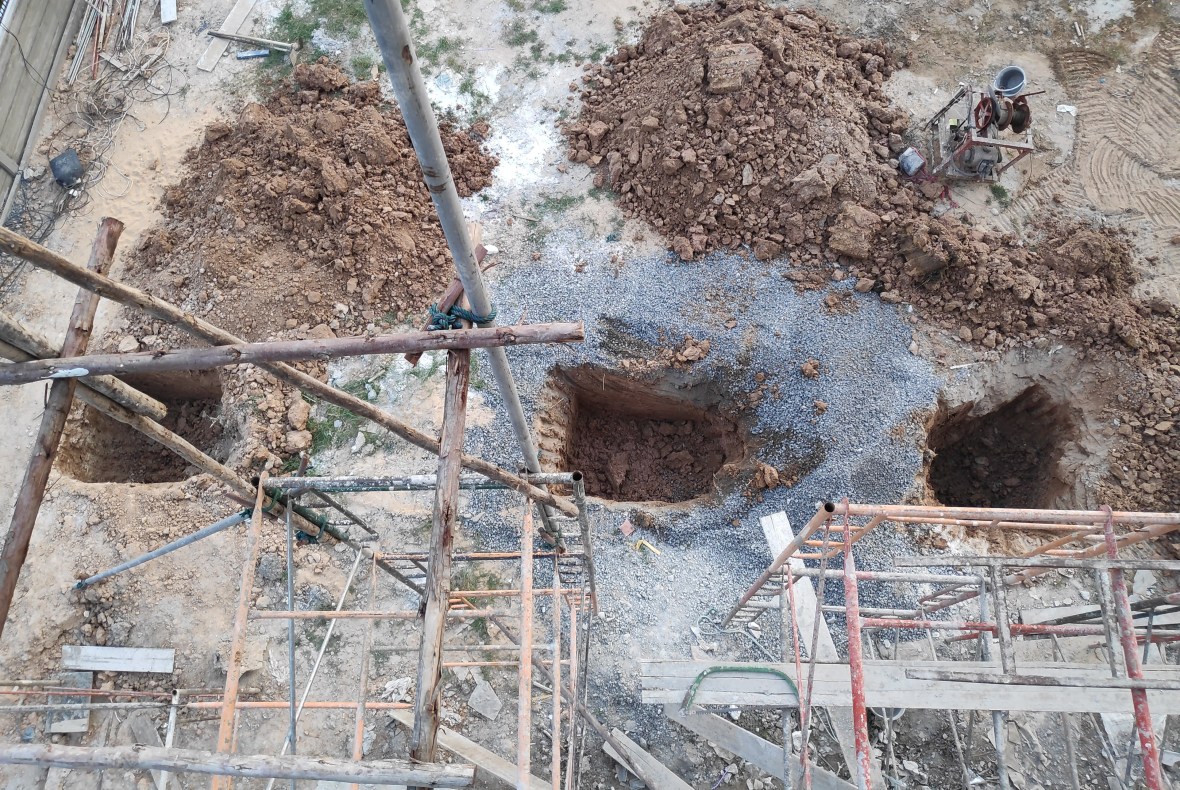
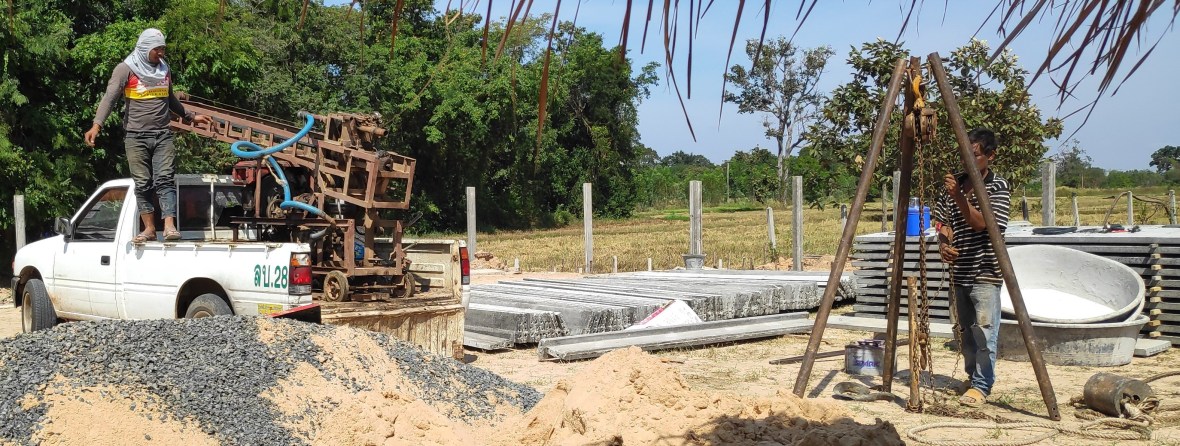 Testing how deep the foundations need to go, 6m in our case. I thought ฿5,000 was a bit expensive by Thai standards, but it came with a full engineers report and recommendation for the foundation type and size of steel to use.
 My house is just sticks in the ground

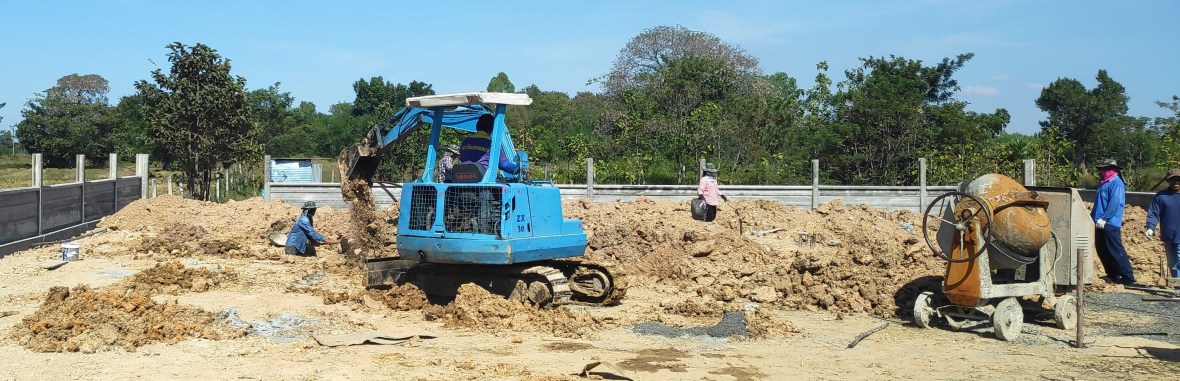
 6m deep holes
 Filled with steel and concrete
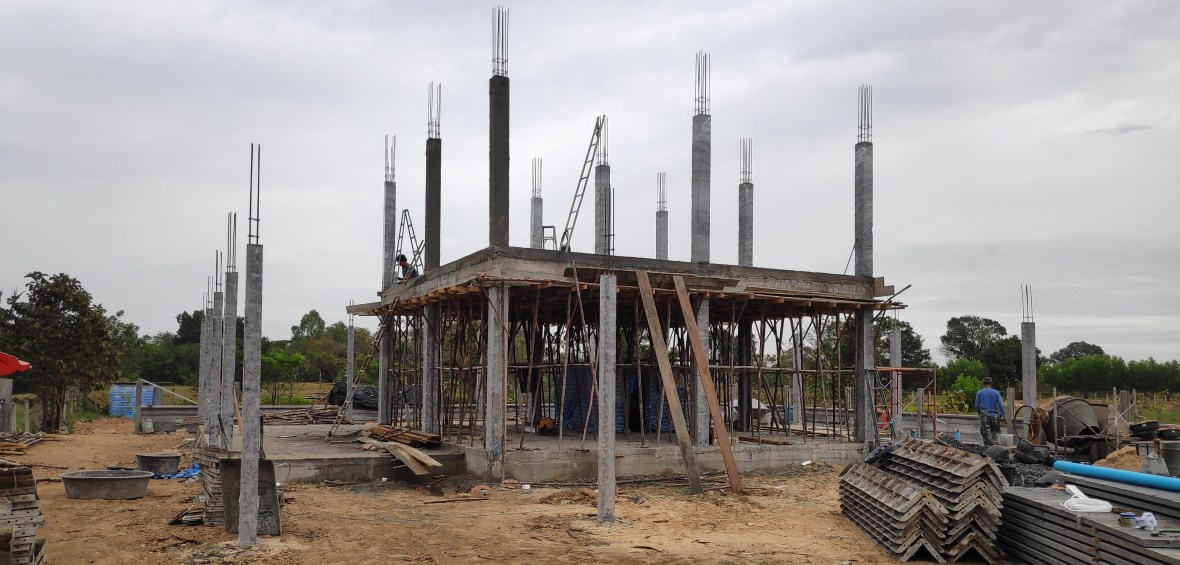
 House now looks like a battlefield
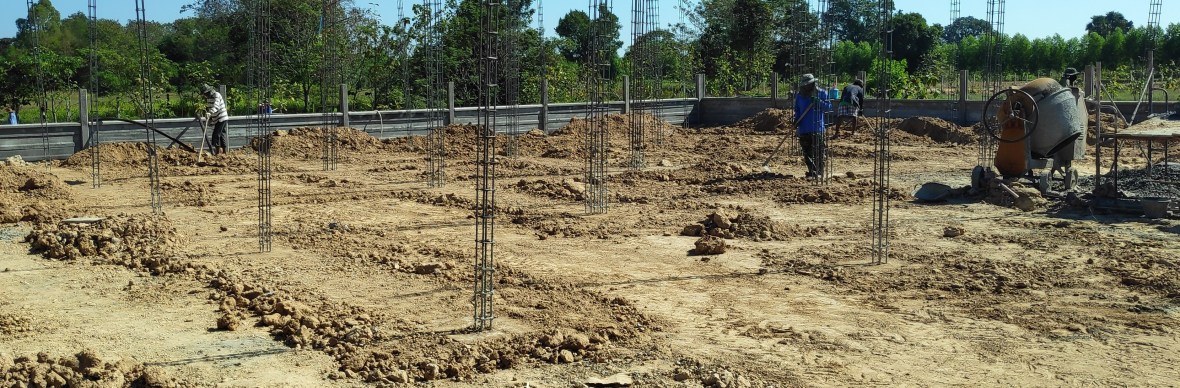
 Dig some more holes
 Add some more concrete
 Add more steel, a lucky stick, some coins and a leaf
 More steel for the column
 More concrete

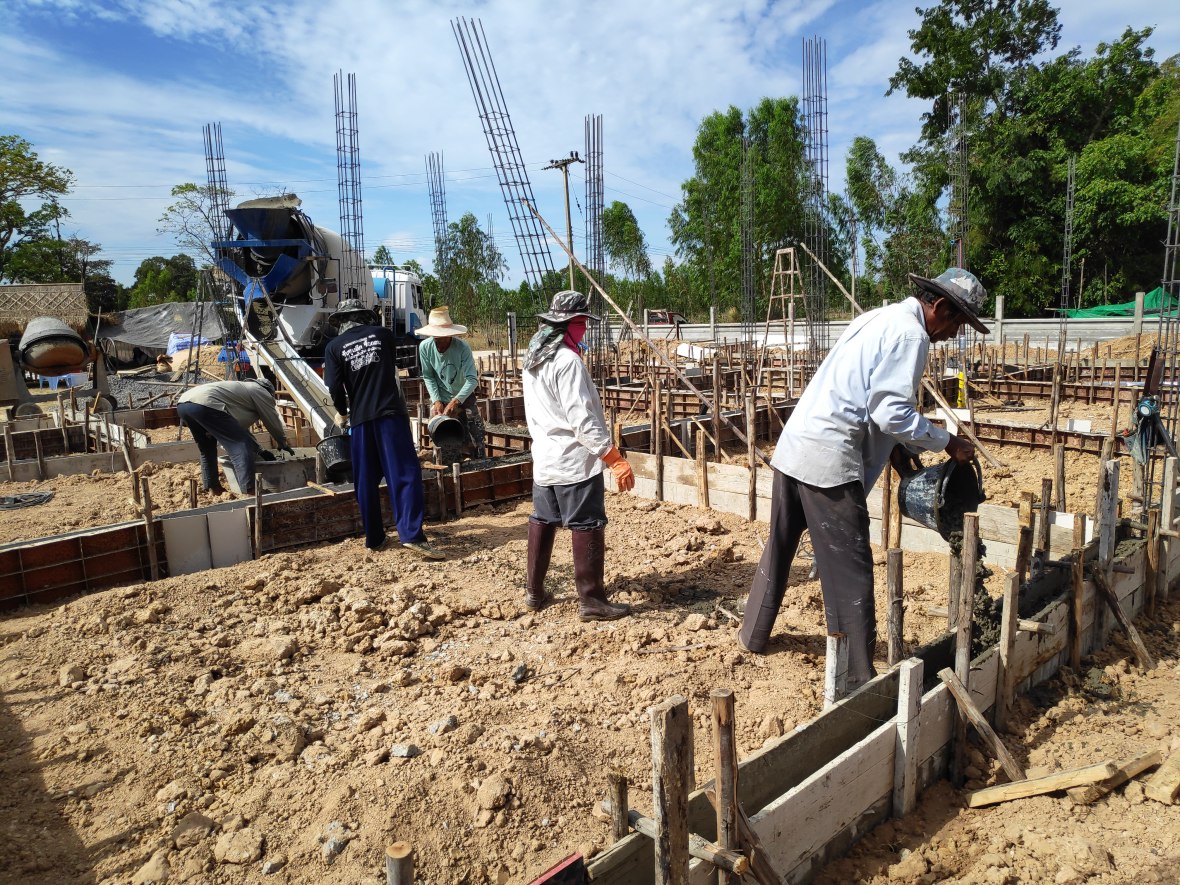
Stage payment to complete all the foundations and column steel ฿300,000
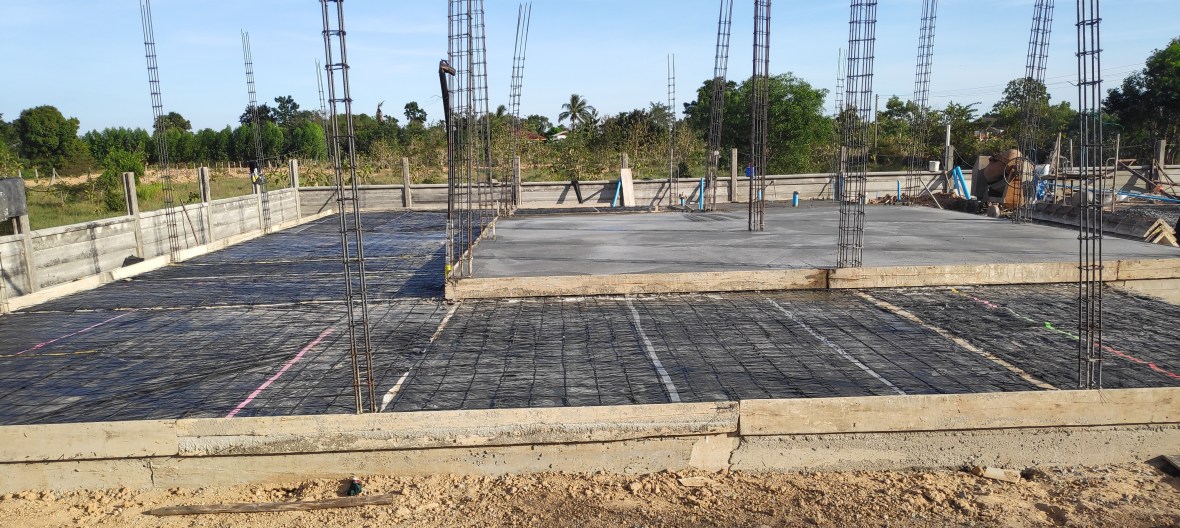
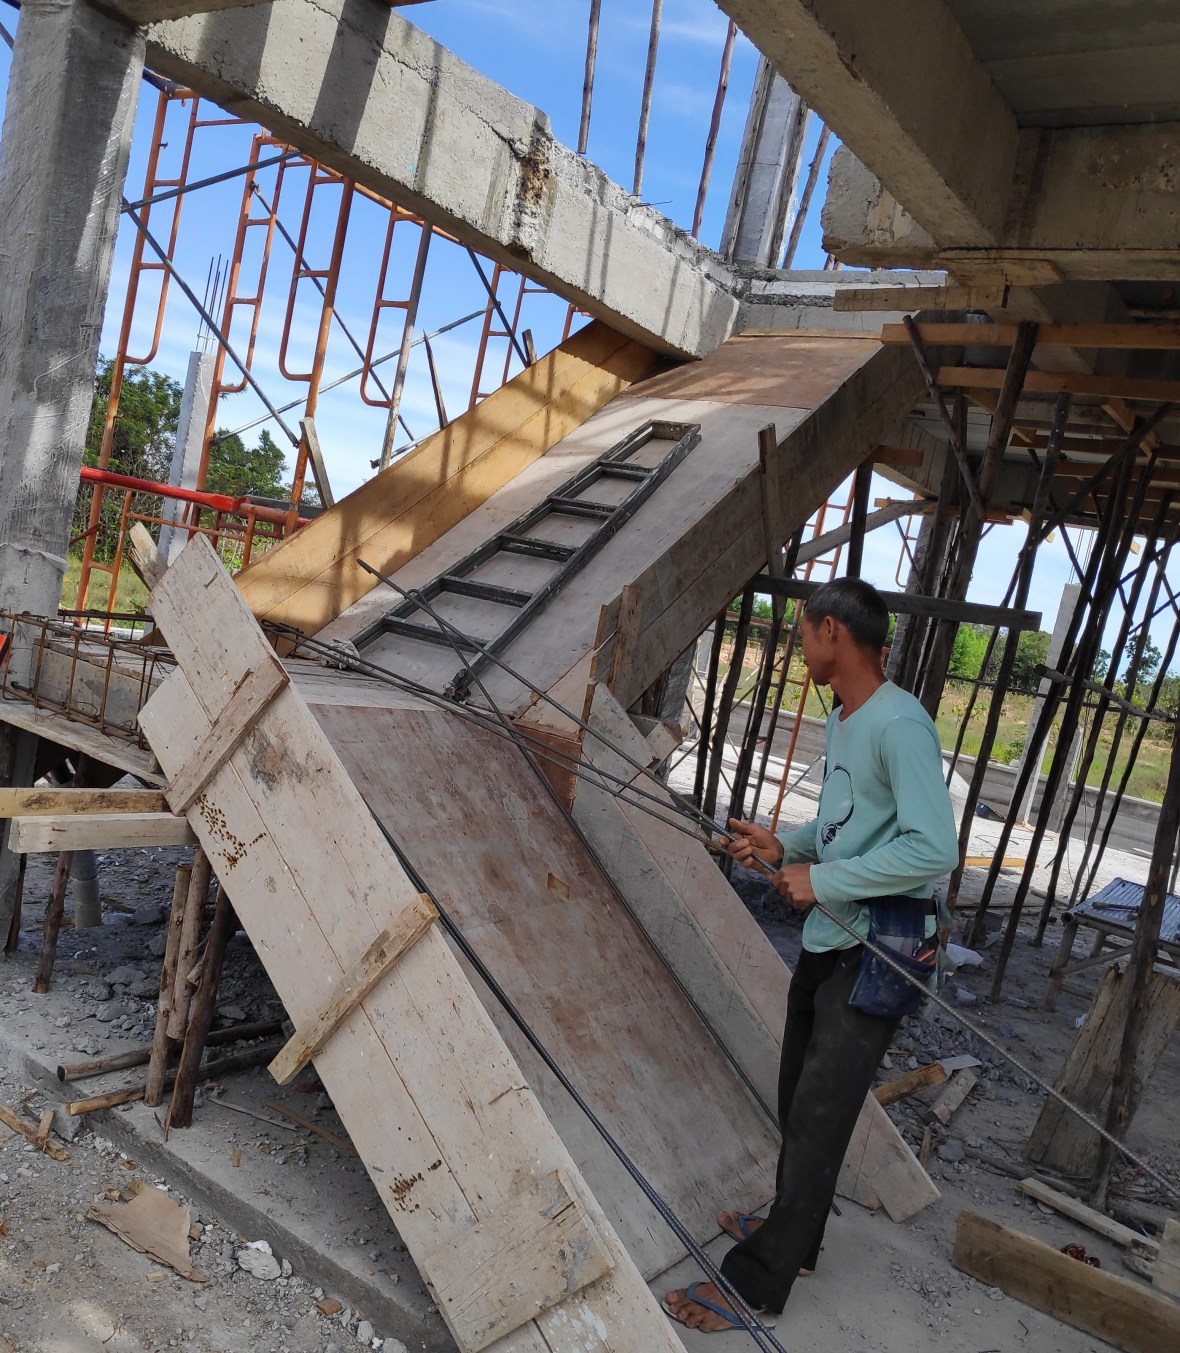
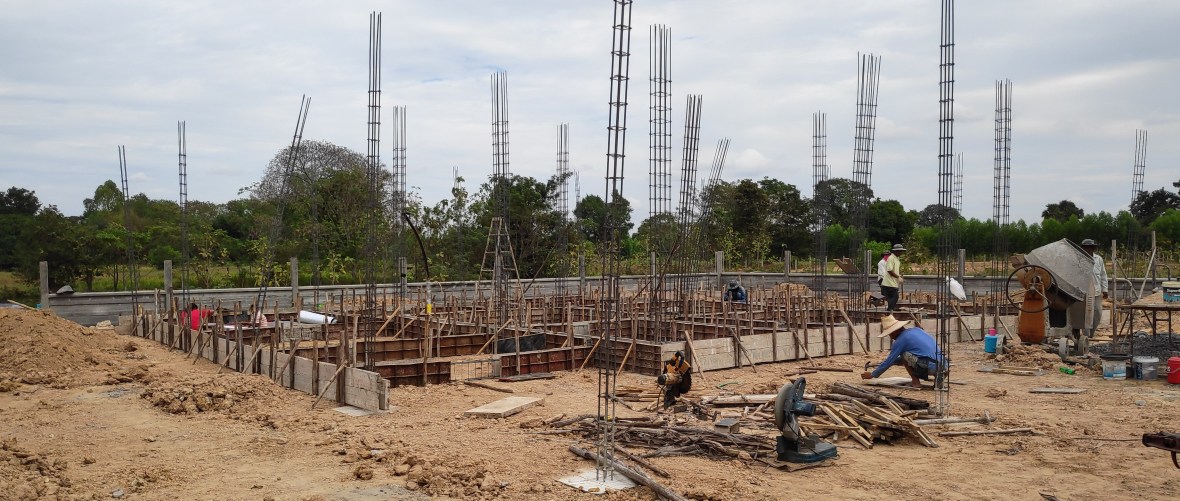 Adding formwork and steel for ground floor walls
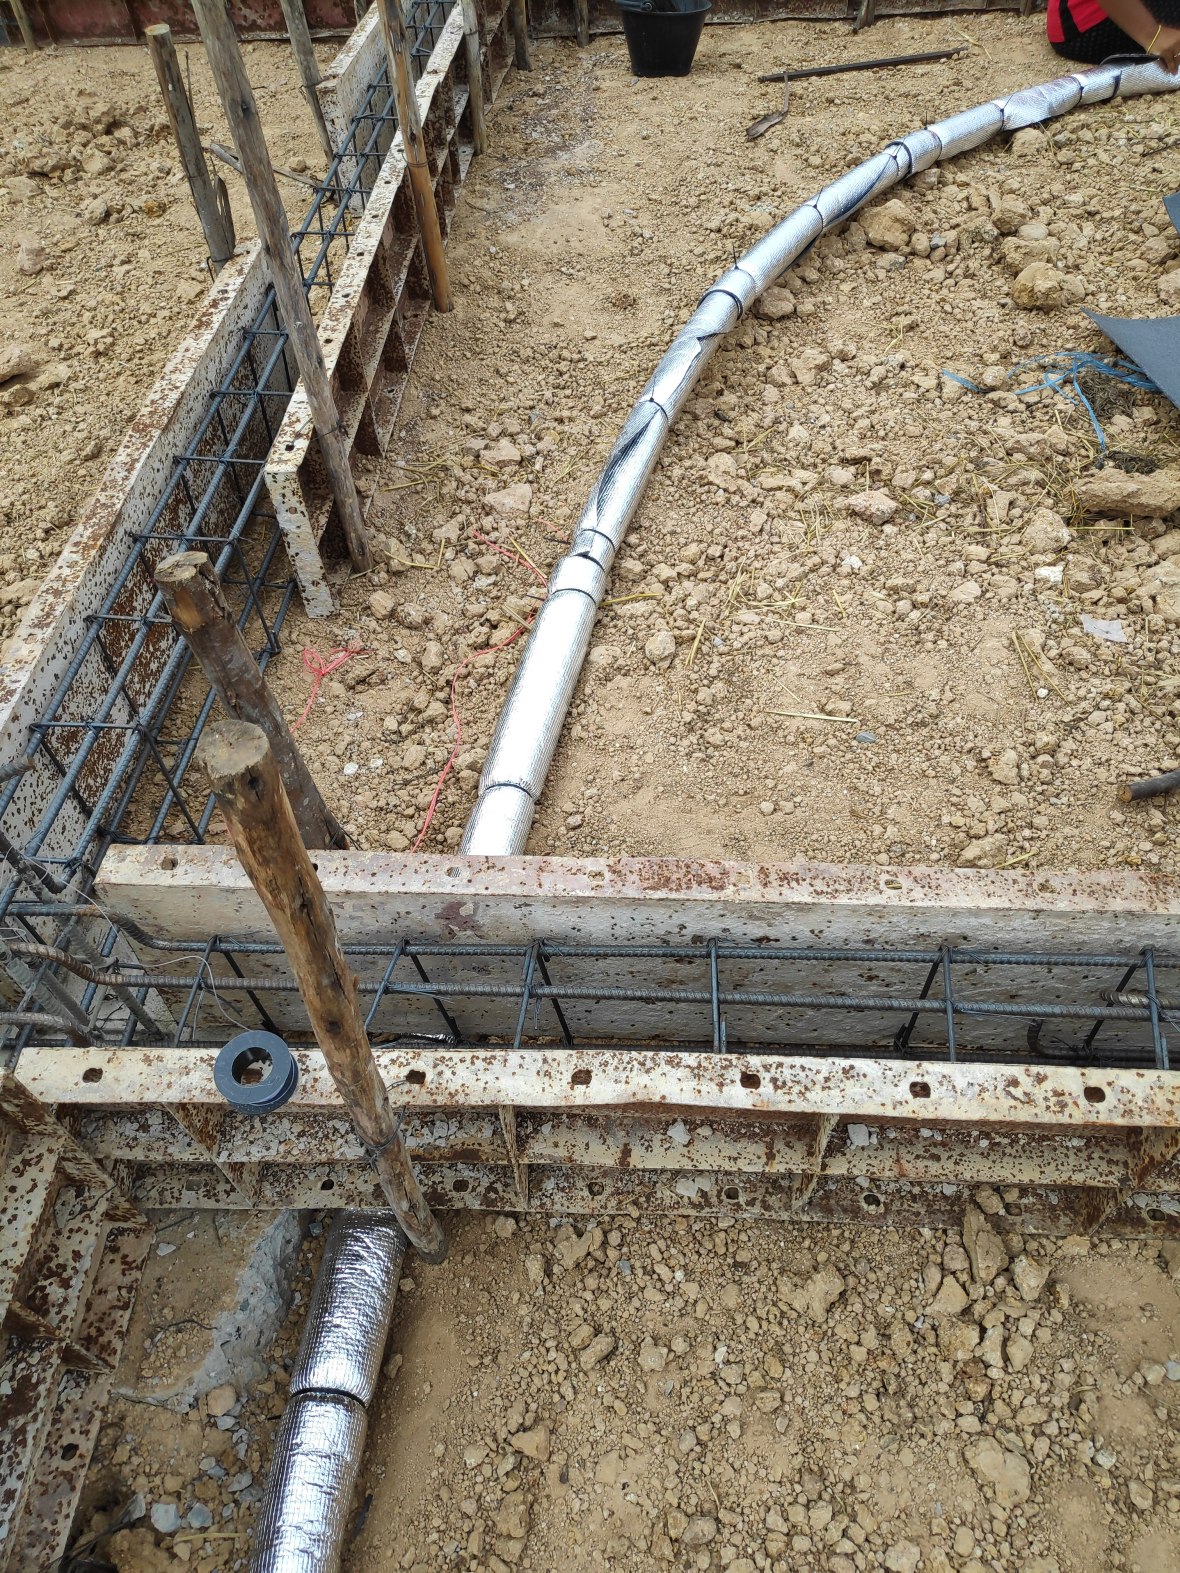 Geothermal pipe gets insulated coat where it comes out of the ground to enter the house
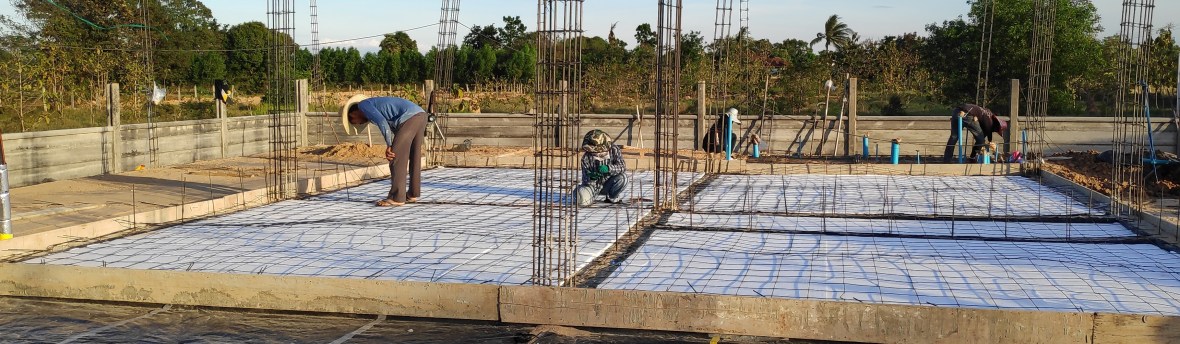
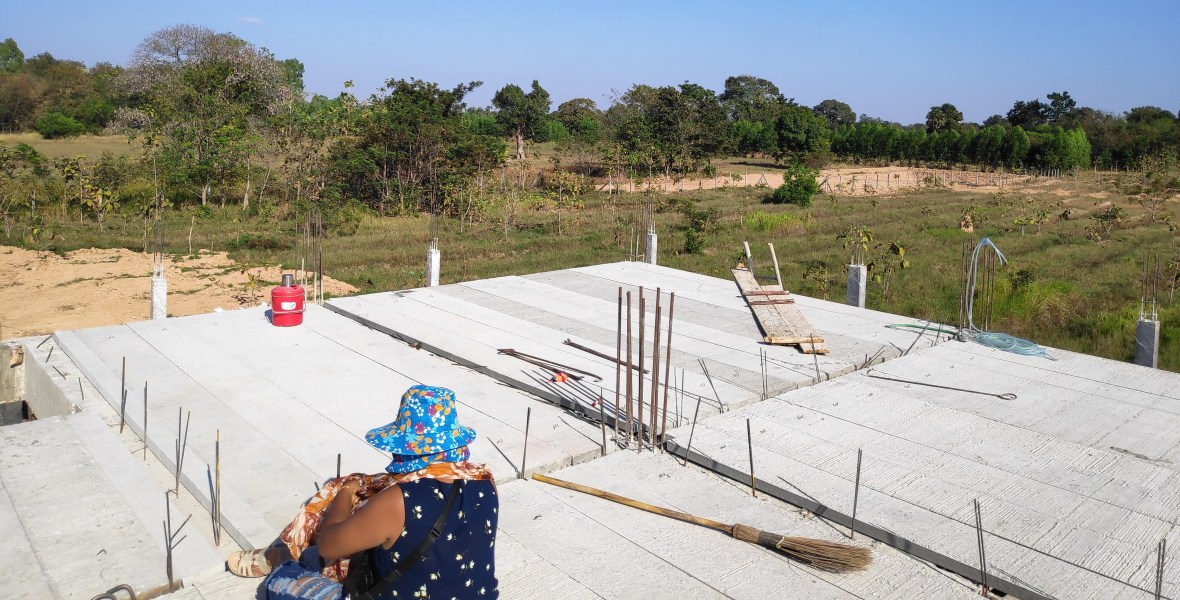
 Sand added between the beams to give a good flat surface to lay the concrete floors on. Sand also reduces the thermal bridge effect, meaning that less cooling is wicked into the ground below, the opposite to what happens in northern countries.
 The sand is part filled, wetted, compacted and the process is repeated. I paid an extra ฿10,000 for the sand, instead of the usual Thai method of using whatever dirt is on site.
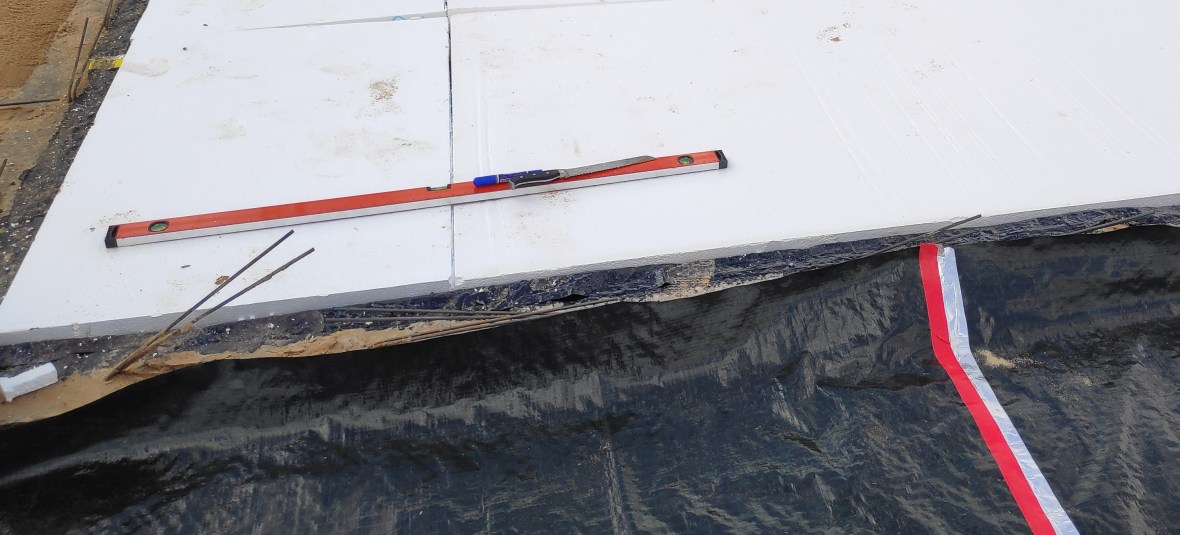
Ordered some insulation foam 184m2 = ฿20,900 Delivered by overnight truck from Bangkok ฿6,500. Foam will be used for underfloor insulation on the ground, second floor and third floor.

30cm of compacted sand, then a vapor barrier and then 3 inches of foam.
 If you don’t have a Hot Wire Foam & Polystyrene Cutter, then use a bread knife
 The Foam floor was a big hit with the village kids…”Dances with Thai Dog”?
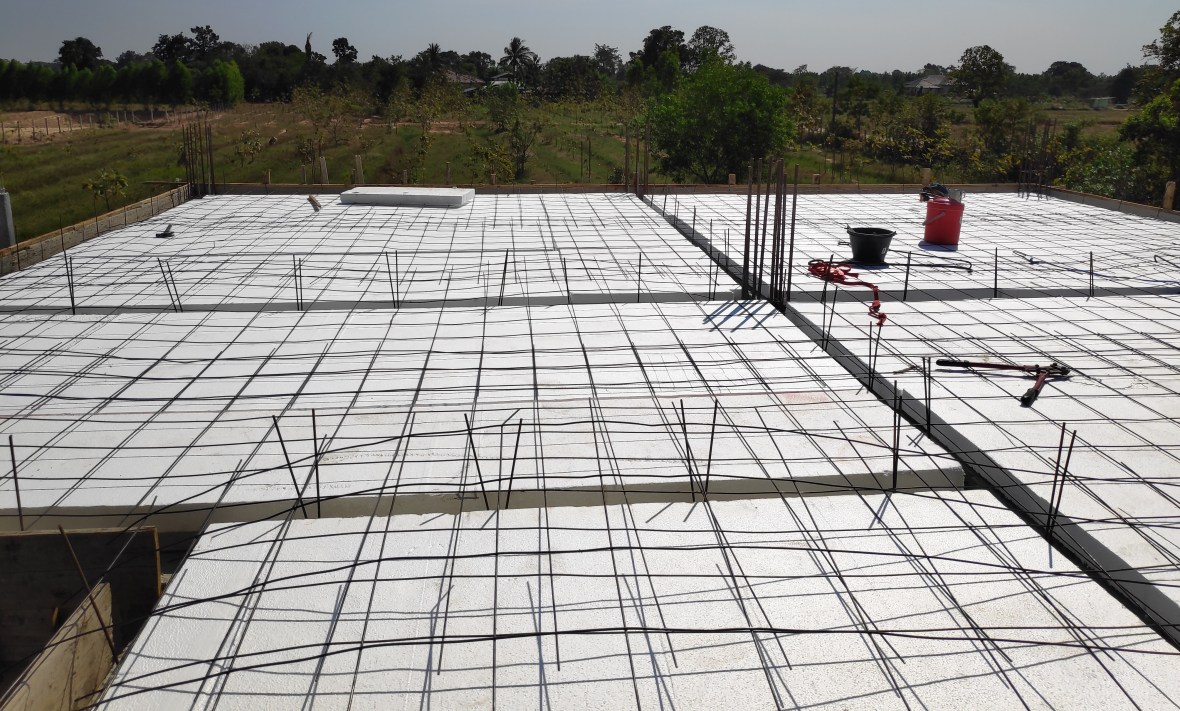
 Adding more steel, ready for more concrete
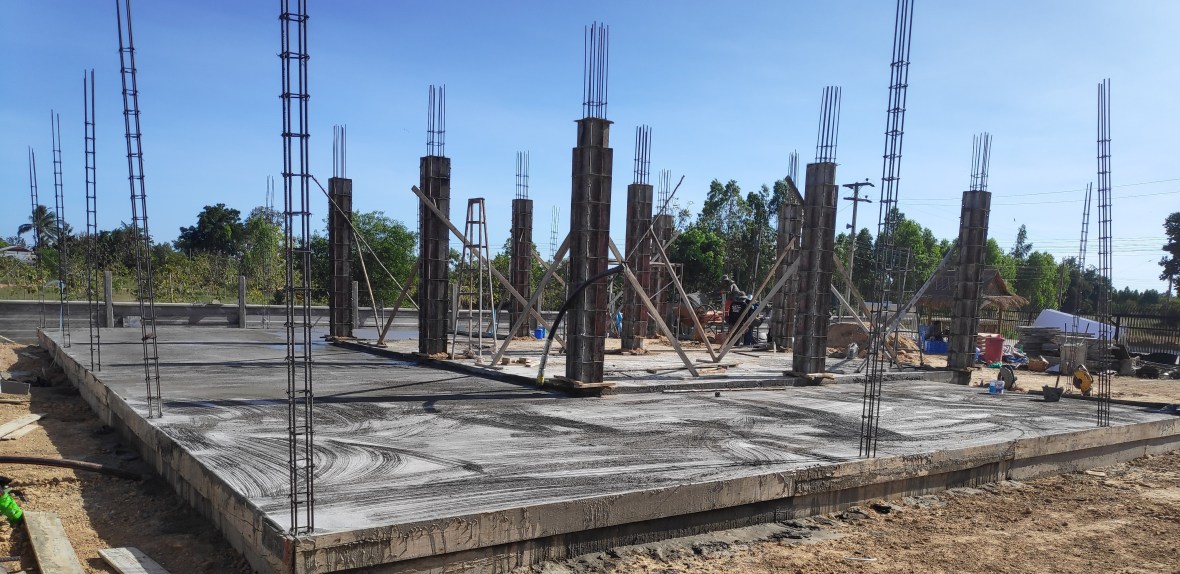
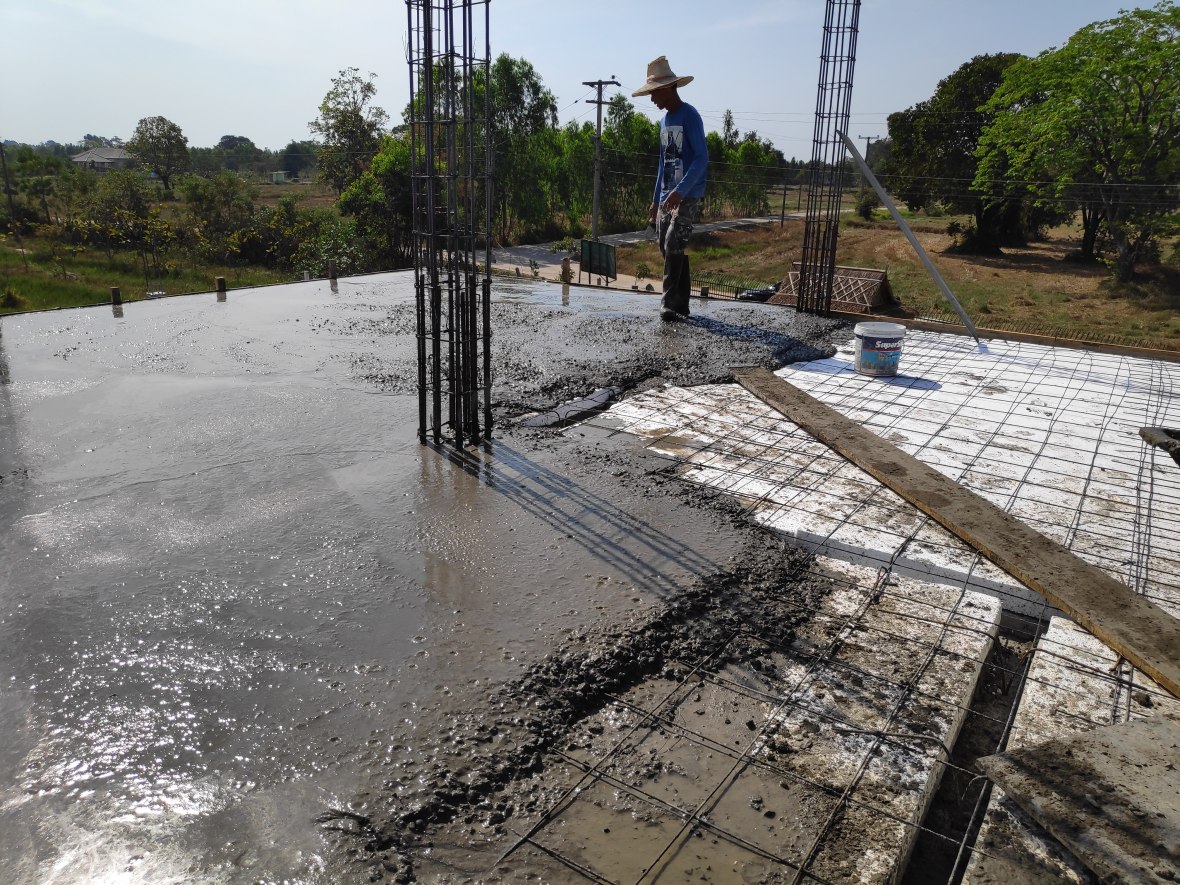
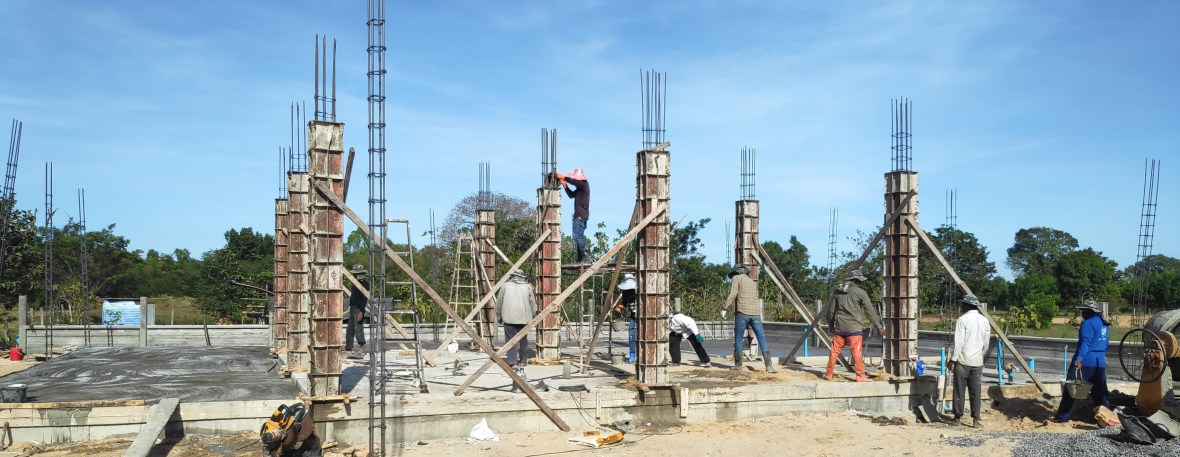 Concrete for the columns
 As the columns for the wrap around porch are filled with concrete, the columns for the second floor are wrapped in plastic cling film. To prevent cracking, plastic is placed over the curing concrete to trap the water inside, ensuring gradual curing.
Second stage payment ฿267,500 for completion of ground floor slab; initial plumbing, waste water, and columns.

Ring beam for the second floor. The smaller posts are to support the wrap around roof on the ground floor.

Bought some windows for the “wet rooms” – kitchen and bathrooms. These windows will be constantly open. They incorporate stainless steel security bars and mosquito screens. 80cm x 50cm are ฿2,690
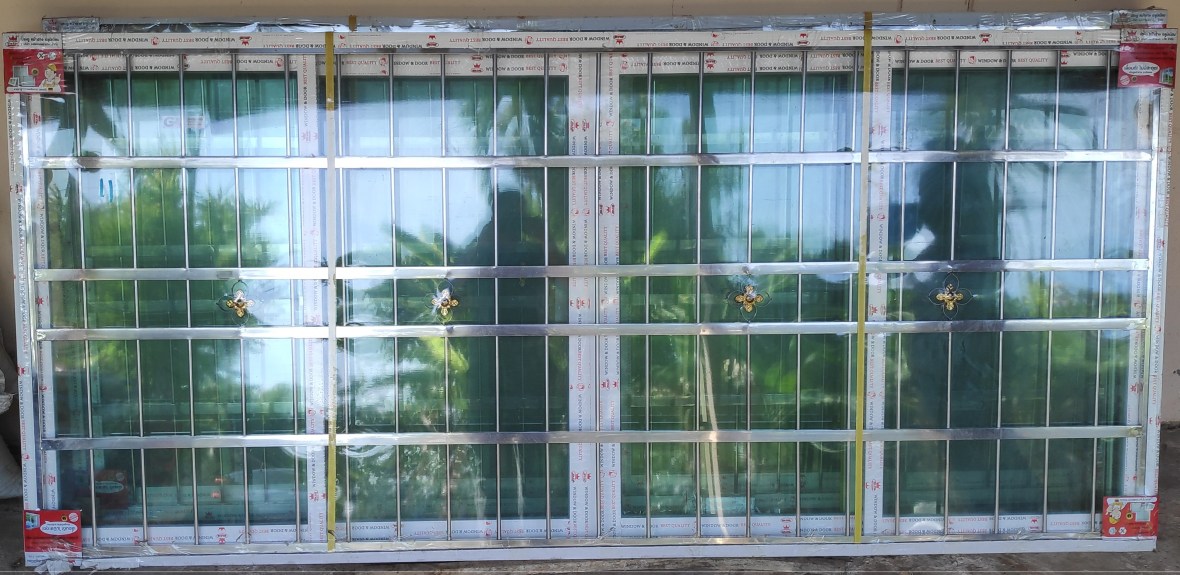
The larger ones for the kitchen are 240cm x 110cm @ ฿8,690. With Thai cooking it is important to get plenty of fresh air into the kitchen. The usual approach to windows is to build the house and have the windows made to measure to fit. For the non-conditioned “wet rooms” I am buying the windows cheaply off the shelf first and then building the walls to fit.

 The second floor concrete floor arrives. The little house of straw and plastic sheeting is where the night security team sleep during the build.
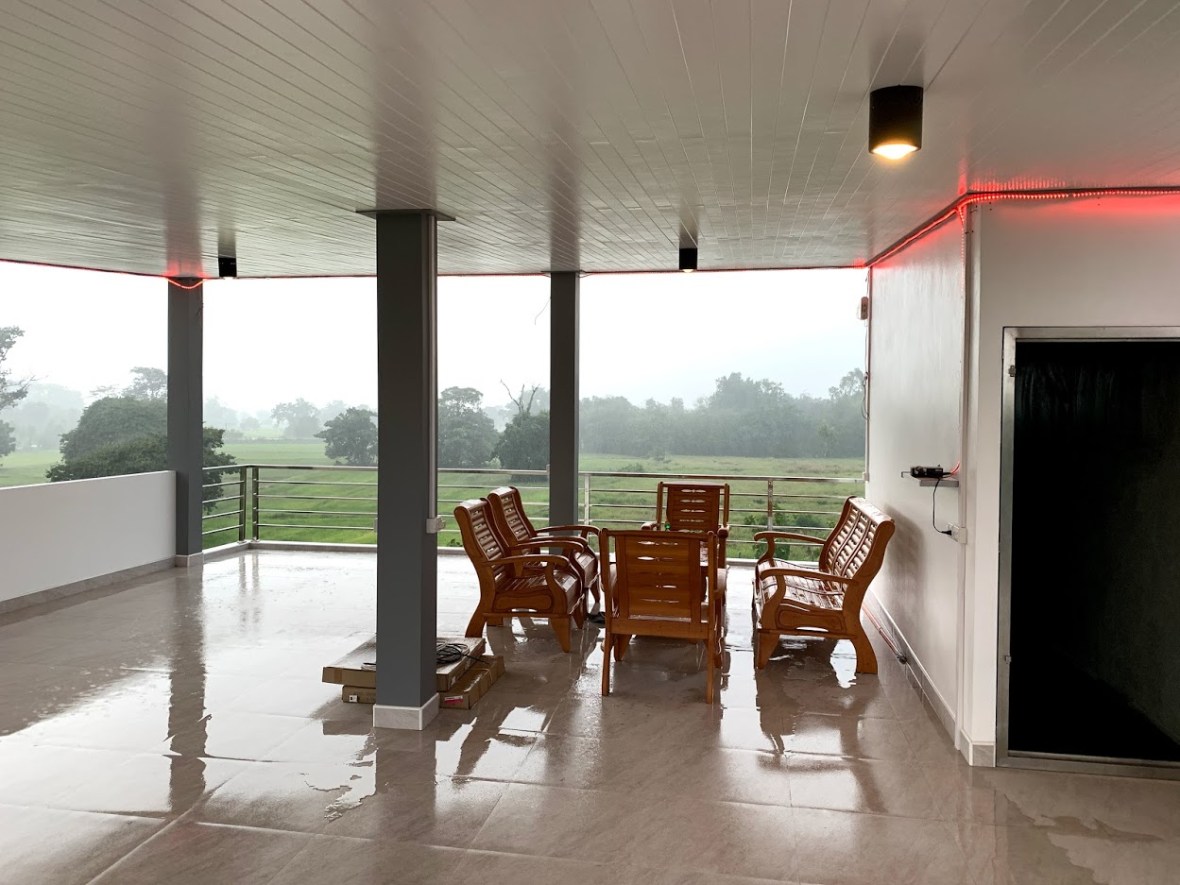
 Great view from the second floor, can’t wait to see the view from the third floor!
 More foam added to the second floor and then more steel. I plan to have a home cinema on the second floor and the foam will help to dampen the noise.
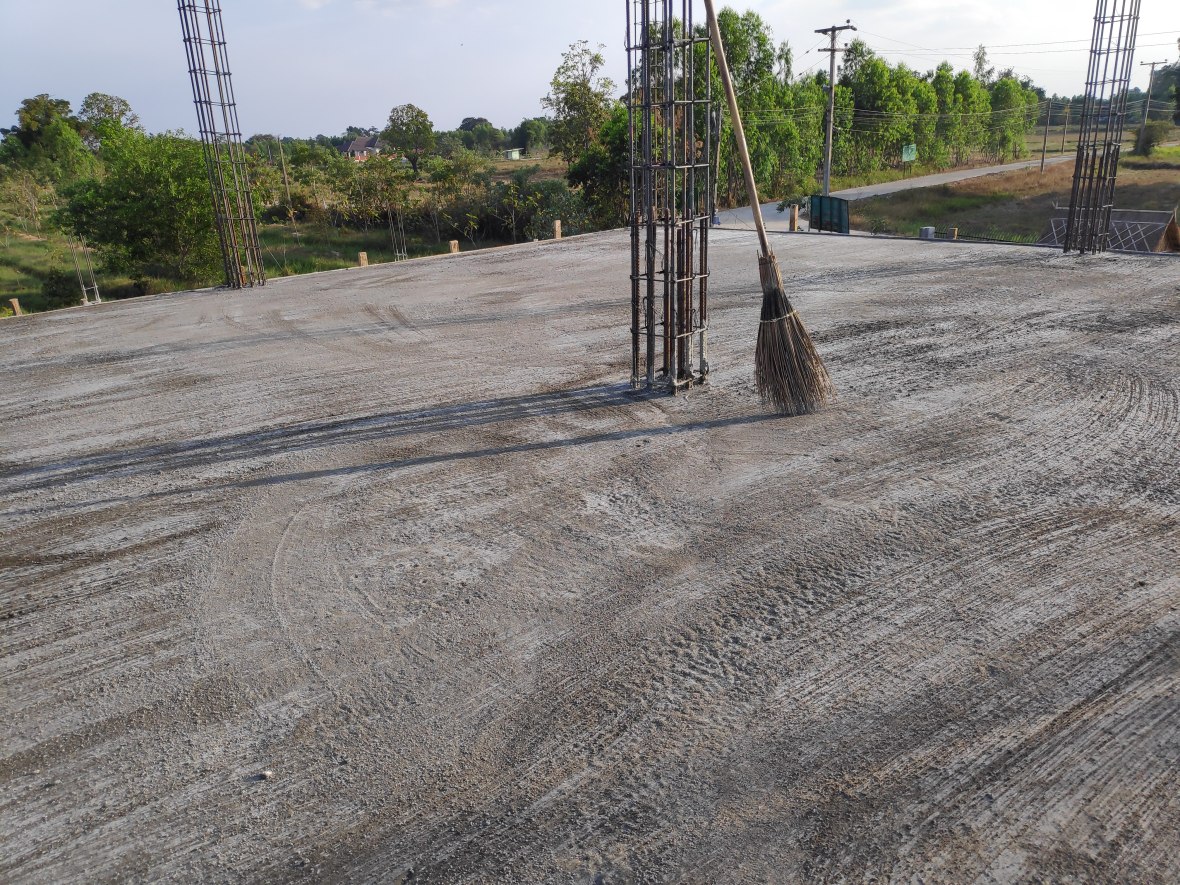 More concrete and we have a second floor.
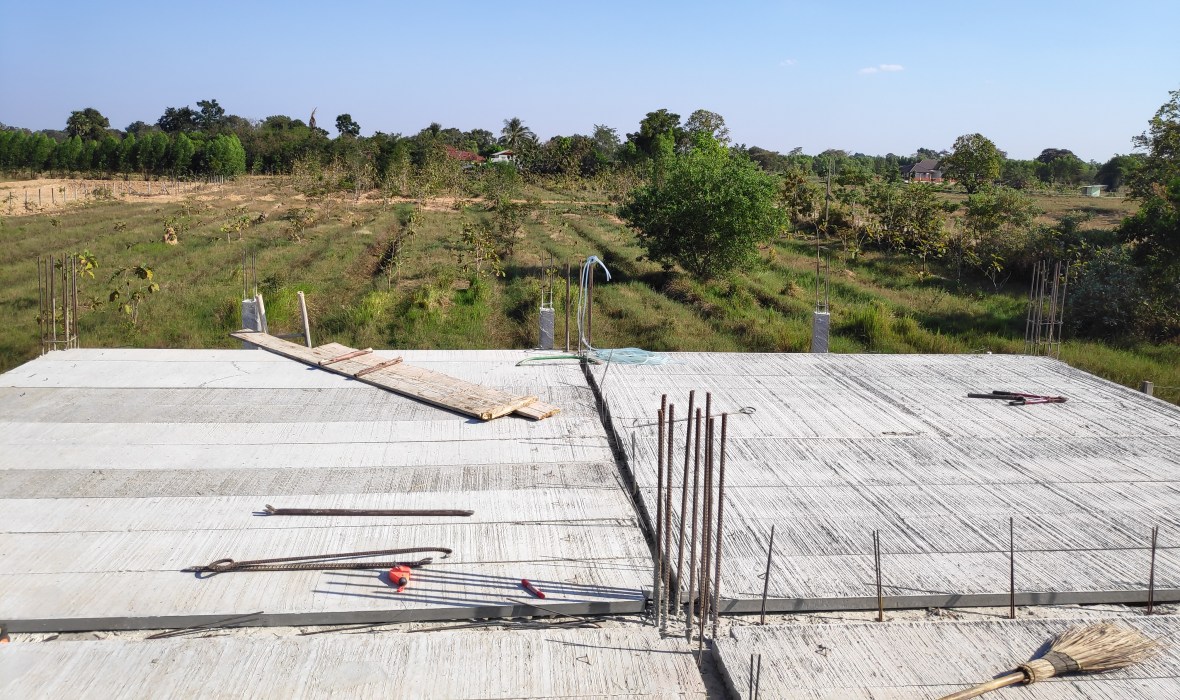
 Concrete columns up to the third floor
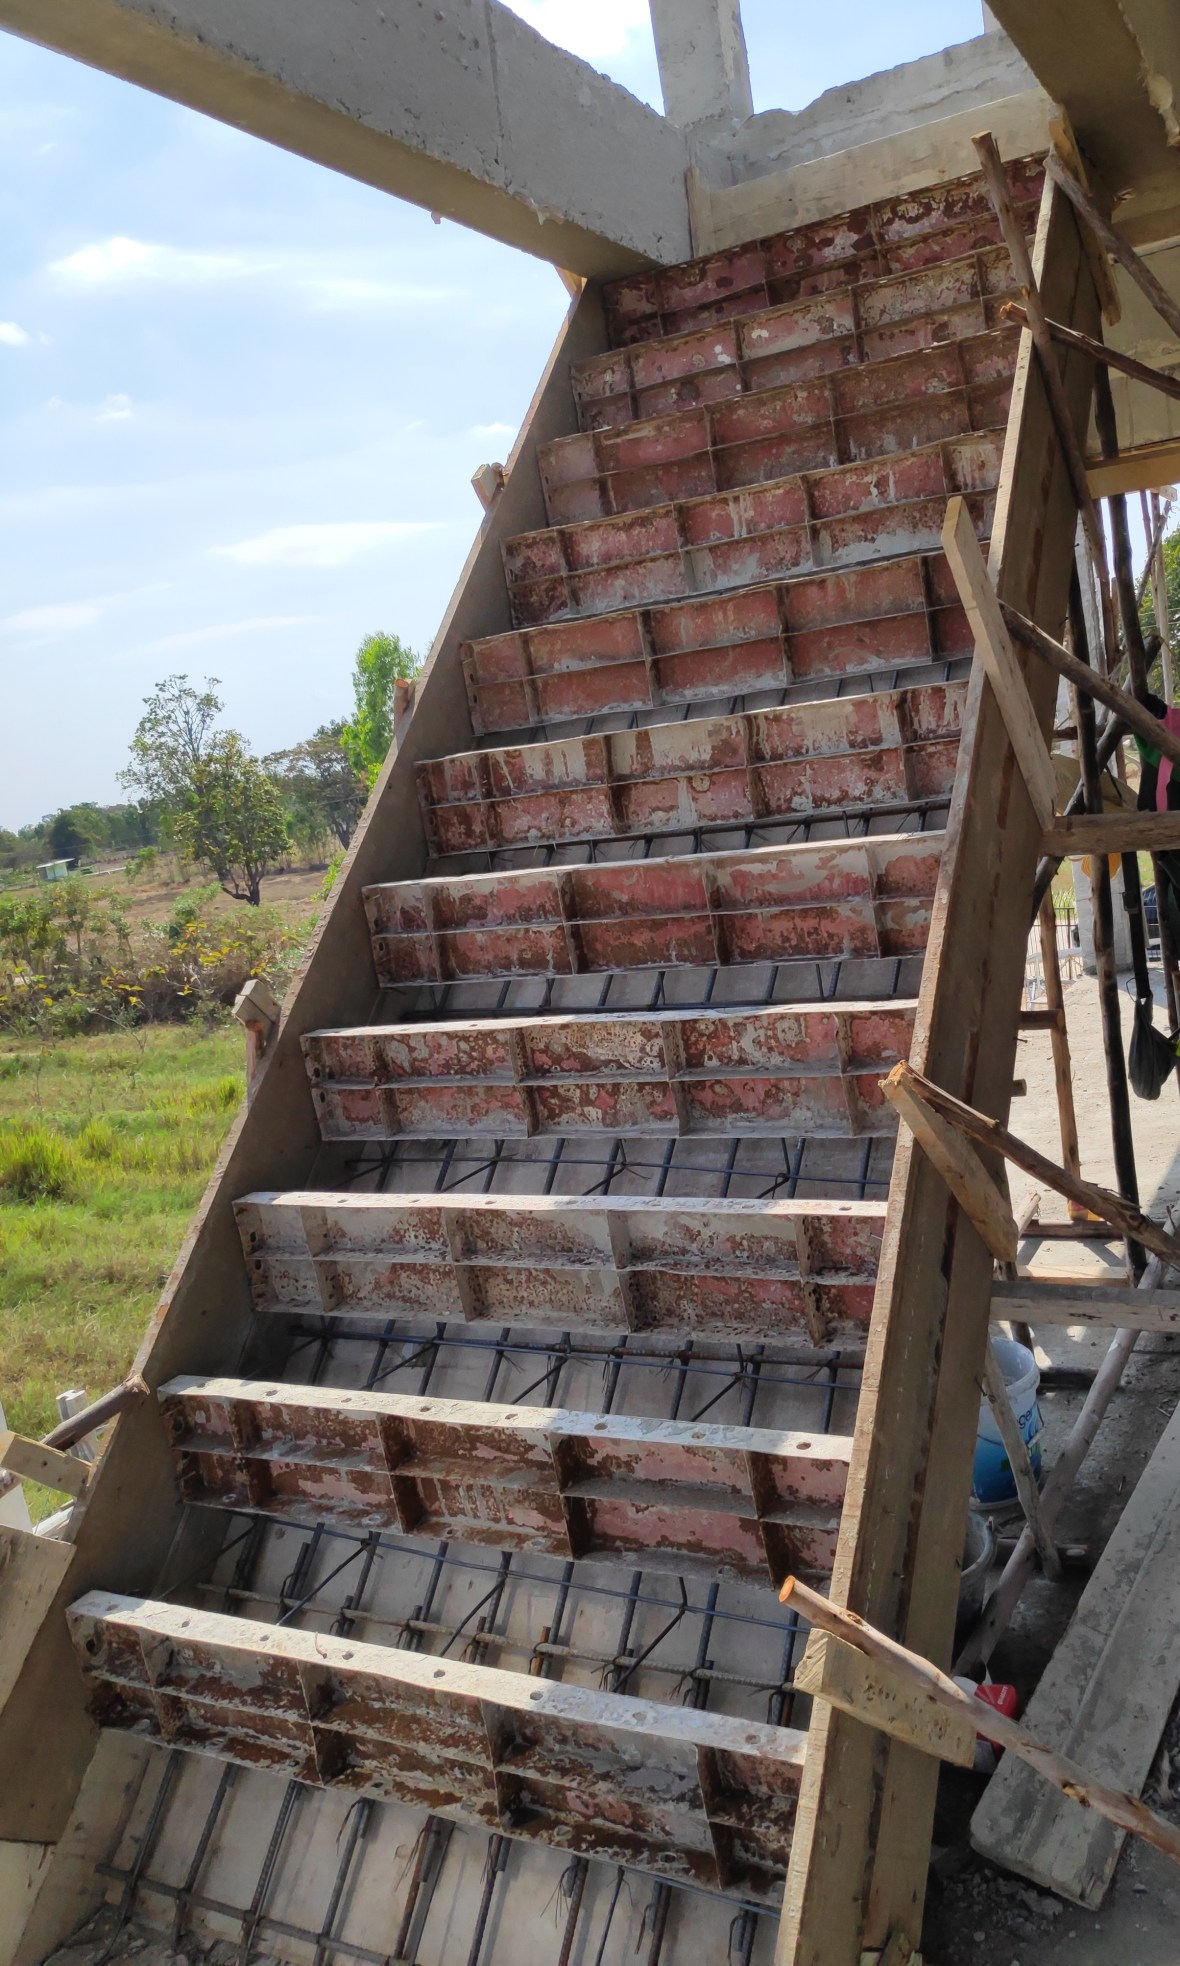
 The cost of building concrete staircases from the ground to the second floor and from the second to the third is ฿40,000. The third stage payment is ฿267,000.


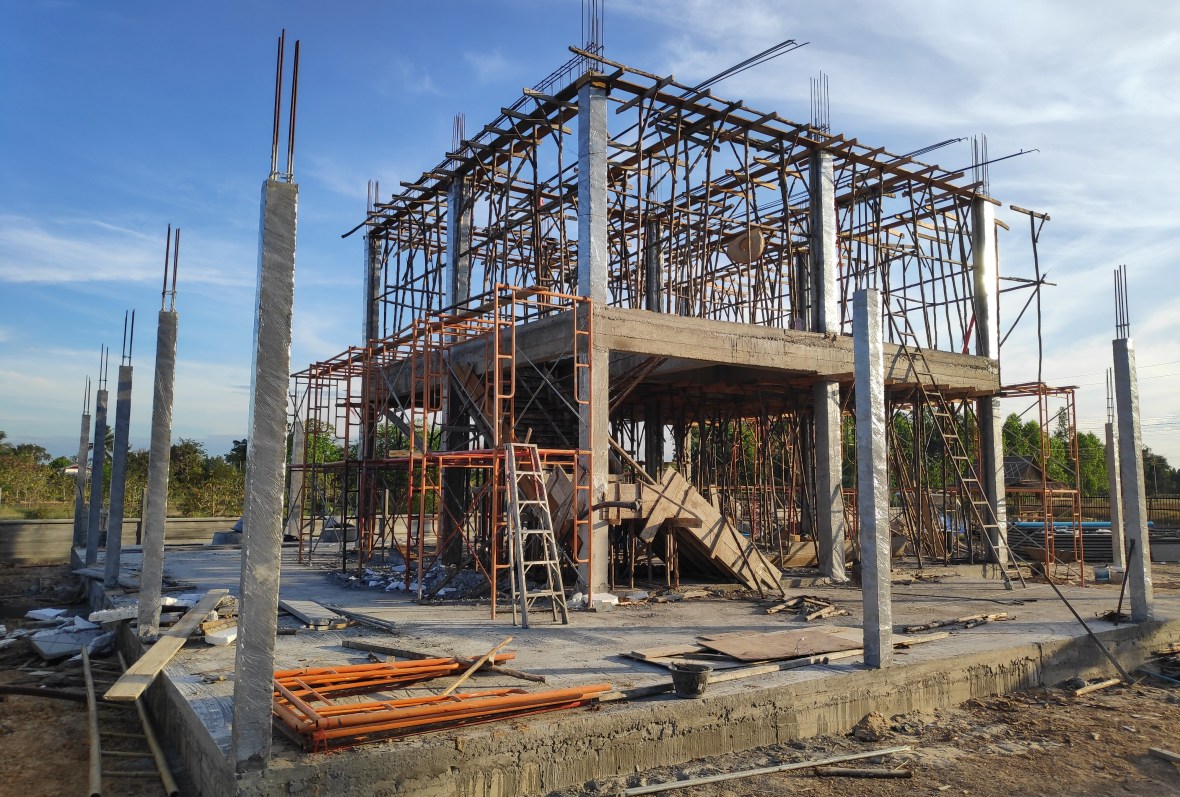

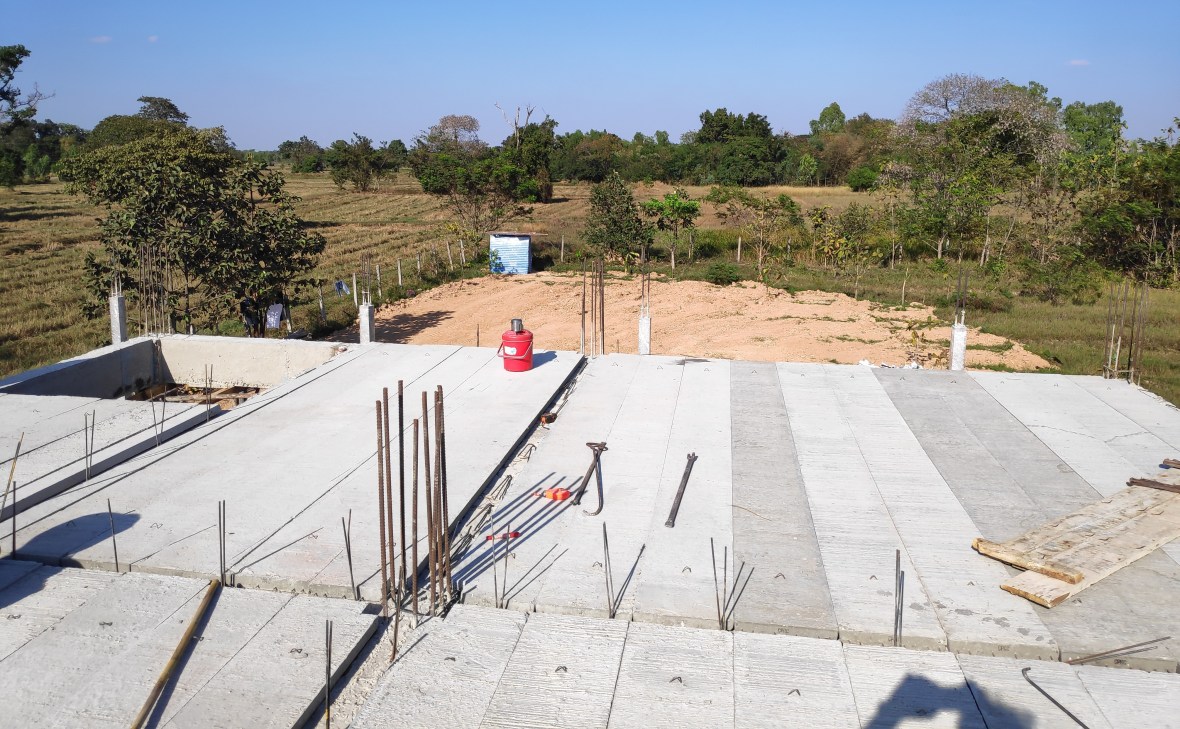
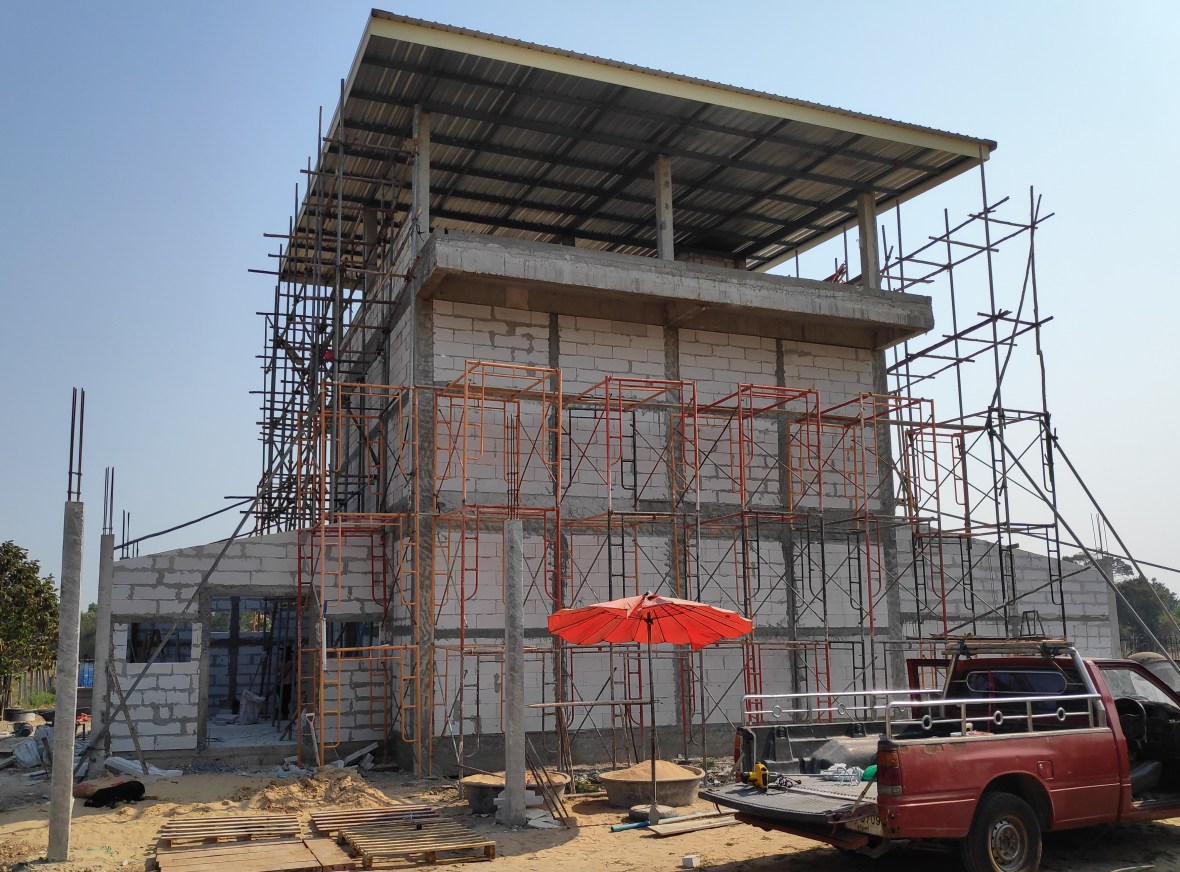
 Ring beam for the third floor. The front and back of the house will have 8m wide by 1m deep balconies on the third floor, which will help with shading.
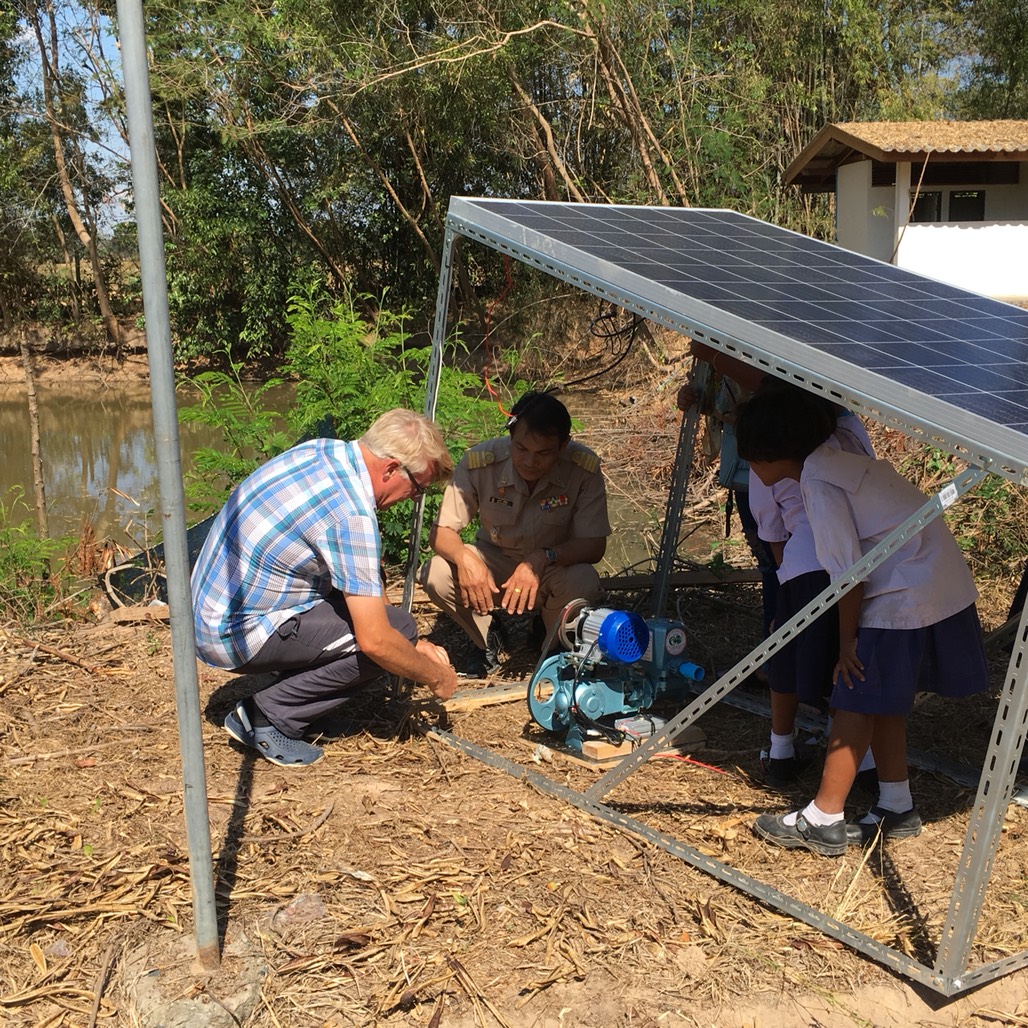
The last couple of days I have been distracted from the house build by another project.
On a recent visit to my local Primary school, I noticed the students watering a dry patch of dirt. I was told that they were trying to grow some vegetables.


I saw that there was a pond nearby, so asked why they didn’t pump the water onto the land. (stupid question) – no money for pump and no money for electricity even if they had a pump. So I set about a little project that would help the school and hopefully be educational. I purchased a 320 watt solar panel; Pump; DC motor and control box.
First requirement was a frame to hold the solar panel at 15 degrees.
 Then sort out the electrics for the motor and pump.
 Note my use of zip ties to hold it all together.


 Back to the build: a boom concrete pump which uses a remote-controlled articulating robotic arm to place concrete accurately in the ring beam for the third floor. The concrete is poured from the concrete truck into a second truck which pumps it up to the third floor.
 There was a little concrete left over and I have another parking place.
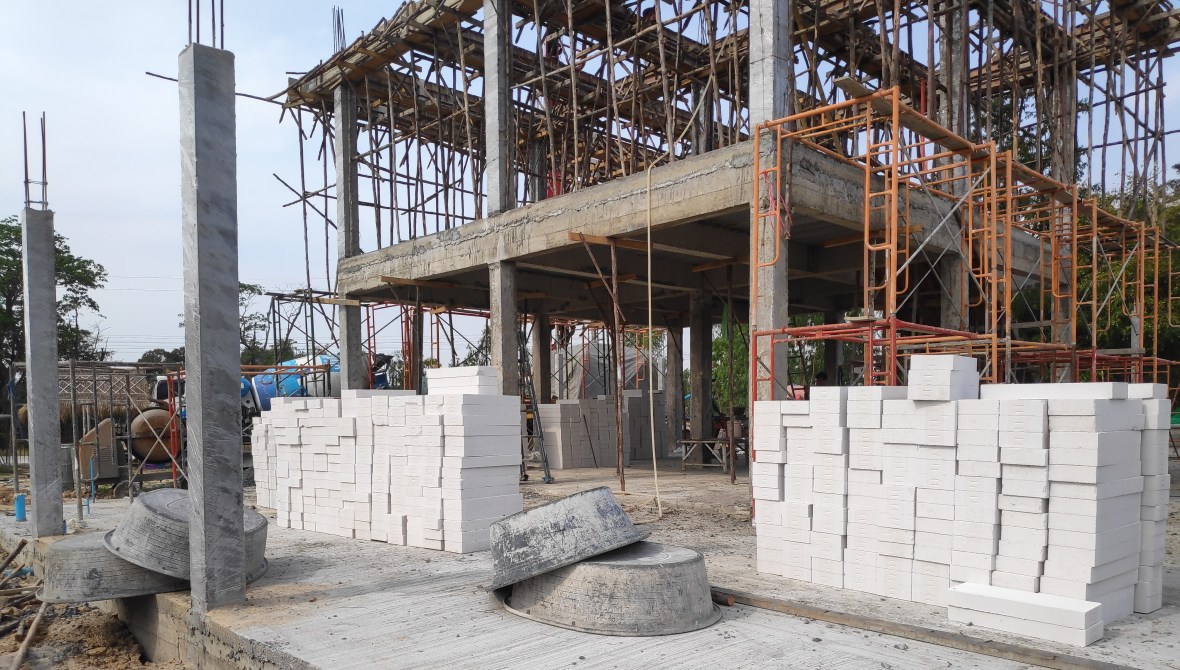
The first Q-CON blocks have arrived. They are Autoclaved Aerated Concrete Blocks (AAC Blocks). AAC is light and the blocks are joined with a thin bed of mortar. They offers excellent sound and thermal insulation, are strong and fire resistant. Originally I was going to use 20cm wide blocks, but have decided to use 2×7.5cm blocks between which I will put 7cm of foam with a silver radiant barrier that reflects thermal radiation and further reduces heat transfer.
I have agreed a price with my builder to purchase and fit all the Q-Con blocks for the three floors, including any steel/concrete reinforcement, the SCG block “glue” and render. This includes the double block walls in the main block and the single block walls for the kitchen, bathrooms and porch. I will purchase and fit any foam/foil insulation. The price includes fitting all the windows and doors (which I will buy) ฿500,000
 The blocks are easy to cut and work with, so the walls go up fast.
 Two guys put these walls up in a couple of hours. Steel bars are inserted between the rows and joined into the columns. Additional concrete and steel columns are added every couple of meters for extra strength.
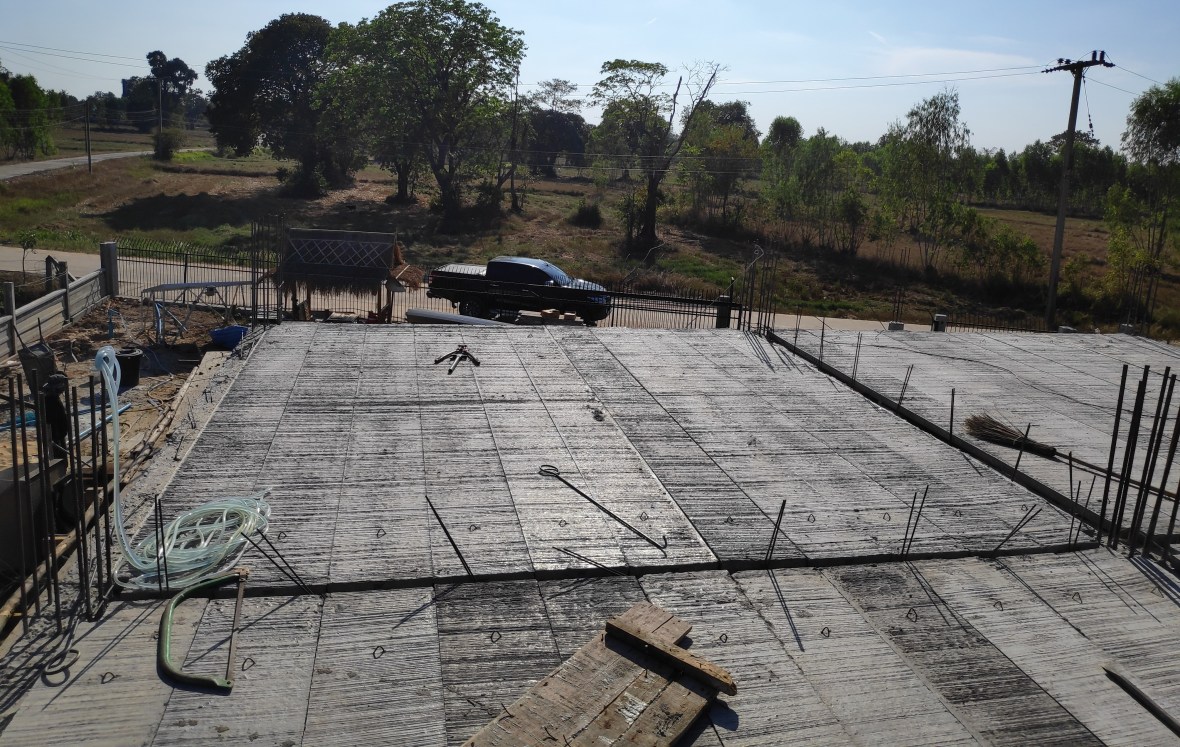
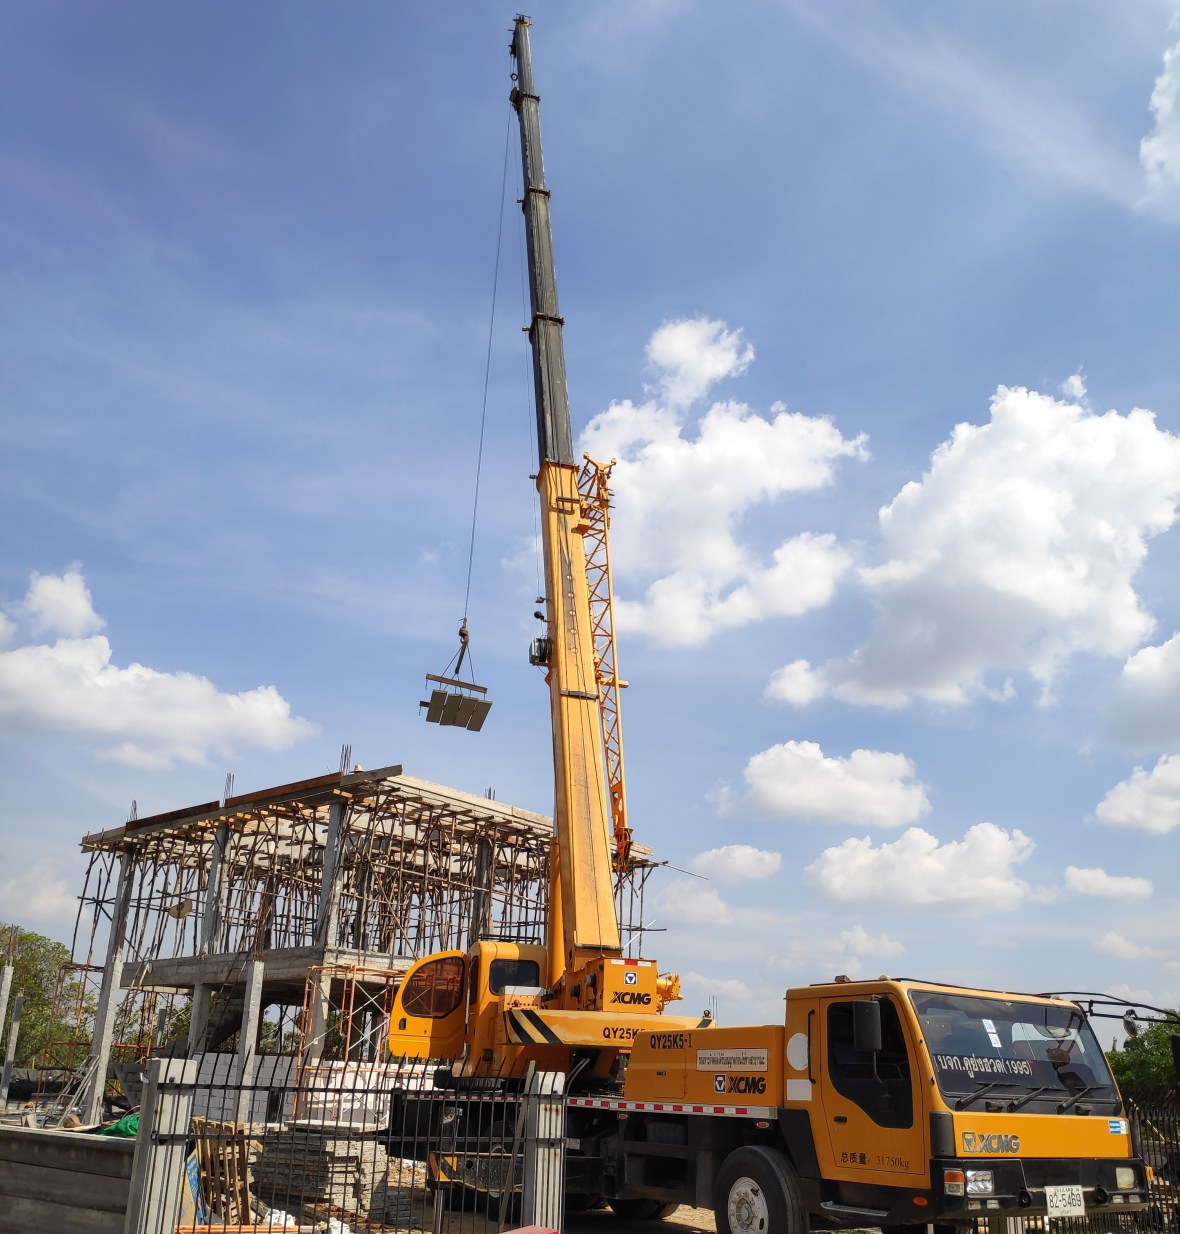 Crane arrived to fly the floor planks up to the third floor.

 Cracking view from the top
 Another giant crane arrived today to deliver concrete to the third floor.
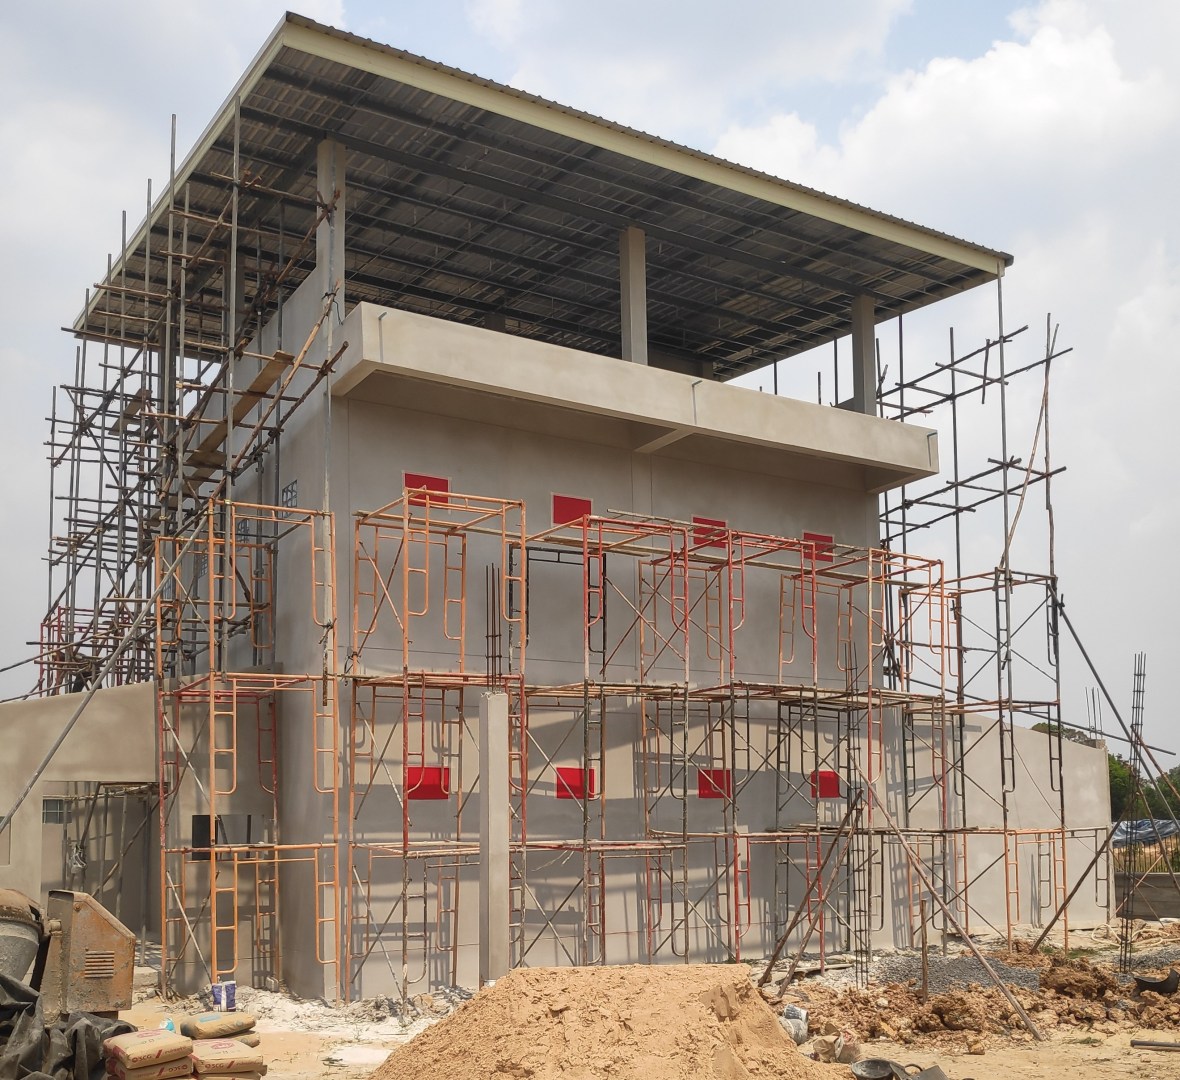
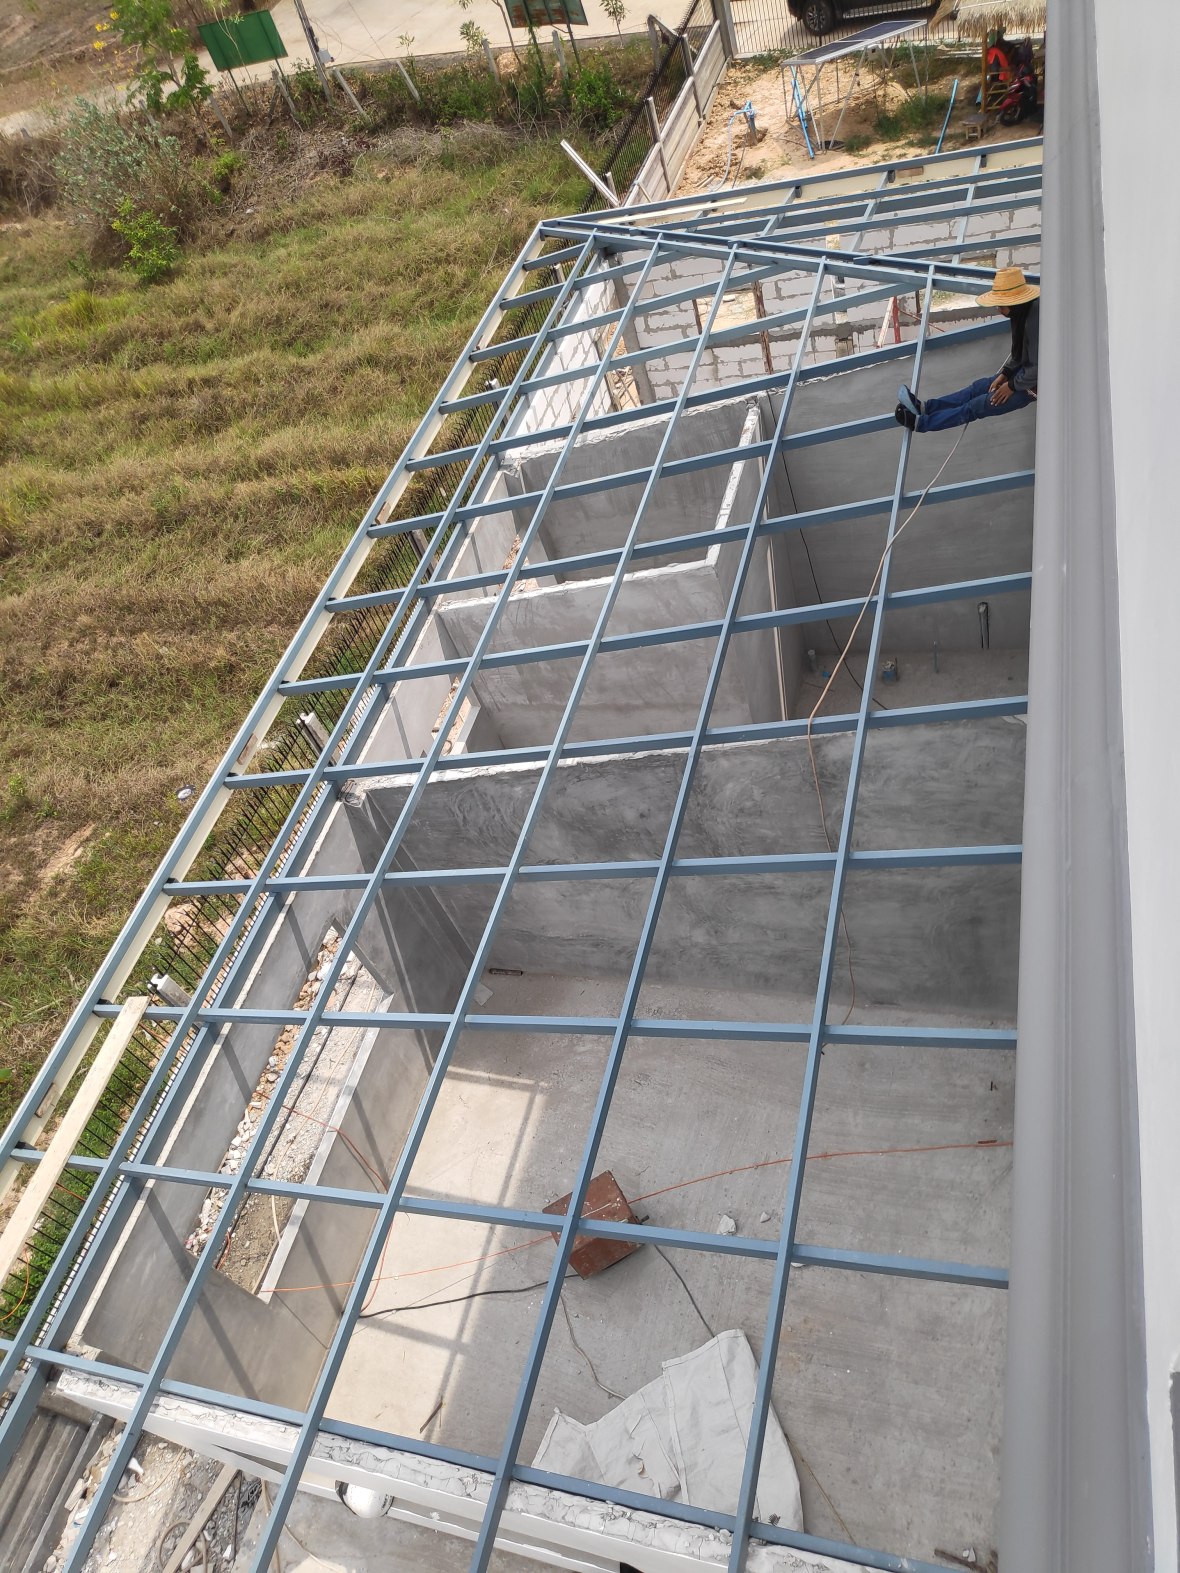
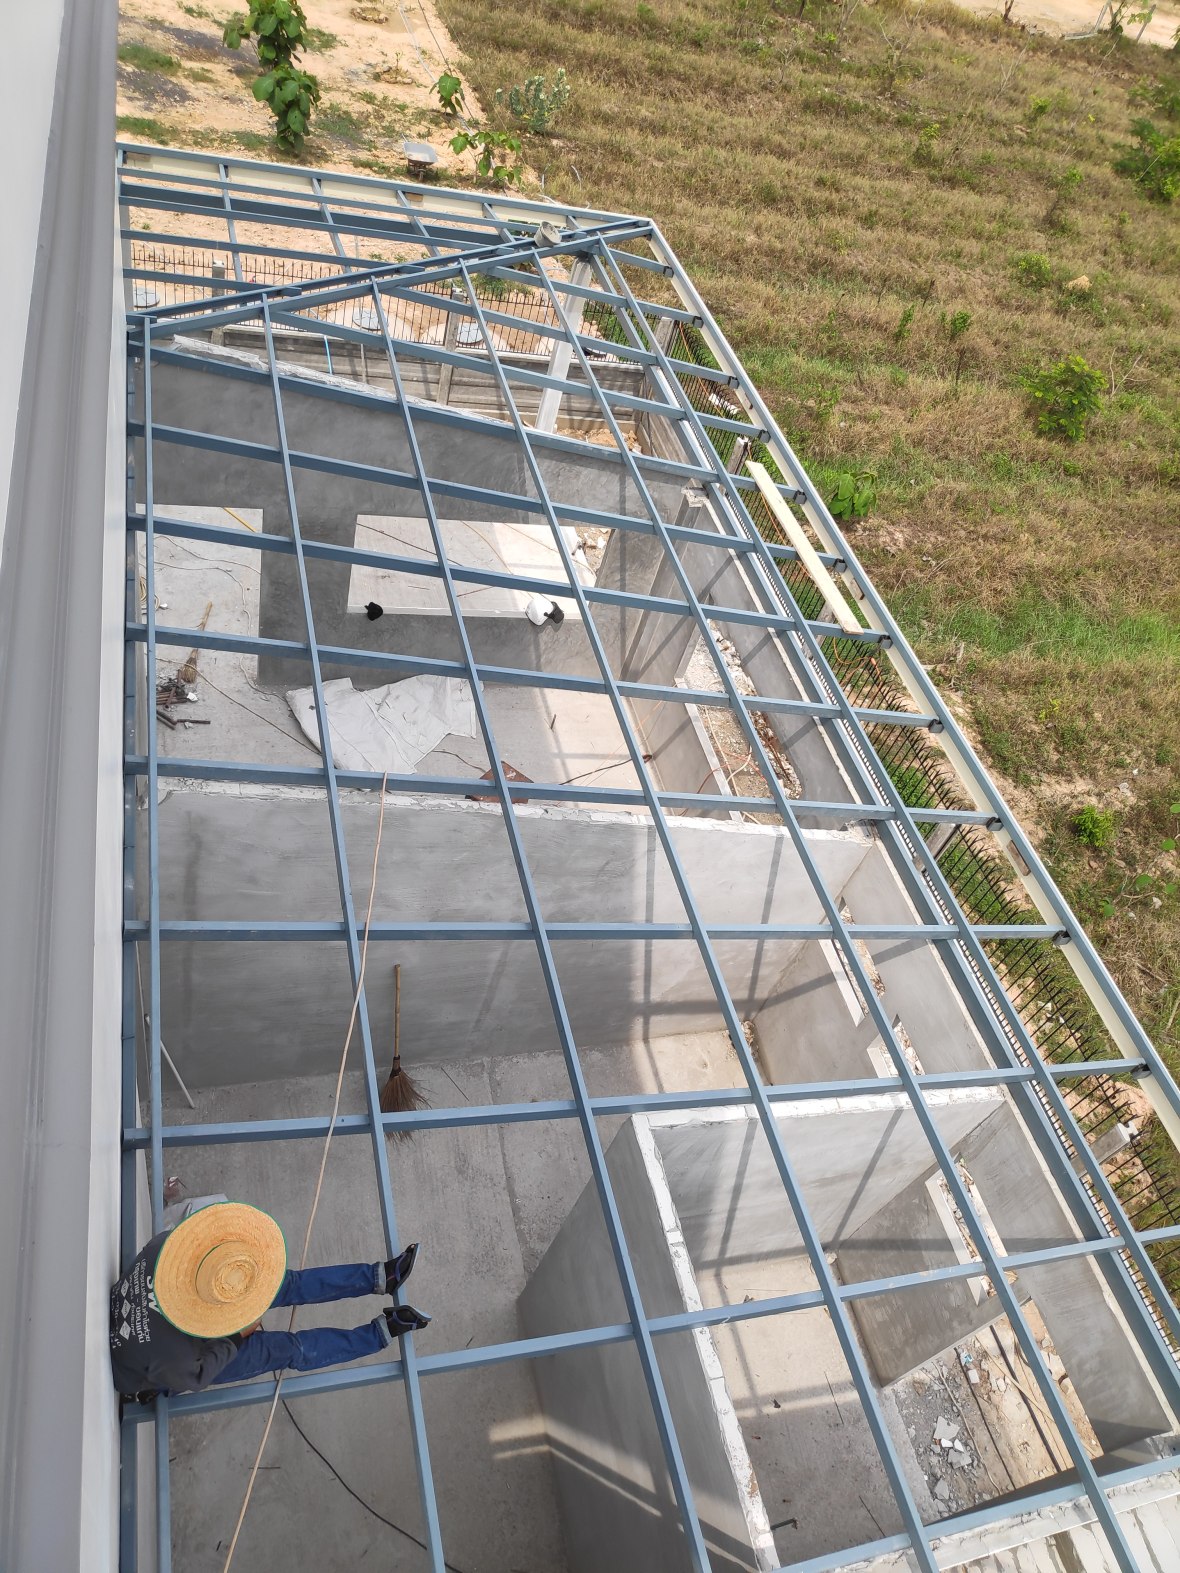
 Walls progressing and columns built for the roof. The fourth stage payment is ฿267,000
 To avoid any confusion on where the doors go – latest plan attached to the wall for all to see. The main block can only be accessed via the porch or the kitchen so there are 2 sets of doors.
An open plan design is very popular now, especially after all the house make over shows, but it far less efficient as you cannot just cool the location that you are in, but instead you are cooling half the house! This is the opposite of designing for climate. For example in the USA, house designs look very similar, no matter the climate that they are located in. This might explain why the USA uses more energy for cooling than the whole continent of Africa uses for everything!
 The same three inches of foam that we used under all the floors will be sandwiched between two 7.5cm Q-CON blocks in the walls of the main block. The double sided foil insulation is stapled to the inside of the outside wall – ฿1,900 for 75m2

 To fill the gaps we used expanding polyurethane foam, just one more product that the builders had not seen before.
We attached the foam to the foil with dabs of spray foam to create the all important air gap between the radiant barrier and the foam insulation
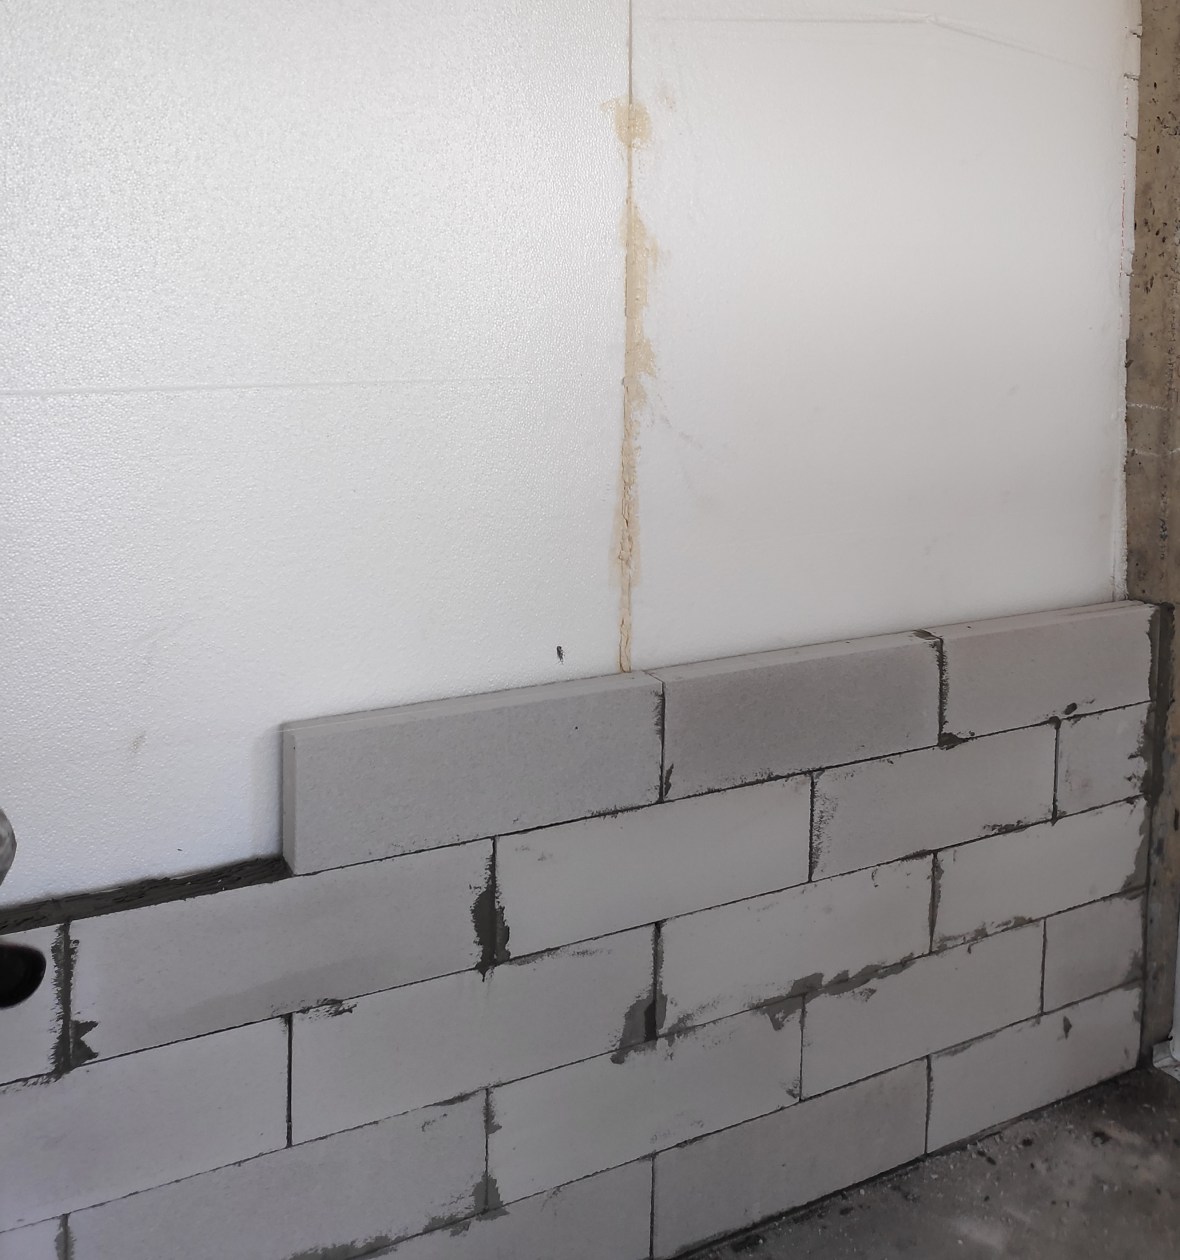 Then a second wall of Q-Con Blocks with another air gap between the foam and blocks.
 Starting the staircase to the third floor. As we are not planning to be dragging any sofas up these stairs, they are designed to be quite steep and narrow to save space. If we do decide to have a ping pong table or the like on the third floor, we can always pull it up the side of the building.

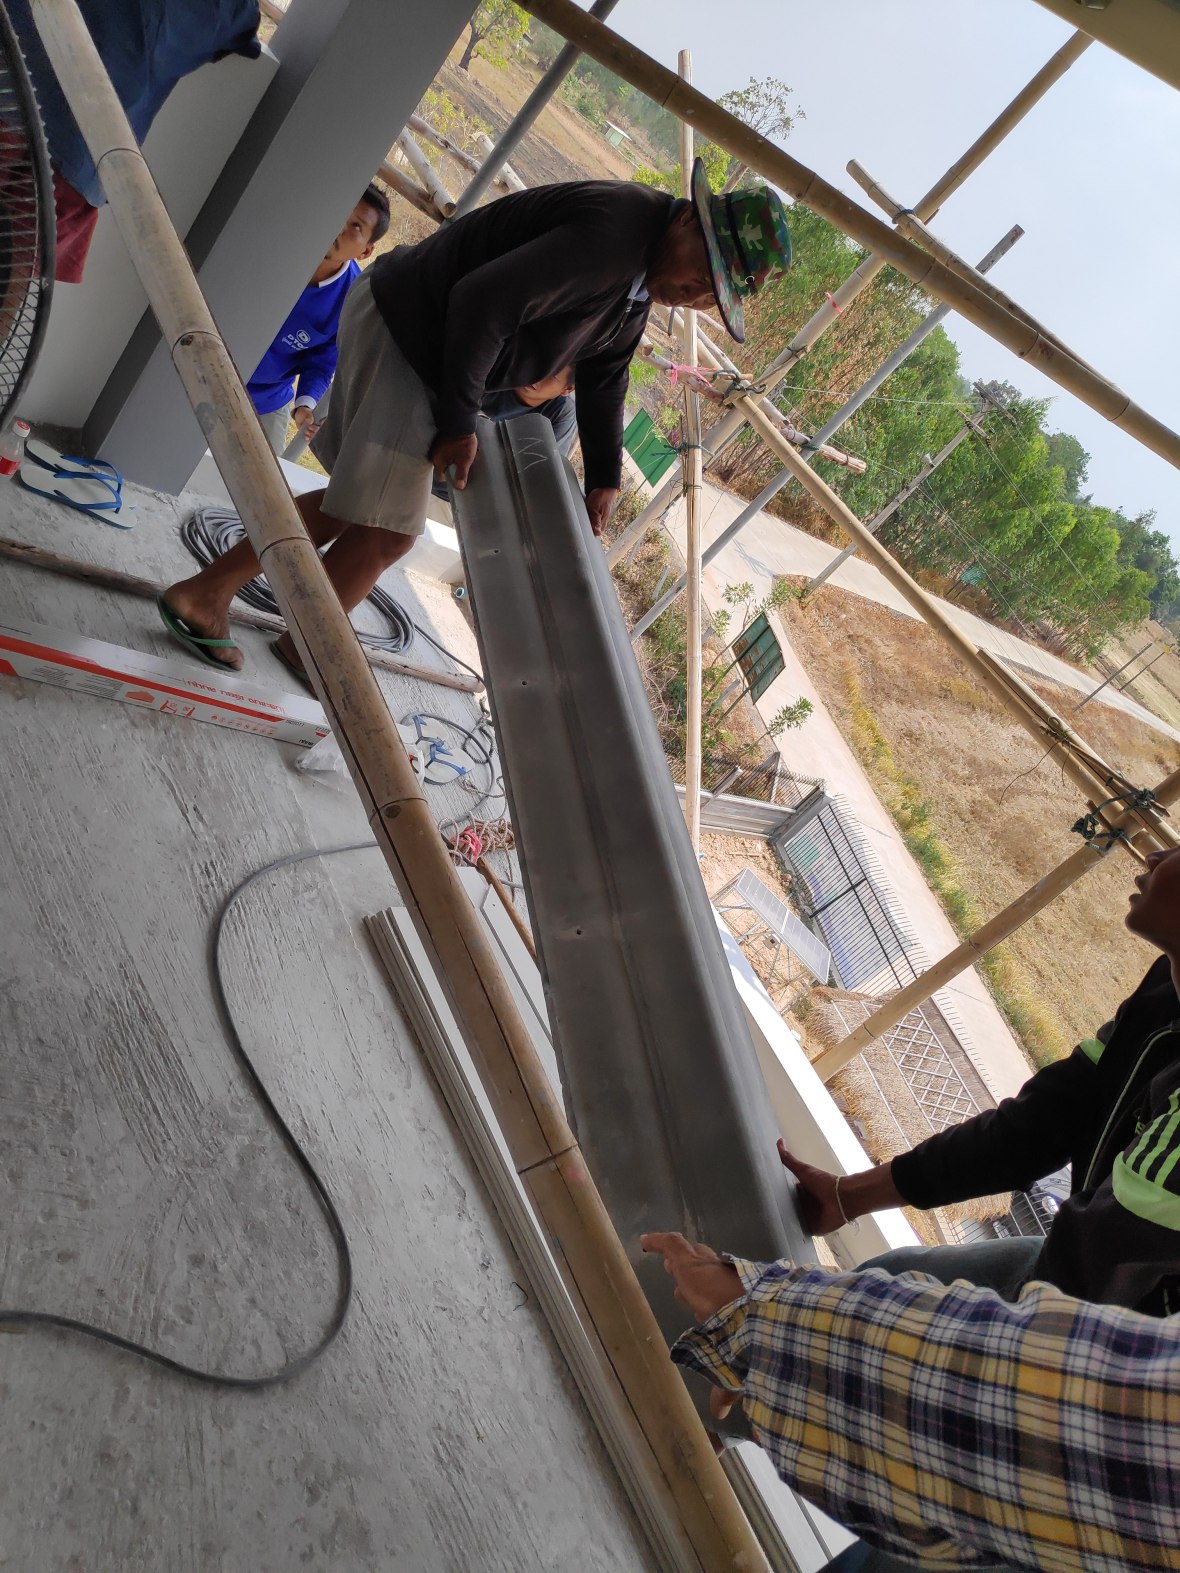
Measuring for the roof. I have decided to use Bluescope Colorbond steel roof for the build. An expensive steel roof by Thai standards. Colorbond uses Zincalume® steel, a Zinc-Aluminium Alloy and the colour is then baked on to the surface, hence the name “colorbond”. It comes with a 30 year anti rust warranty. I have chosen .44mm thickness in white. I have also ordered 5mm of foiled coated foam to be preattached to the steel at the factory. This improves the thermal reflection of the roof and reduces the noise from rain. The materials cost for the roof above the third floor is ฿48,000 but this cost is included in the quotation I received from my builder, so he will be paying.
Most houses in Thailand are built with dark coloured concrete tiles. The main problem with concrete tiles is their very high thermal mass which means that they absorb, store and release heat far more than a steel roof. You are effectively installing a thermal battery on your roof!


The roof and walls of my house have reflective foil insulation, able to stop more than 97-percent of radiant heat. There is also a layer of foam in the roof, walls and floors to reduce Thermal Conductivity.
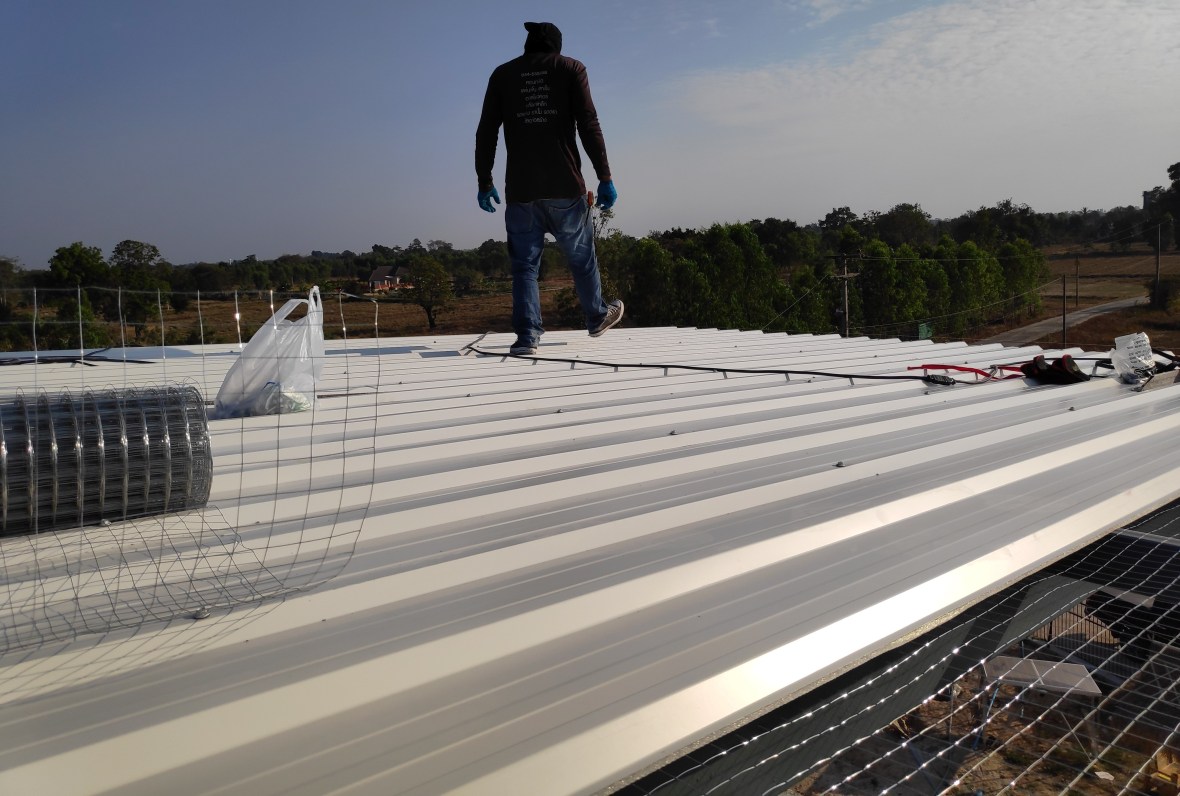
 The roof sections arrive. Attached to each sheet is 5mm of foam and silver radiant barrier. The sections are the whole length of the roof, so there will be no joins. They overlap each other with the ridge section on the right with no foam sitting on top of the ridge section of the next piece.
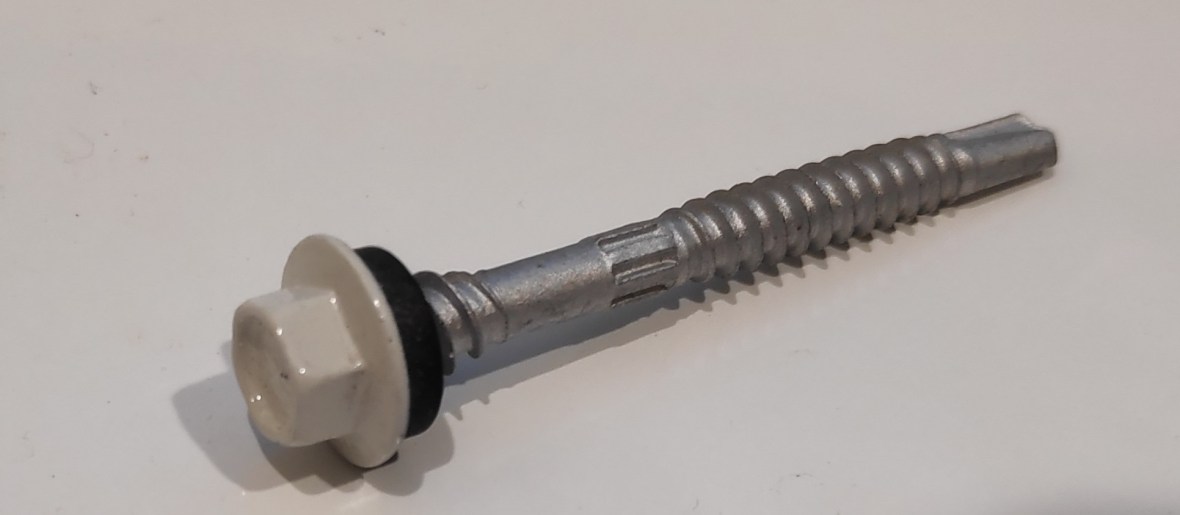 The galvanized screws, complete with rubber washer are colour matched to the roof – in my case white.
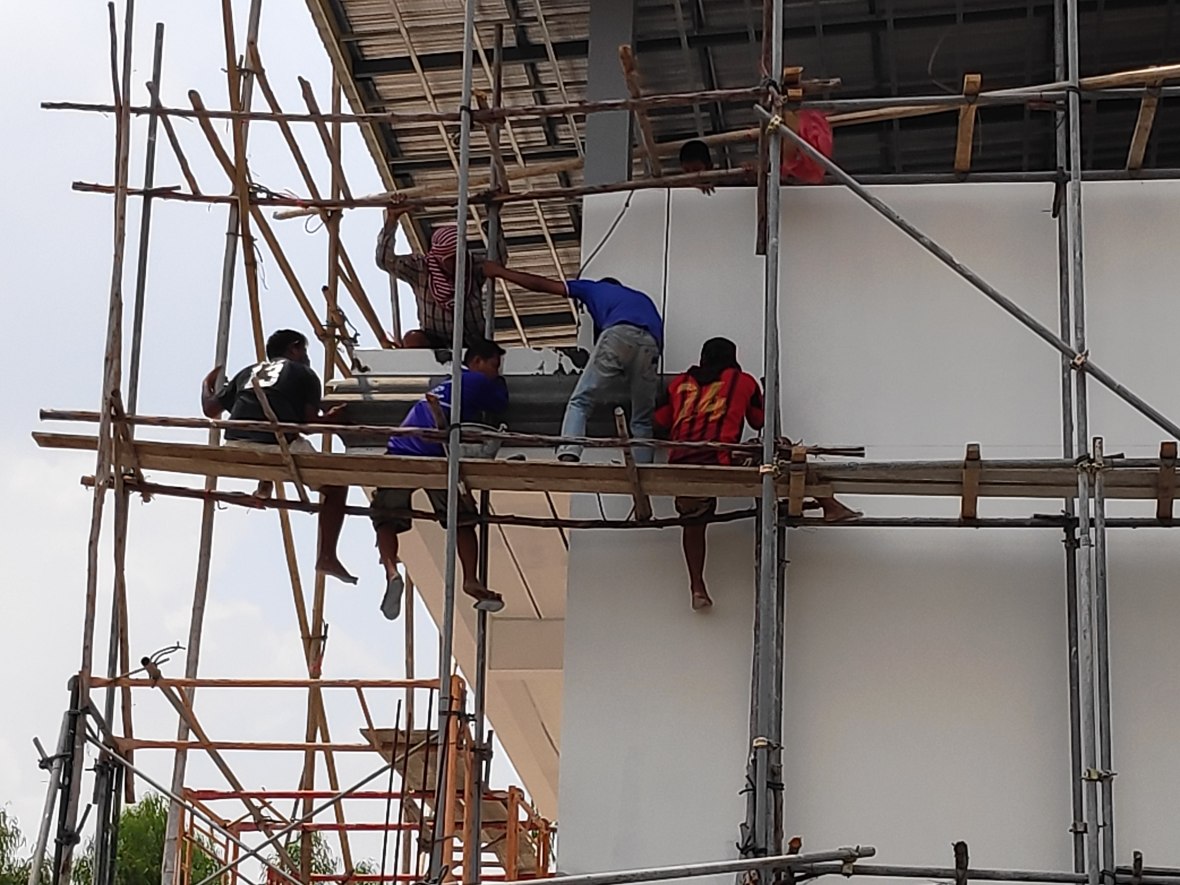
 The first job is to pull all the roof sections up onto the roof.

 Galvanized wire mesh is then attached to the roof steel, this prevents the foam from falling off the roof panels.

 There have been some comments from the locals about why The House has no windows. In the thermal envelope of a building, the weakest link are the window frames – so I don’t have any. The next area of weakness are the windows themselves. In Thailand, double glazed windows are not easily available and are very expensive.

 The glass in a clear glass block is much thicker than standard window glass and there is a much wider air gap between the panes than what you would find in double glazing. The result is a window that is far better insulated and soundproofed and only costs ฿48 per block.
As steel bars will be inserted between the blocks and tied into the walls, they are much stronger and more secure than standard windows. When the double internal walls are finished, the glass block windows will be added.
Ventilation will come from in the form of filtered, cooled, dried air which will be pumped into each room from the ground source geothermal and the Energy Recovery Ventilator.
The reduced view from the small windows will be supplemented by “virtual windows” from security camera feeds.
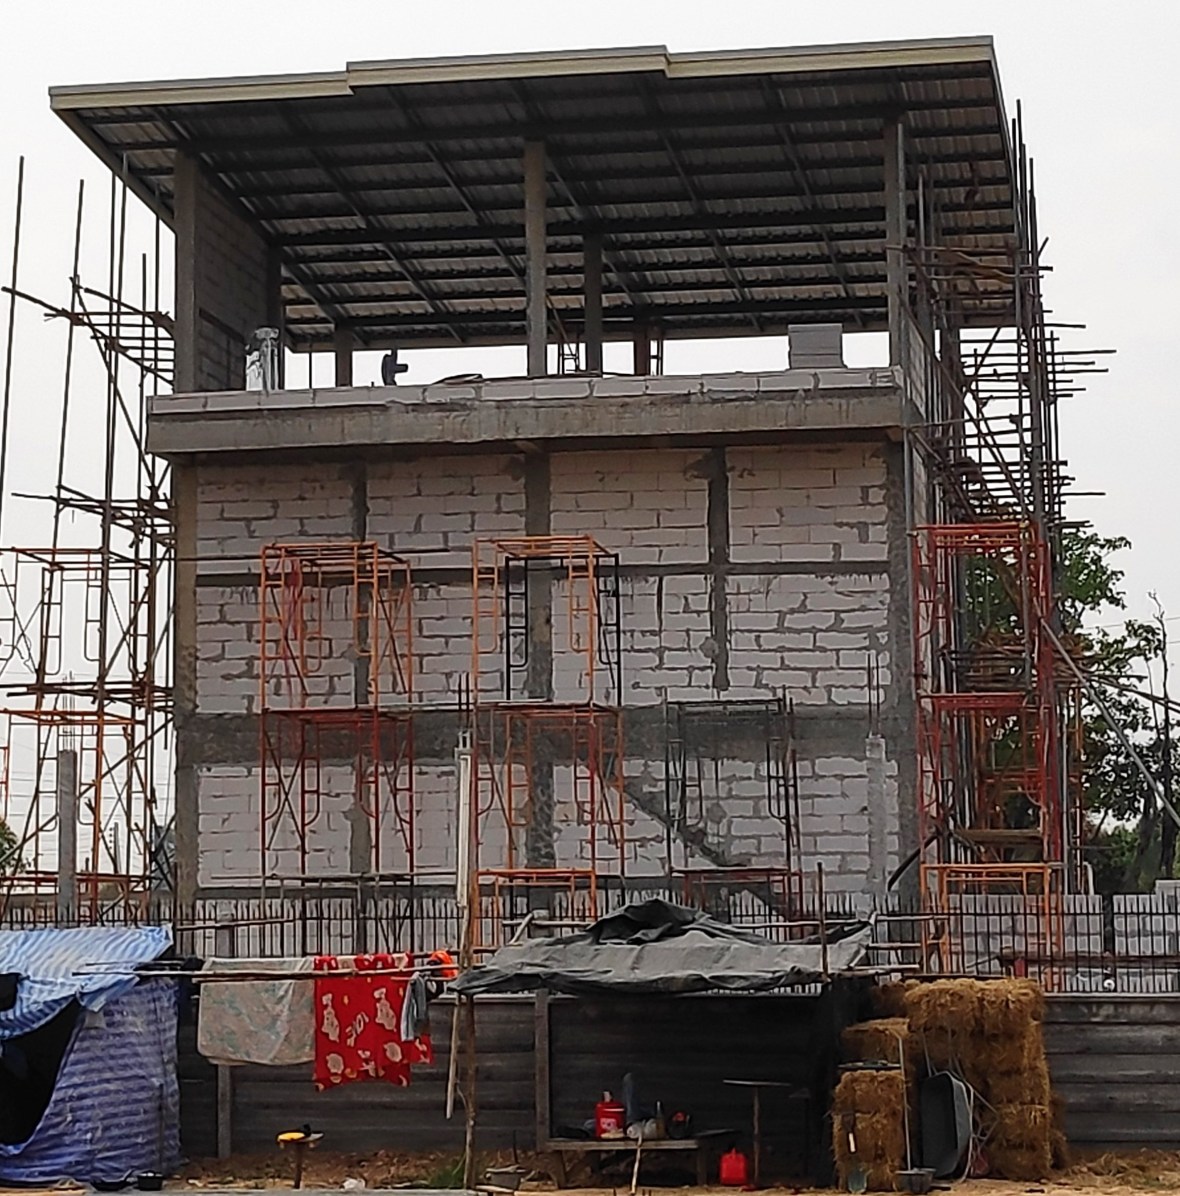
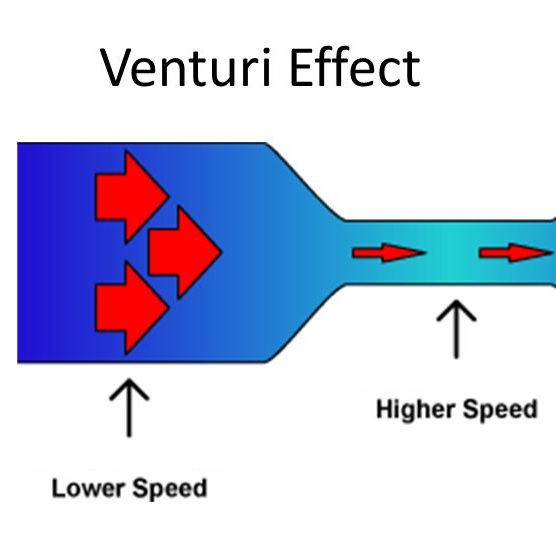
It is far cooler on the third floor than at ground level, this is partly due to the fact that wind speeds are higher with increased height, but the speed of the wind is further increased by the building design. The wind is funneled by the sloping roof and partial side walls, this phenomenon is called The Venturi Effect
Doors:
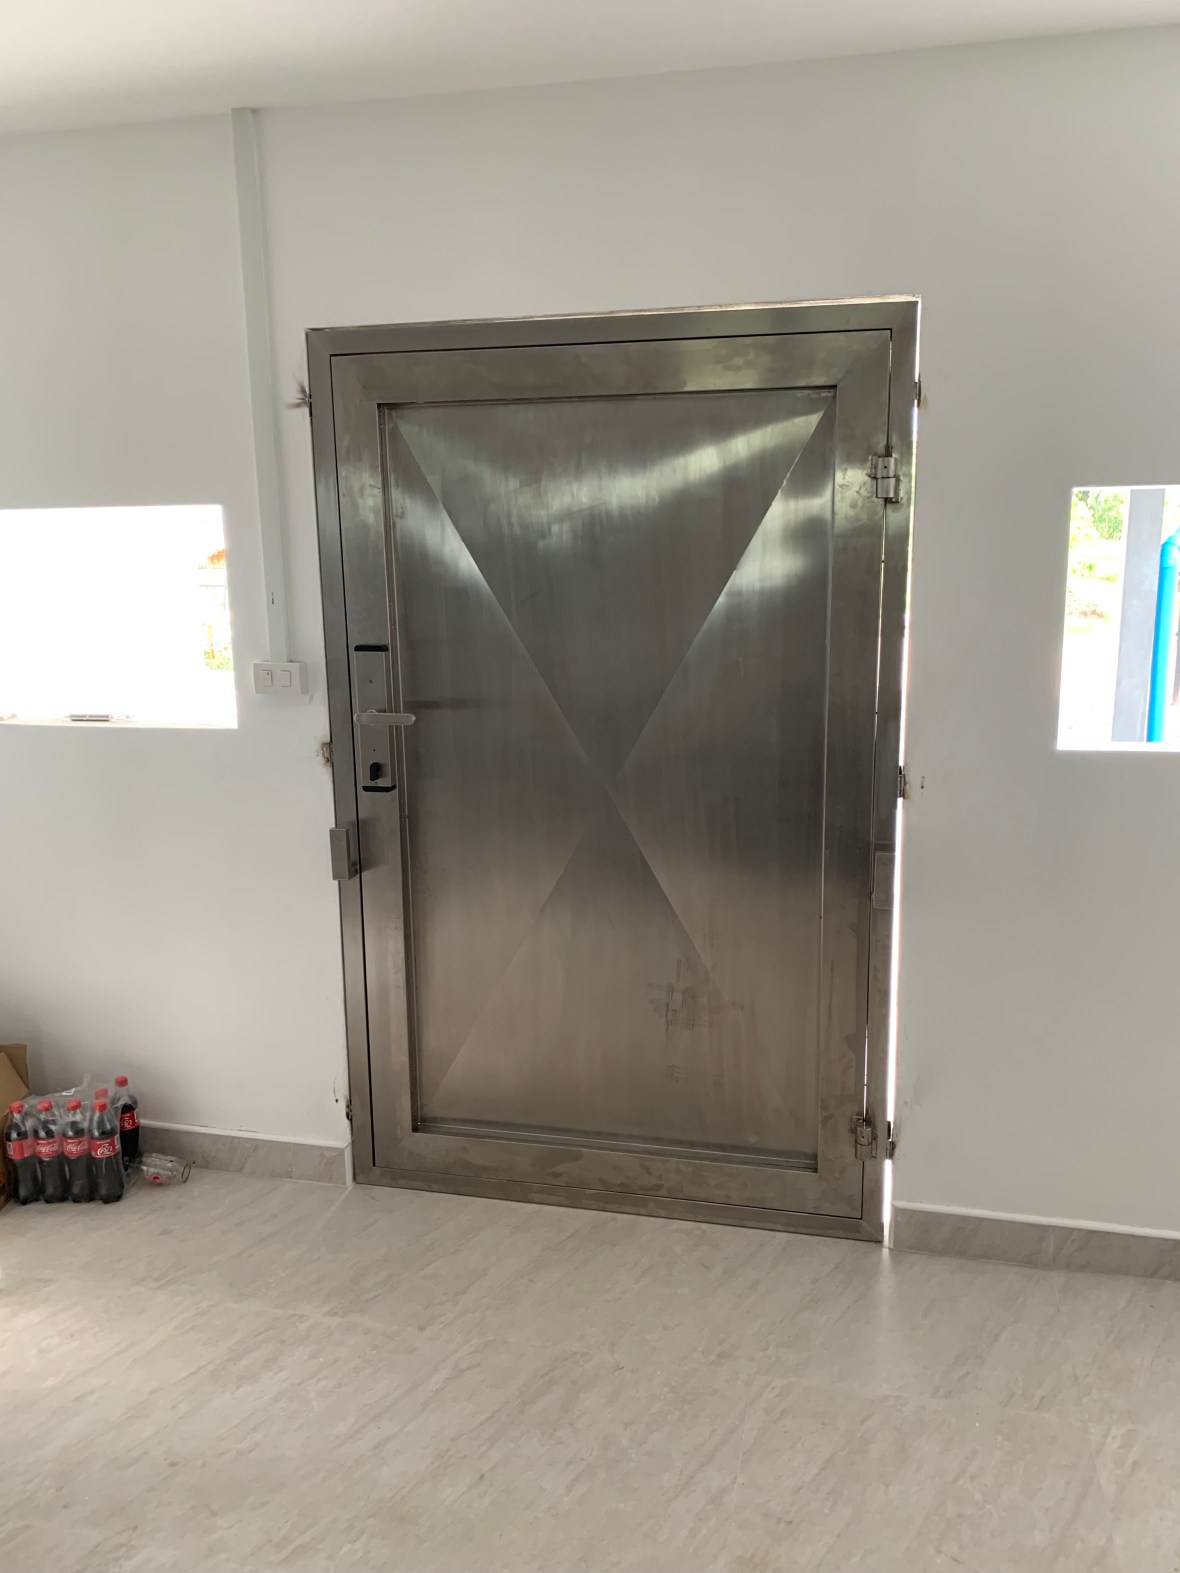
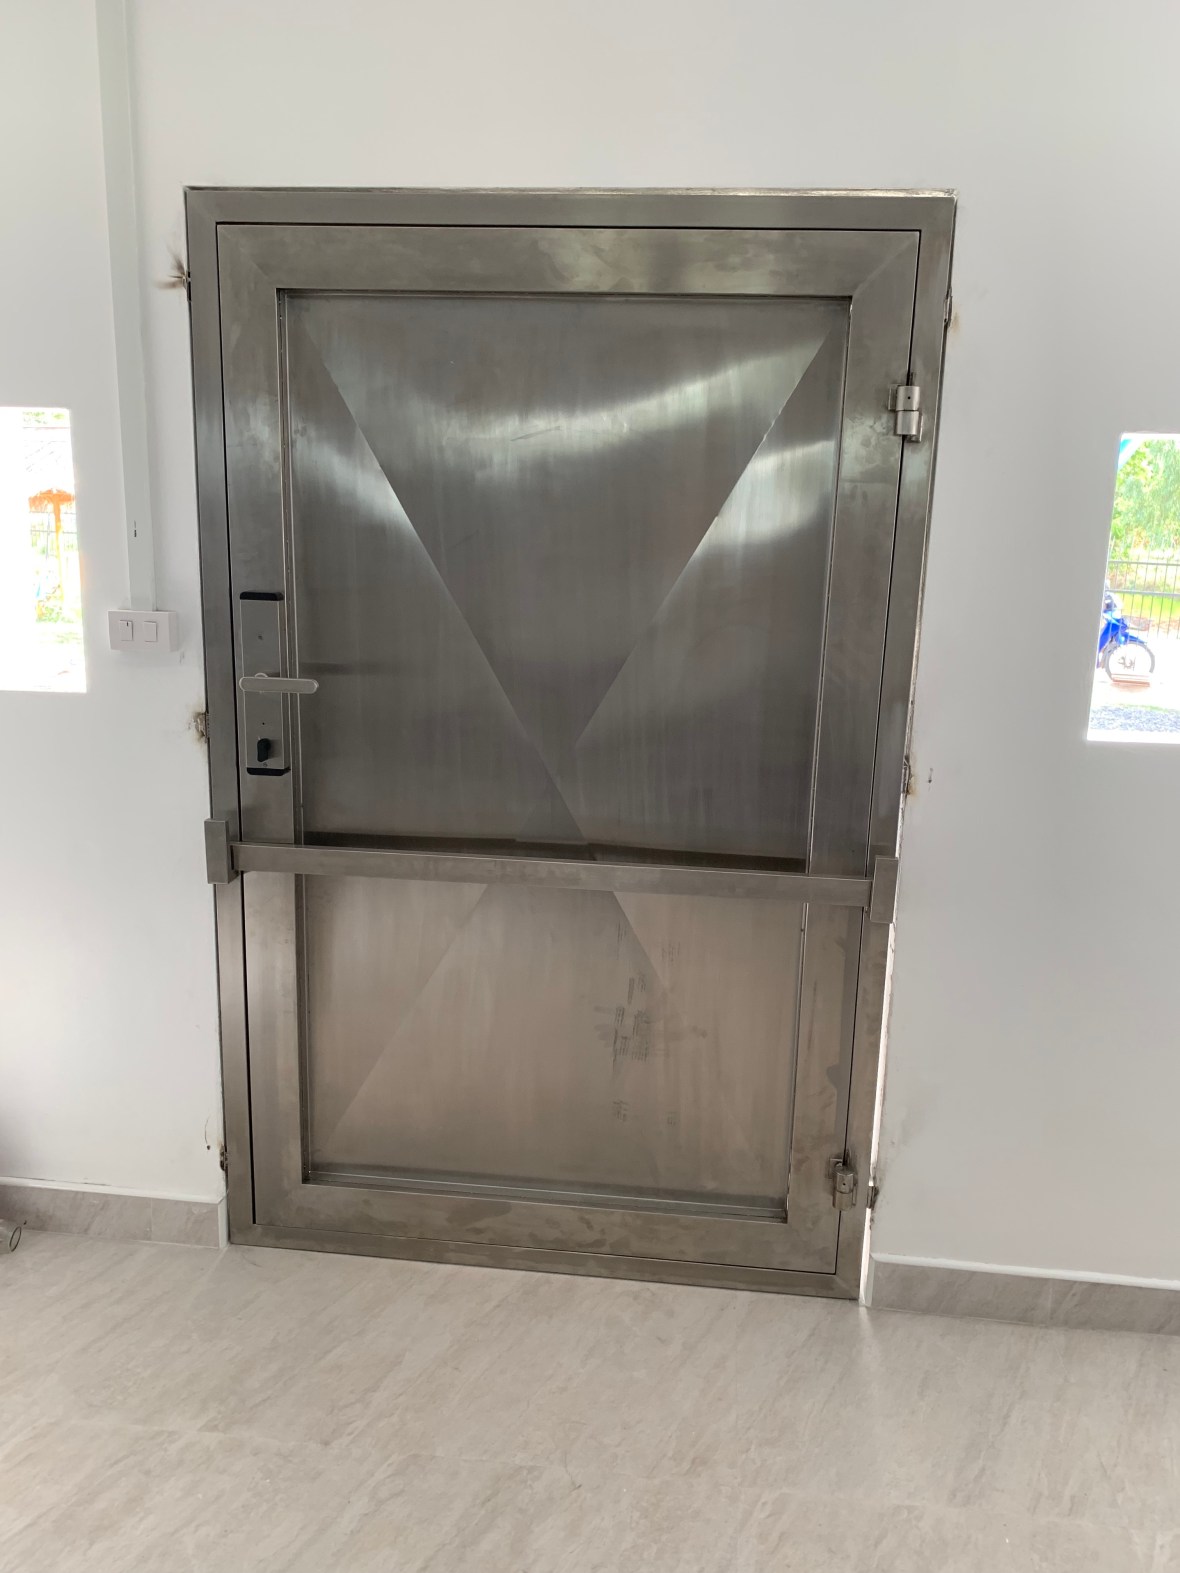
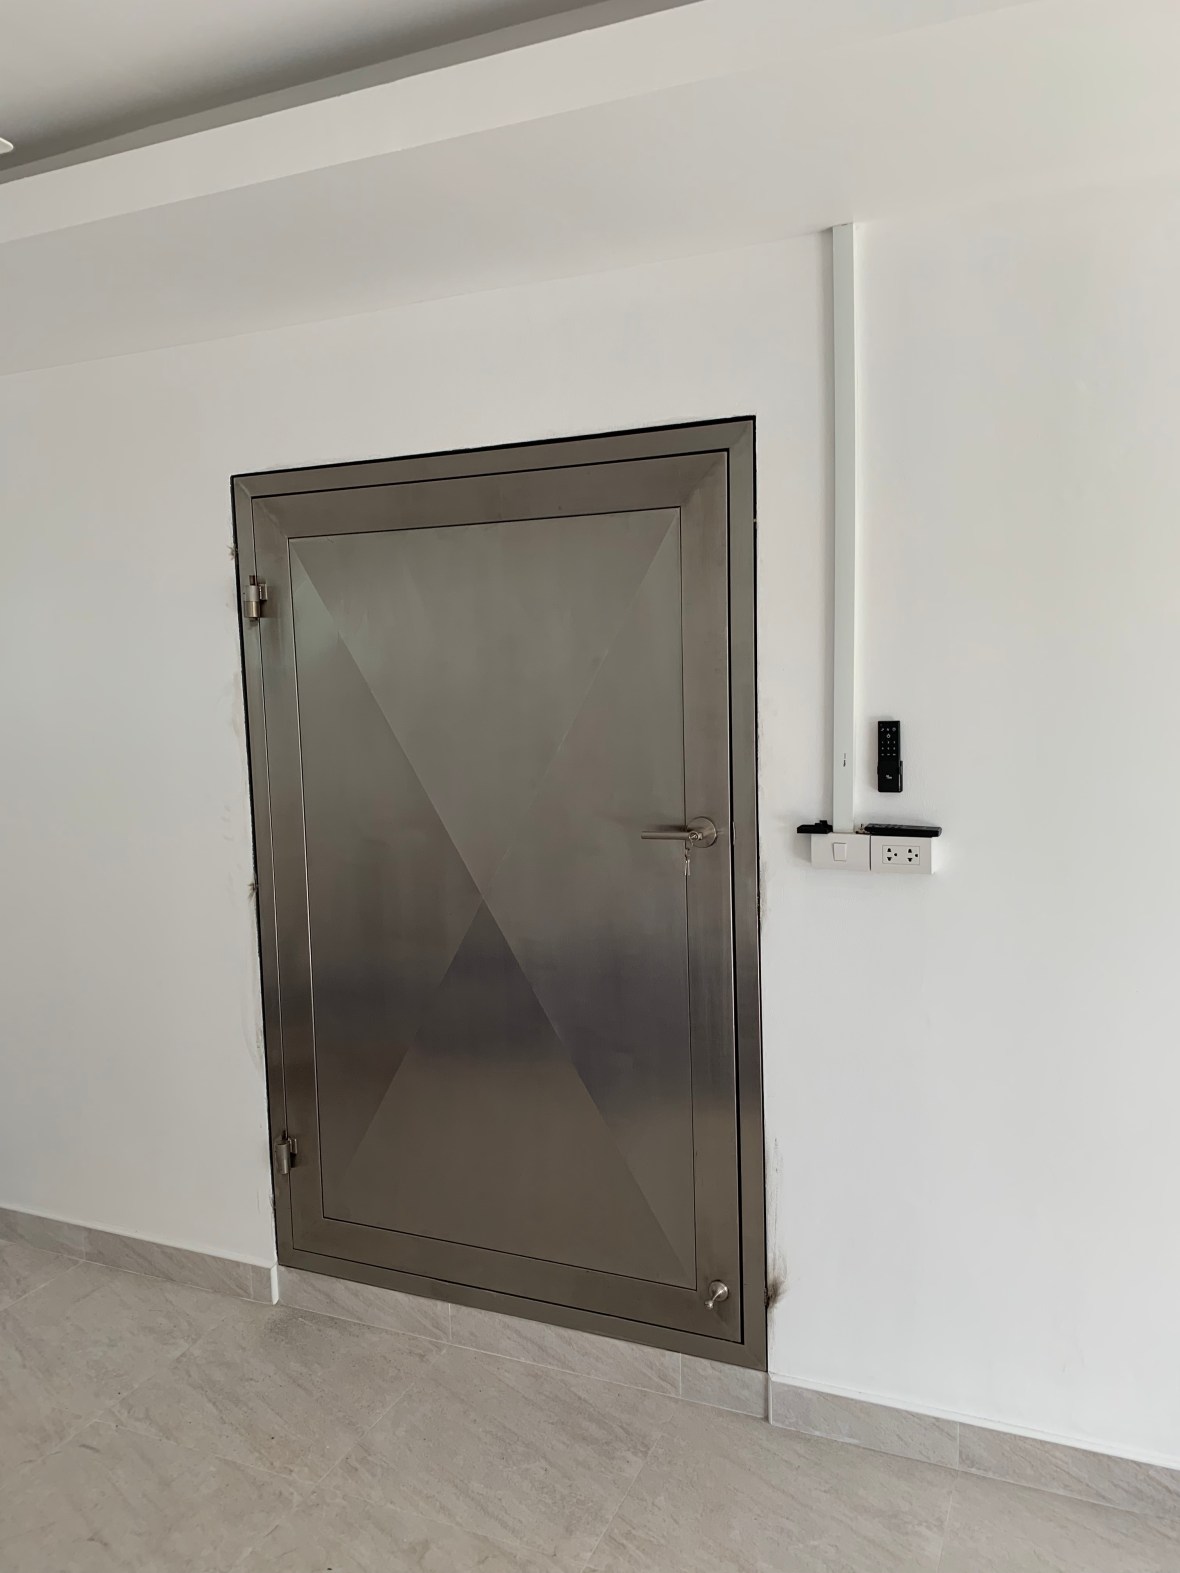
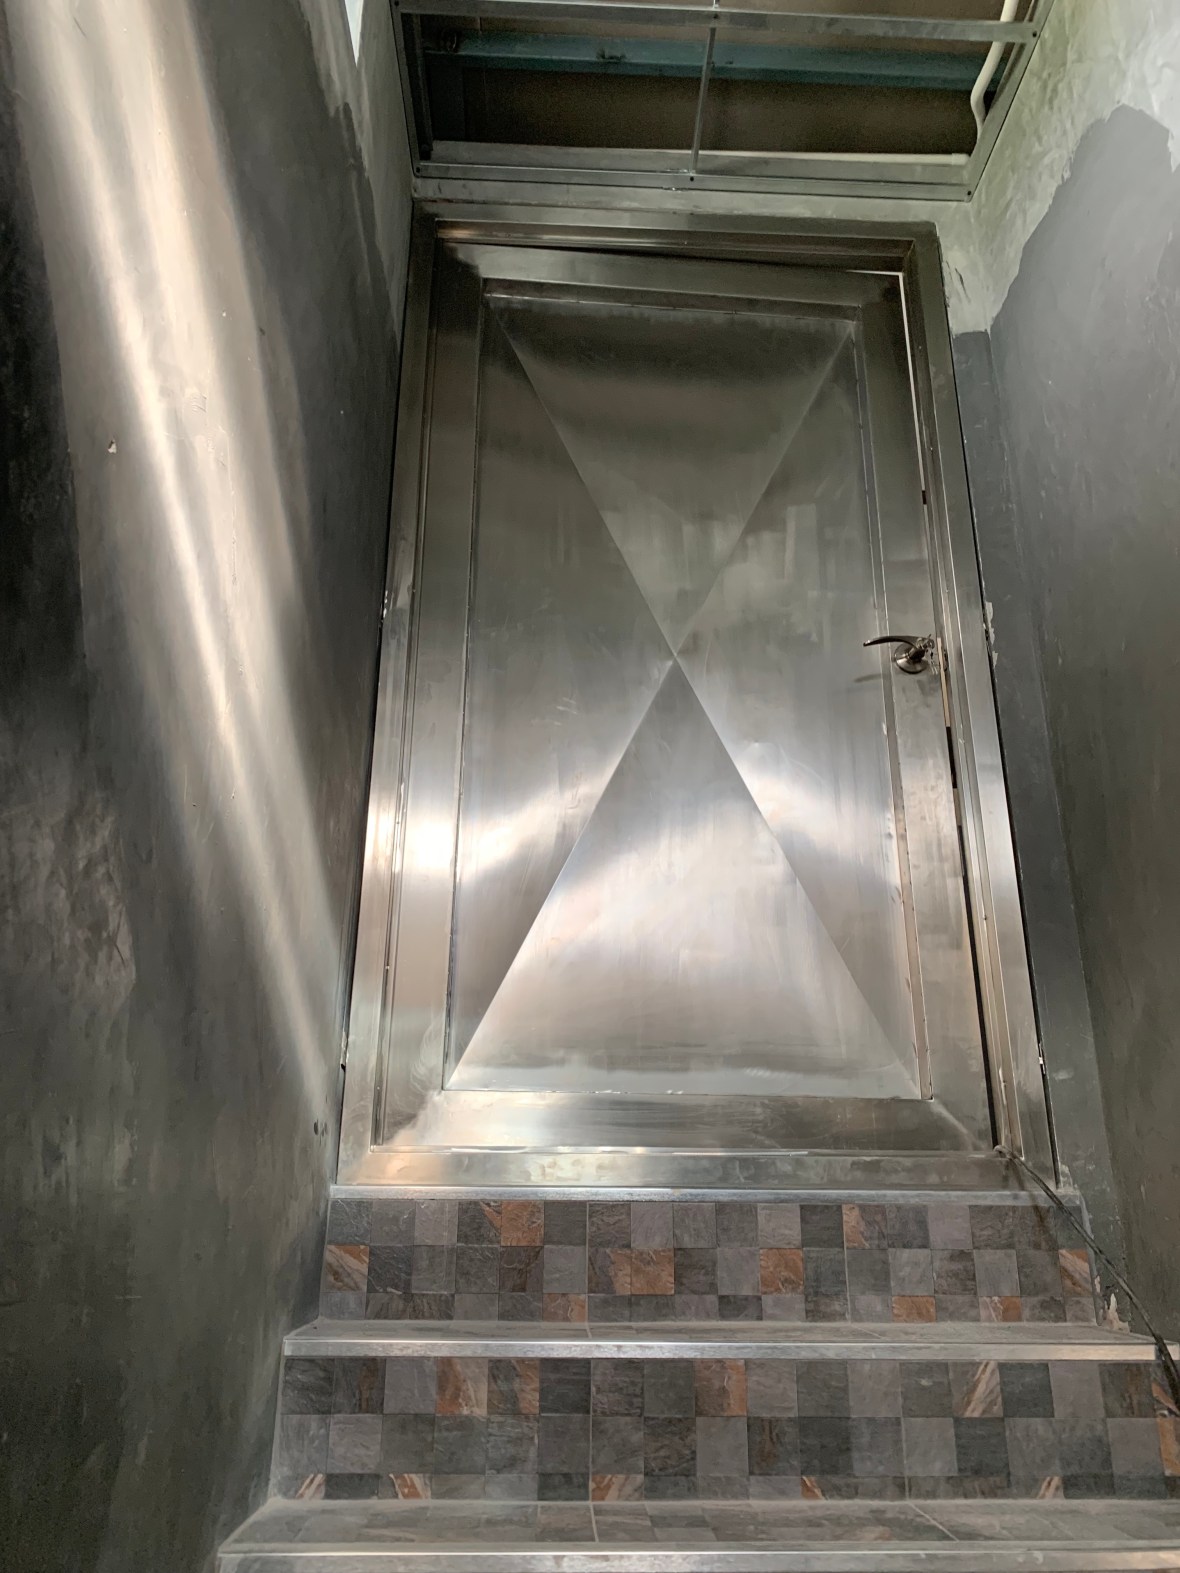
Internal doors will not be made of wood, which rots quickly in the hot humid tropics and is also subject to termite attack. So I have chosen foam filled UPVC from eco-door at ฿3,200 including frame. External doors will be oversized and made to measure in high grade stainless steel ranging in price from ฿12,000 to ฿16,000 depending on size. The doors are currently being manufactured and I will post pictures when they arrive. Three ground floor stainless doors will be equipped with biometric digital door locks from eco-door at ฿5,500 each

There will also be a stainless steel door at the top of the second floor to secure the whole floor as a safe-room. The third floor will have a stainless door to prevent access down to the second floor or up from the second floor, making the third floor a place of “last stand” there being a rope ladder on the third floor down to the ground.
Stainless steel doors will all be fitted with stainless steel Zombie-Bar security barricades made by the door company. Basically a piece of medieval technology, but it is time tested.

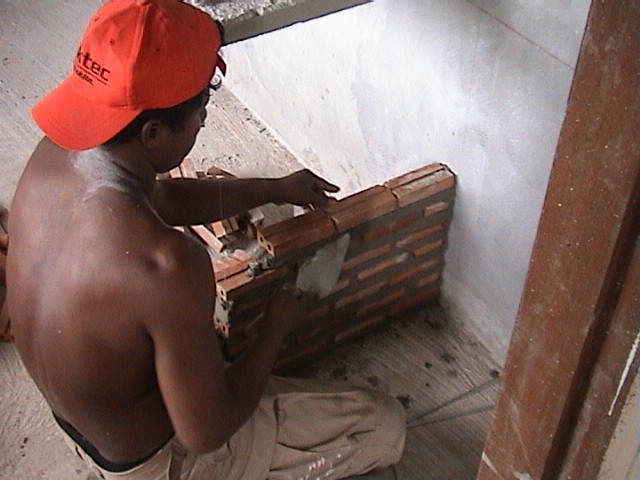
 The blockwork for the porch on the left and kitchen and bathrooms on the right has started to go up. These rooms are part of the buffer zone and will not be air-conditioned. My plan is to have all the “wet-rooms” (kitchen and bathrooms) together. It simplifies the plumbing of the solar thermal hot water and means no chance of a leaking pipe in the main house. You can see that window holes for these rooms has started to be punched out. These rooms will be naturally ventilated, so will have the only windows that actually open.
 Before applying the render a primer coat is sprayed onto the brickwork.
The stairs from the ground to the second floor and from the second floor to the third are boxed in to prevent air-con being wasted into areas not being used. It also means that a security door can be placed at the top of the stairs on each floor.
When no aircon is being used, the doors in the stairwell are opened to aid with natural cooling, using a principal called Stack Effect Ventilation: having an opening at the top of the building, draws warm air up and out like a chimney. The effect is magnified by the higher wind speed on the third floor – The Bernoulli effect: wind speed differences move air. It is a general principle of fluid dynamics that the faster air moves, the lower its pressure. Outside air that is further away from the ground is less obstructed, so it moves faster than air closer to the ground. The higher air, therefore, has lower pressure. This lower pressure can help “suck” fresh air through the building. A building’s surroundings can greatly affect this strategy, as more or less obstruction could be caused depending on whether the building is in a quieter or more built-up environment.
The Bernoulli effect is magnified by the Venturi Effect which creates a partial vacuum in the stairwell. It is like adding an extractor fan to the chimney.


This type of design was common in warm climates before the arrival of air-conditioning.
These days people are always talking about designing a house with cross ventilation through having windows on opposite sides of the house, but cross ventilation only works if there is a breeze to push the air , where Stack Effect Ventilation will always occur if there is a way for hot air to rise and escape at the top of the house.
One thing that many people comment upon when they see the house is the thickness of the walls compared to the bricks used in most Thai house construction.
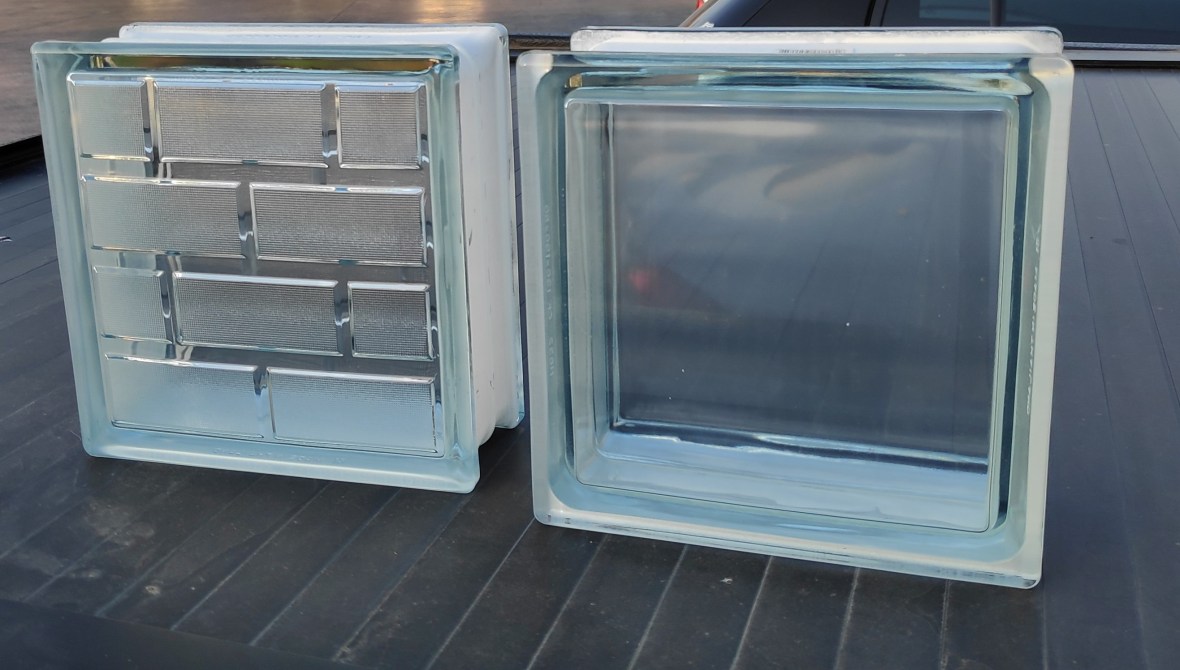 For symmetrical reasons the front of the house will have the same glass block windows for the ground and second floor. However, three of windows on the second floor will be for the home cinema, where having windows would cause a problem, so an opening is cut only through the first wall as far as the foil and the glass blocks used will be patterned and not be clear.
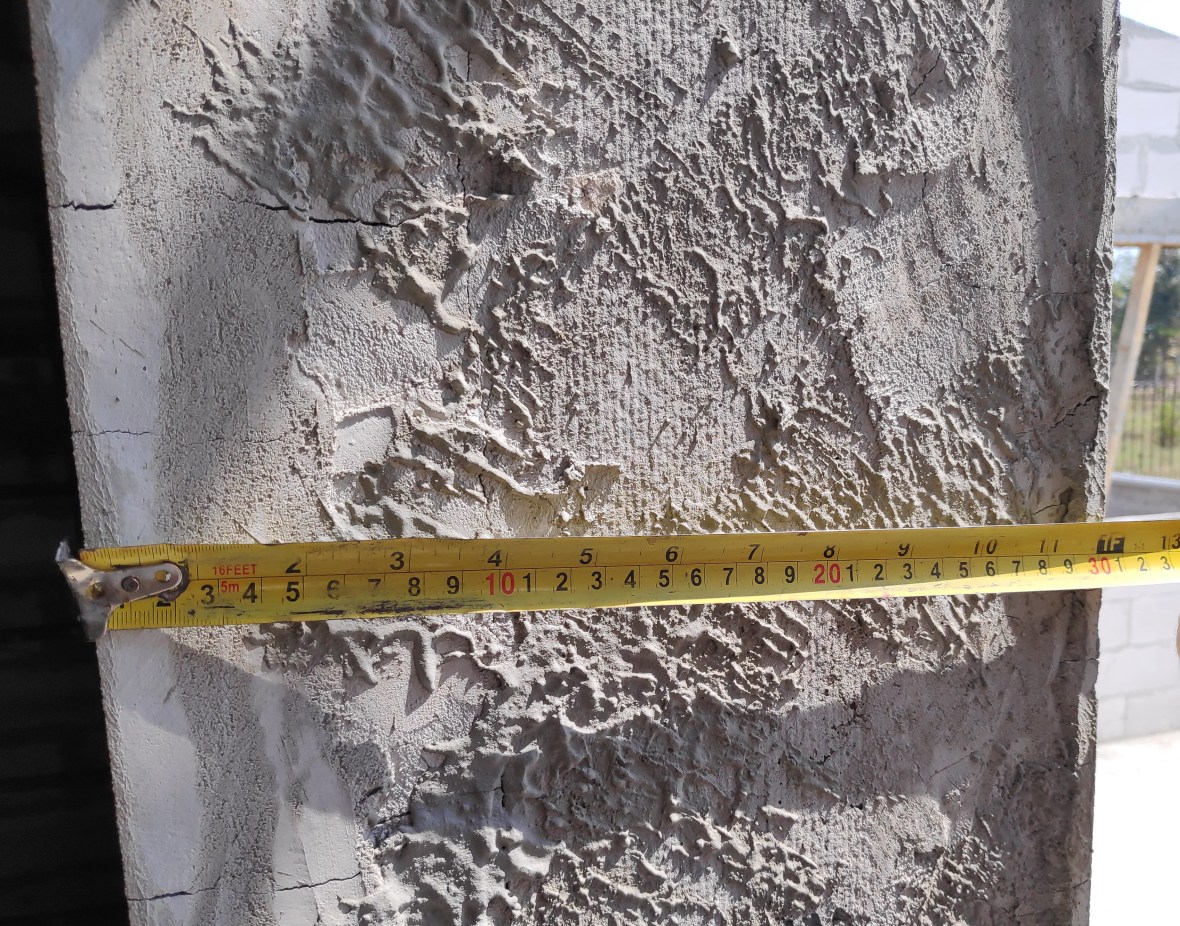
 Rendering has started and they are doing a good job of it
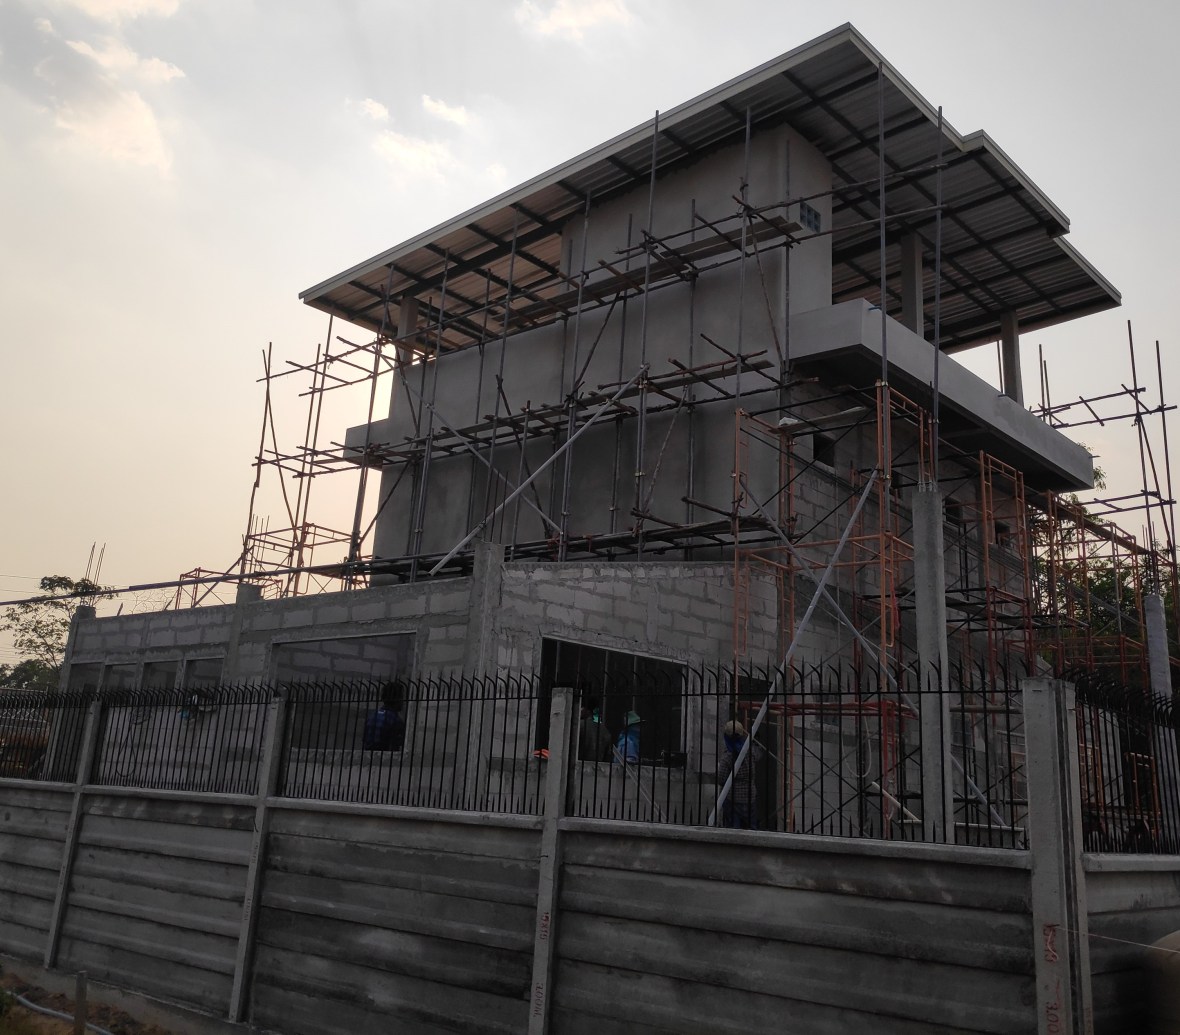 The rendering is a major part of the build and will take some time to complete.
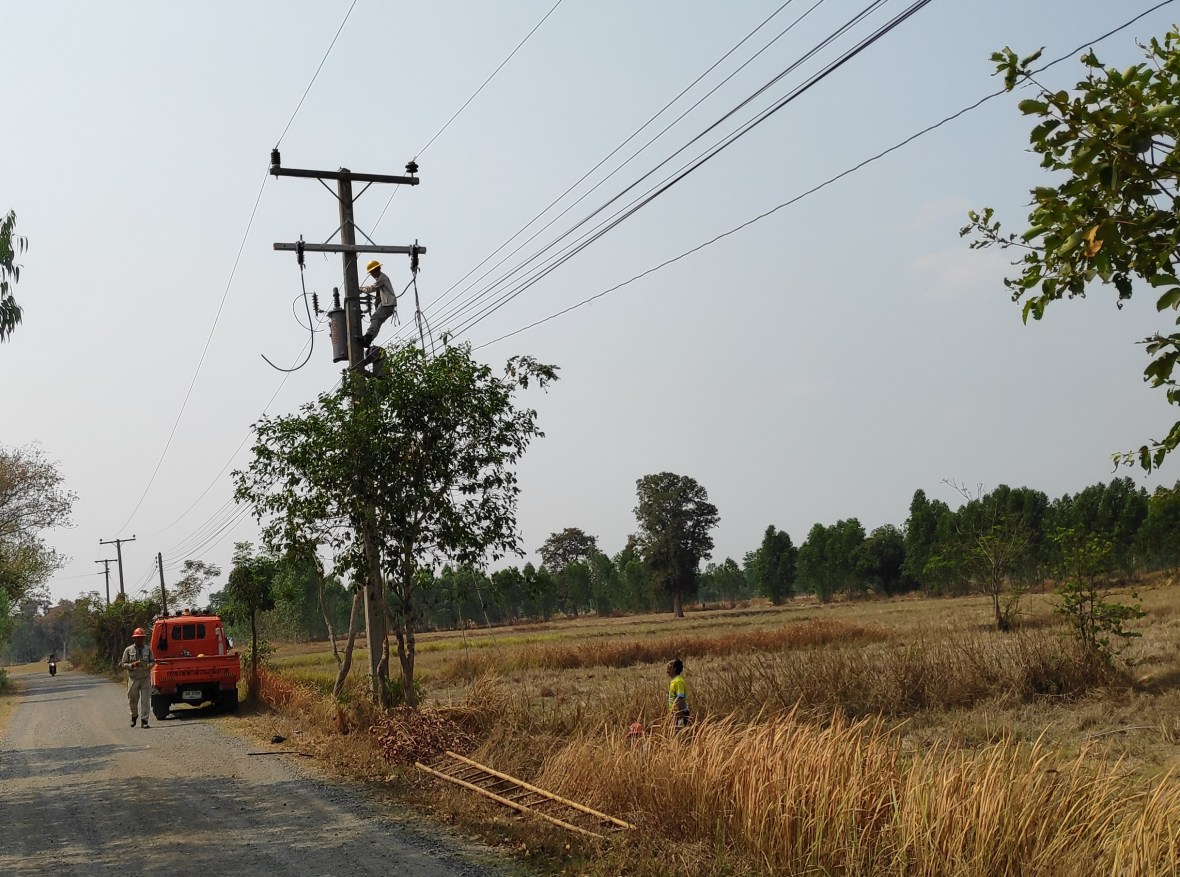 New transformer being added on the road into our village, bit of luck for me as mine is the first house in the village and closest to the transformer.

 I thought I was long finished with digging holes, but these three holes are for 3 more posts to go in front of the house in line with the 2 existing posts. These new posts will mean I will be able to run the Blue Scope steel roof across the front of the property and join up with roofs of the carport and bathrooms. If you want to read the story of why this was not done from the beginning and you are not afraid of Ghosts then visit: https://ecohousethailand.wordpress.com/building-the-thai-way/
These three posts gives me a new 20m2 room in front of the bathrooms which will act as a pump room/invertor room/battery storage. I will also gain 40m2 of roof area facing due south for solar panels as well as a much extended carport.


 The outside render is complete


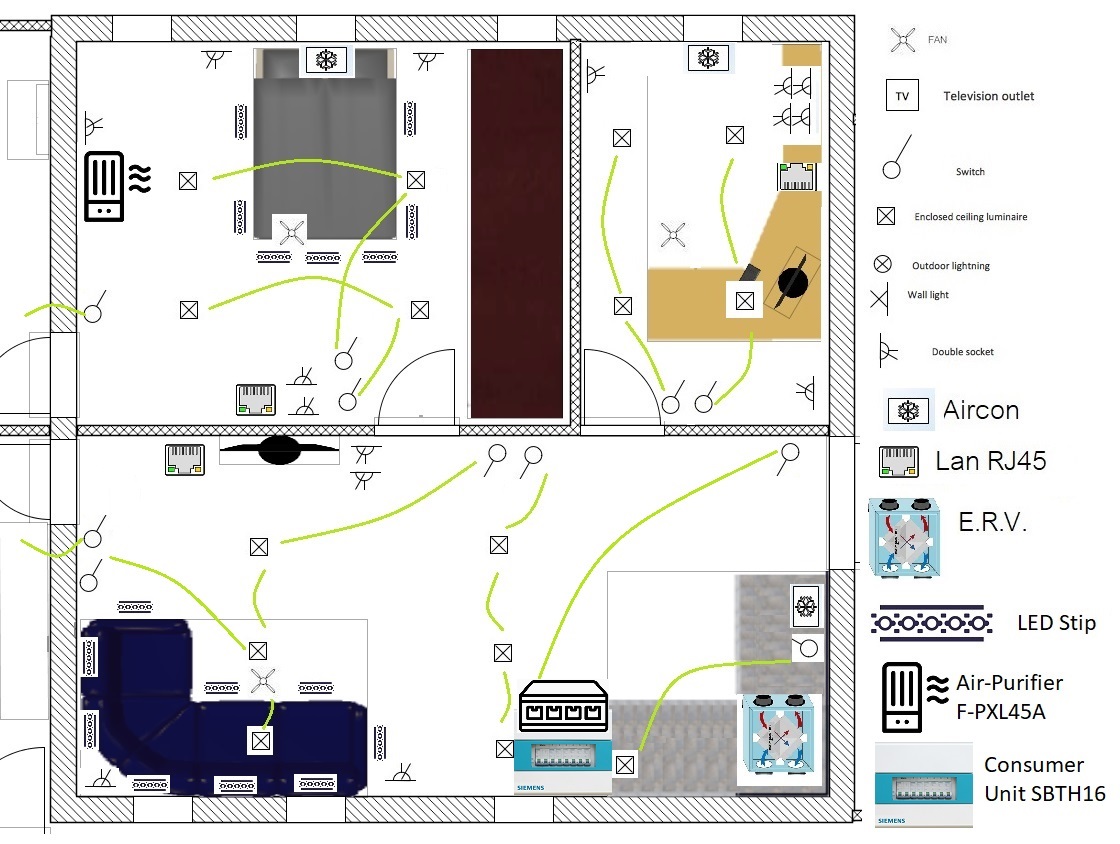
Tomorrow have a busy day helping the top builder fit the electrics. I have prepared an electrical plan, but it will need some explaining. Labour to fit the electrics ฿40,000.

*

*
 Still need to paint the walls, so not all the trunking is going in yet. Copper speaker cable marks the spot for a wall speaker
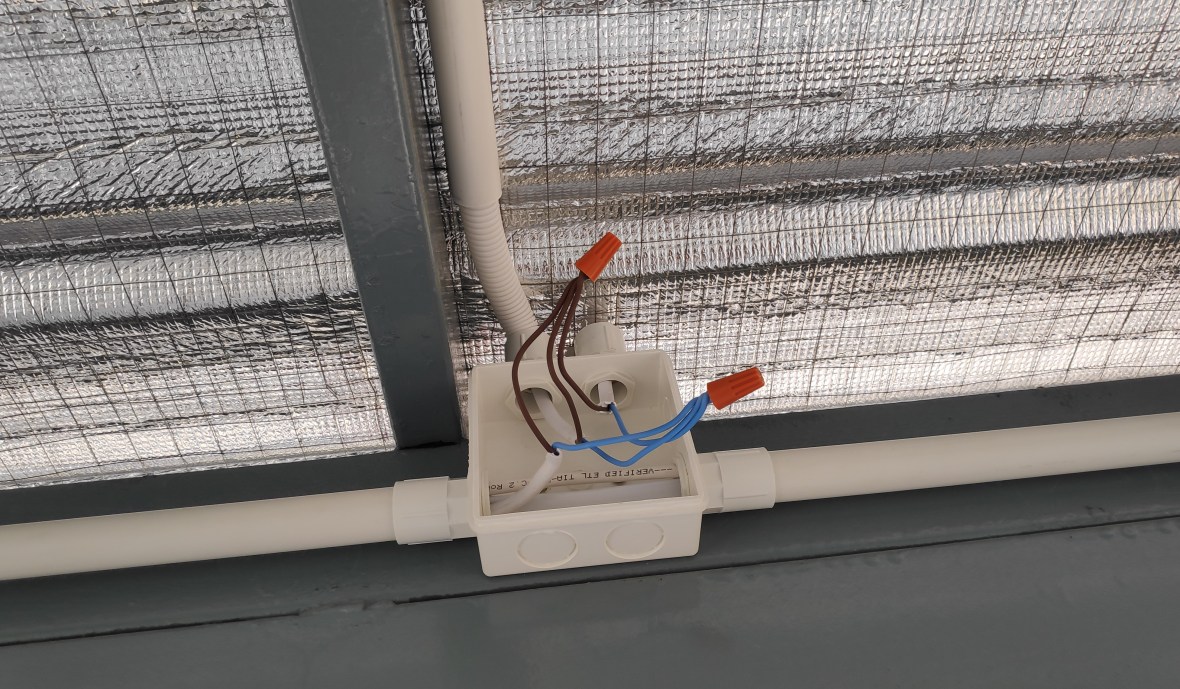
 Thais prefer to use individual wires as they can get away with thinner (cheaper) trunking. I want all the colours to match in the house, so insisted on sheathed wiring. Also using Twist Connectors rather than just tape. It helps if you insist on paying for all components yourself as this rules out cost as a determining factor.
 Your ability to successfully terminate LAN cable is a factor of the quality of your connectors and your eye sight. In my case, fail on both counts.
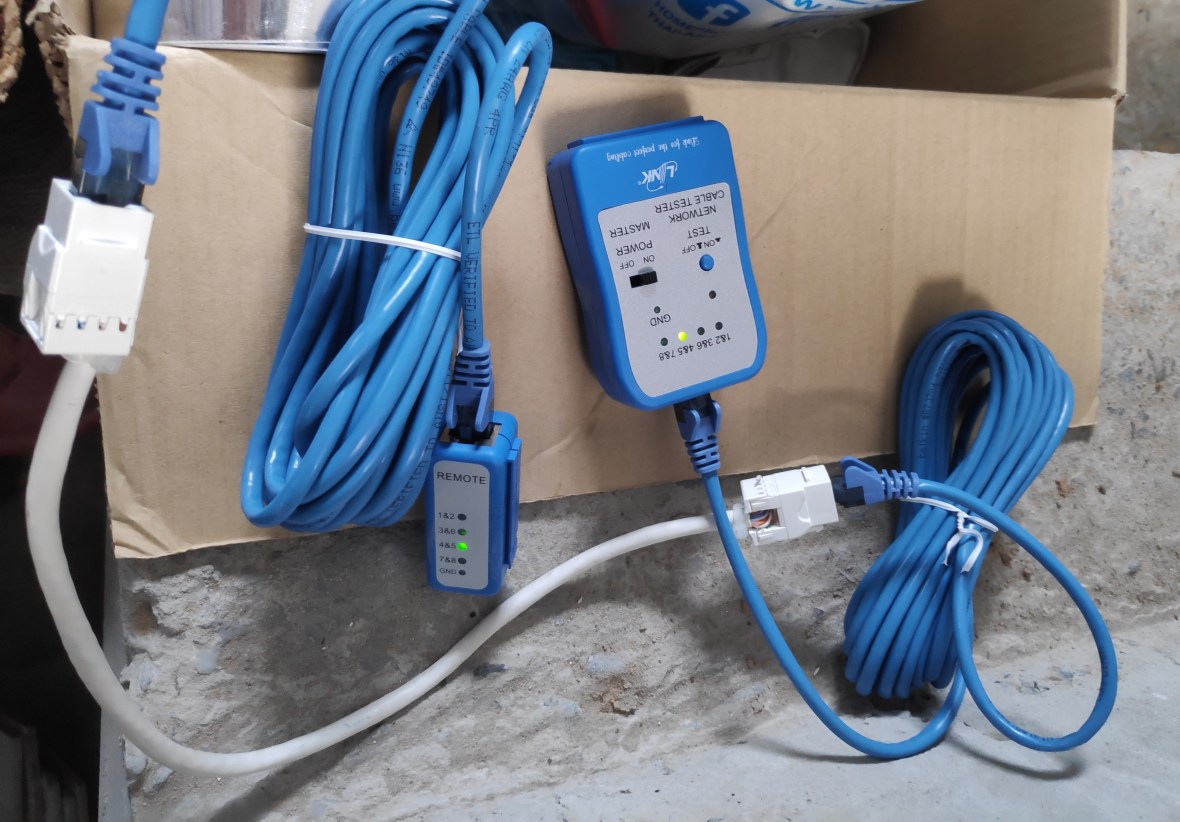 Luckily I had more success terminating using Cat6 Keystone Jacks
 Cables going down to the second floor: Lights; Power Sockets; Led Strips; Speakers; Security Cameras; WiFi and 3G/4G Booster.
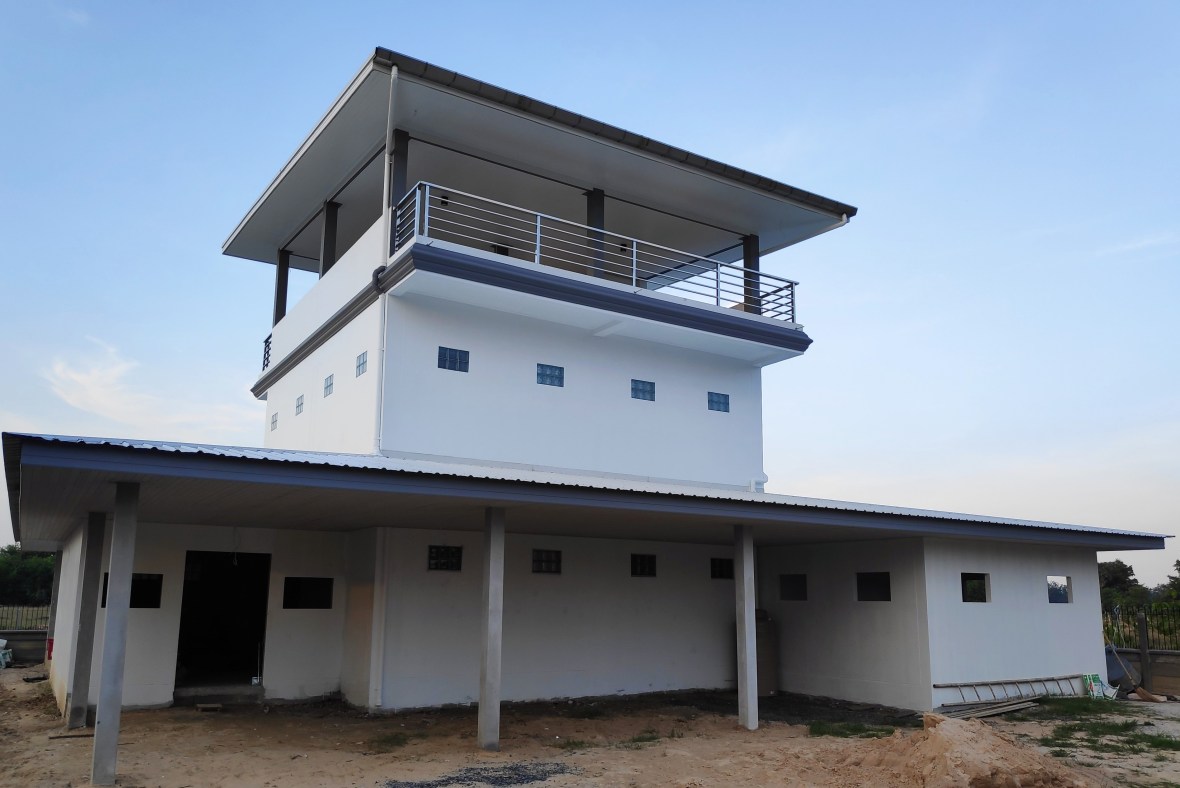
 Outside of the building is all primed and we are starting on the top coat – Dulux Weathershield Ultima in Bright Shiny White.
 A contrasting color had to be chosen for columns etc where heat reflection was not critical. Sophisticated Grey was chosen and I had great fun asking the Thai Staff what the colour was called. The colour is mixed by computer, so we will always be able to match it.

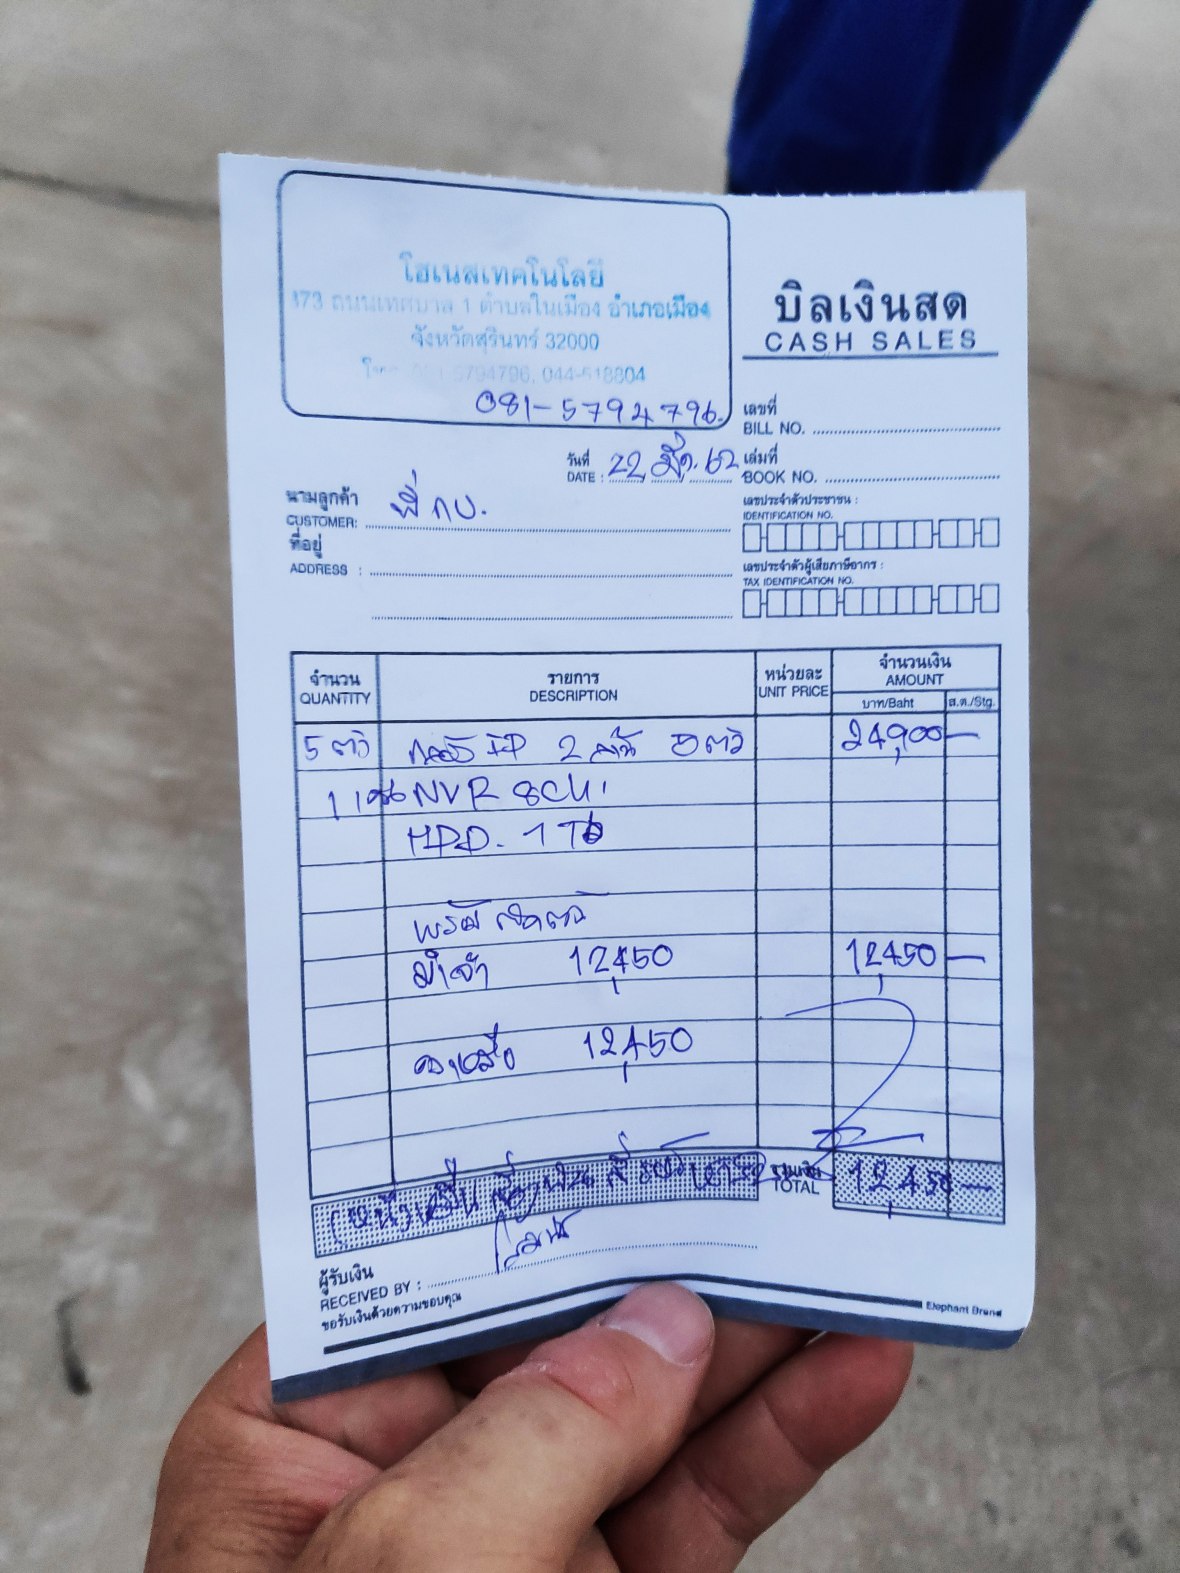
 My Energy Recovery Ventilator arrived today, now just have to work out the how to get the ducting installed to feed fresh air to all rooms. The ducting needs to bring fresh air in from my Geothermal system through the ERV, then split to send fresh air to the ground and second floors and stale out Video explaining ERVs
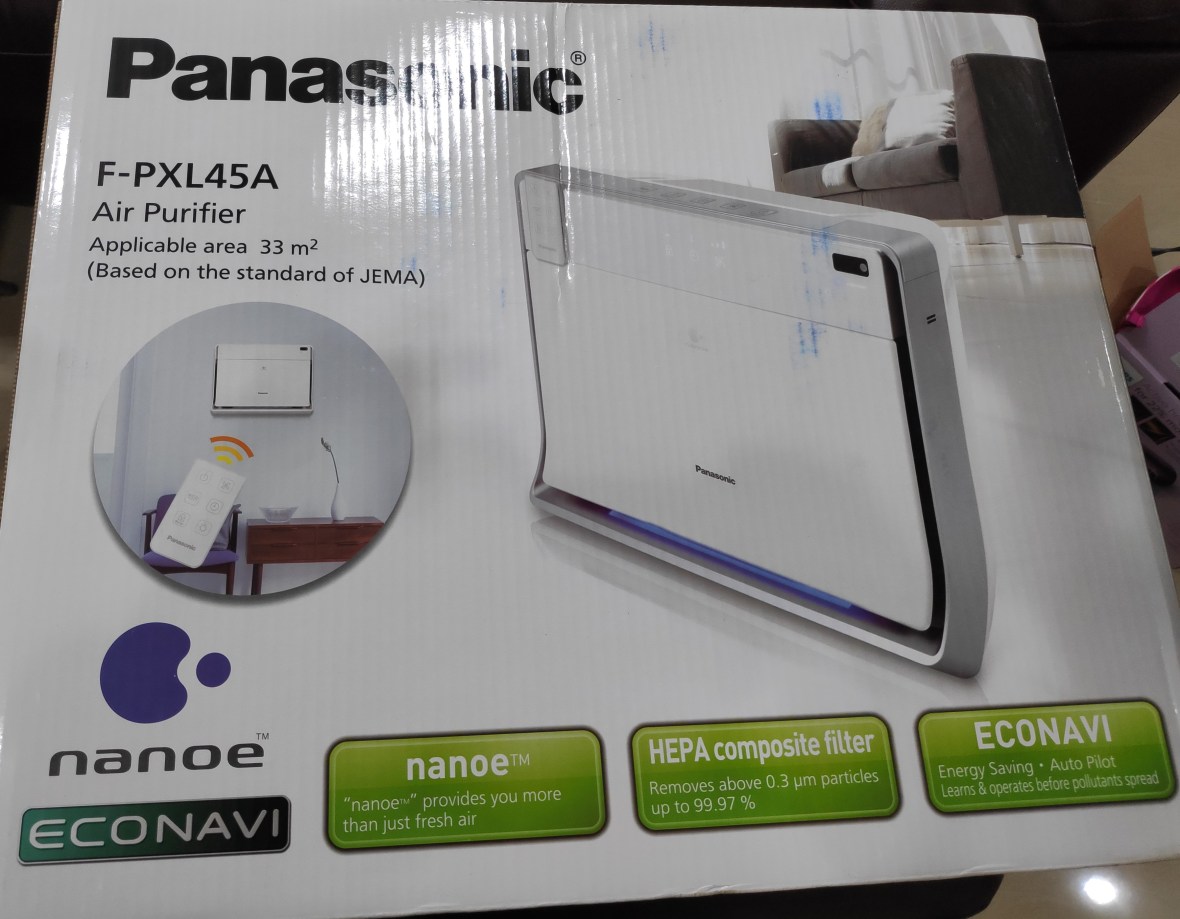 Even though the ERV has it’s own filter, I will also be installing a wall mounted HEPA air filter in the bedroom
 Some decorative concrete is being attached to the building, which will be painted Sophisticated Grey ฿300 per meter to make and fit
 The cabling for 5 Video cameras are being fitted before the ceilings go in. The cameras are connected to the control box by CAT6 ethernet cable with POE (Power Over Ethernet) – so a few less power sockets to fit.
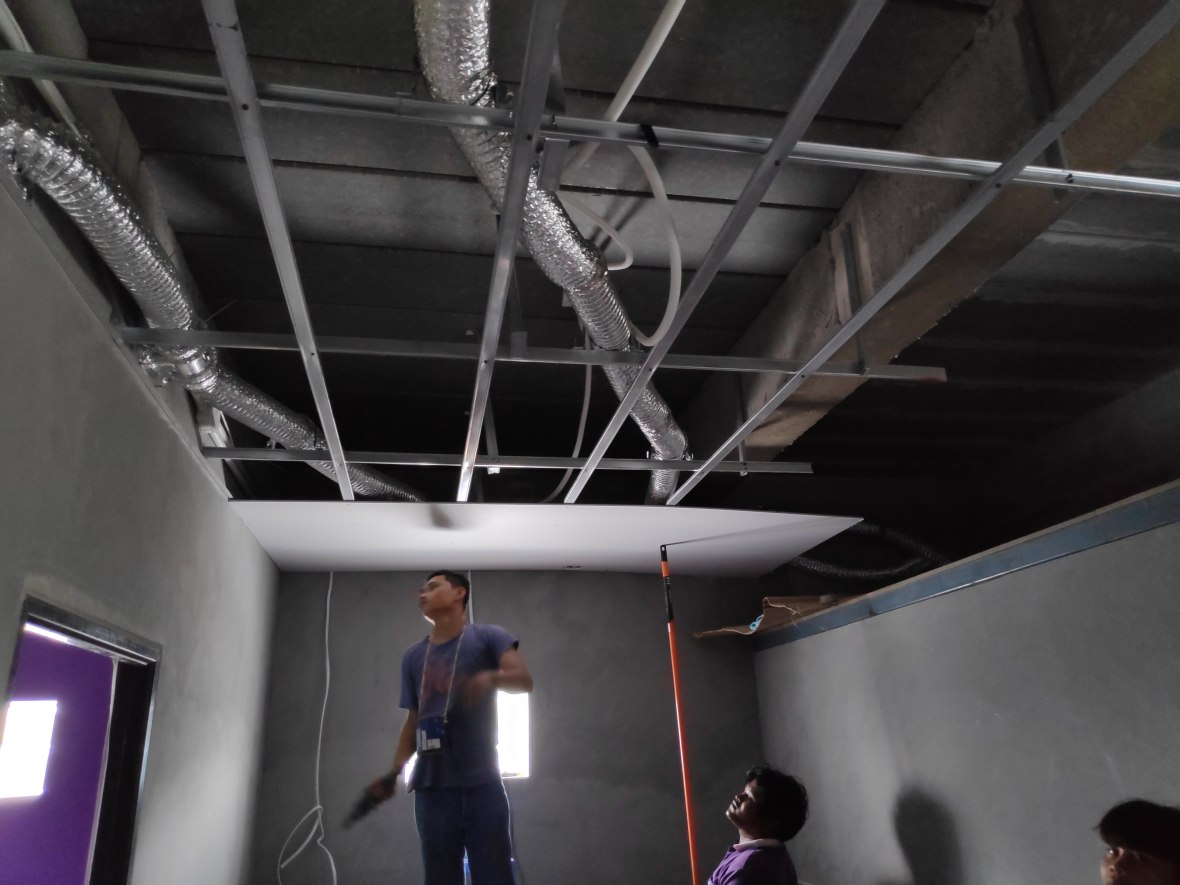
 Ceiling on the third floor going in and being painted
 Foam applied to the back wall of the home cinema to insulated it from the adjacent room
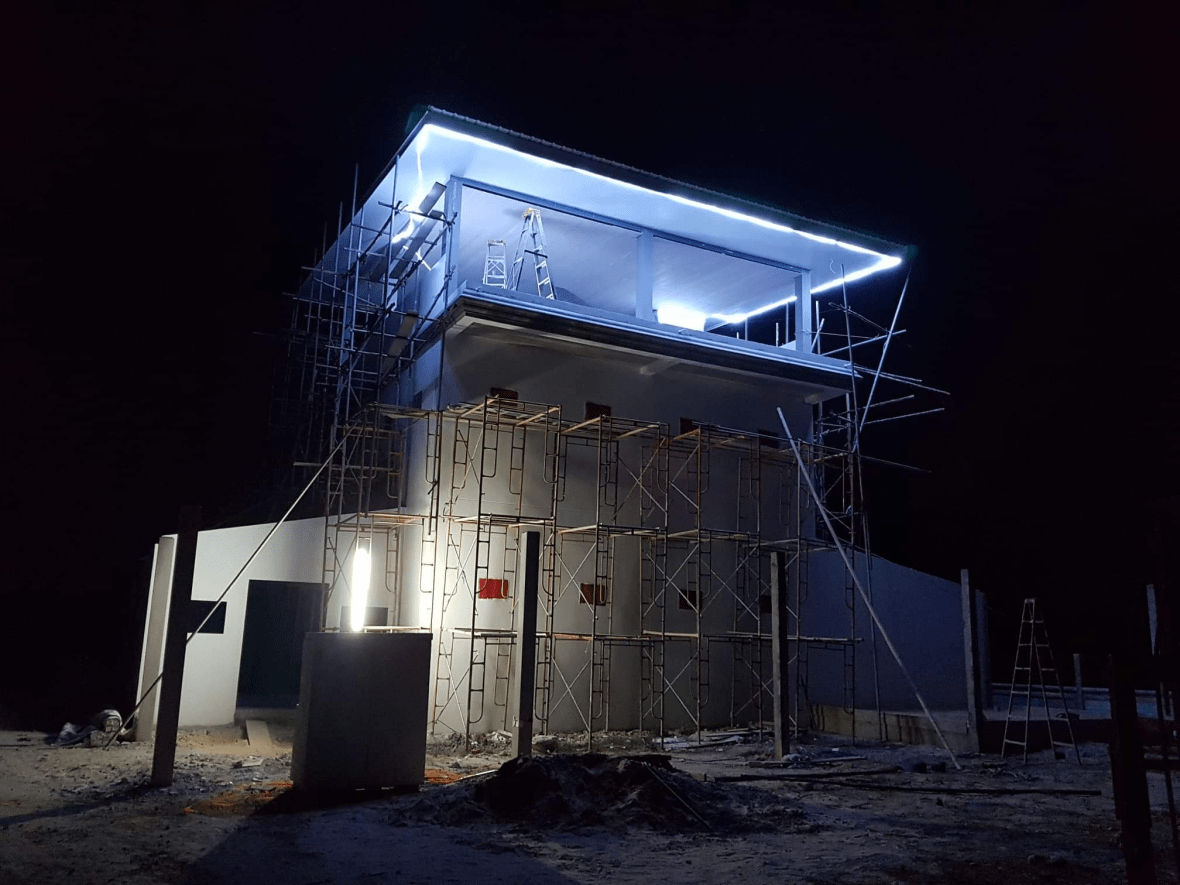
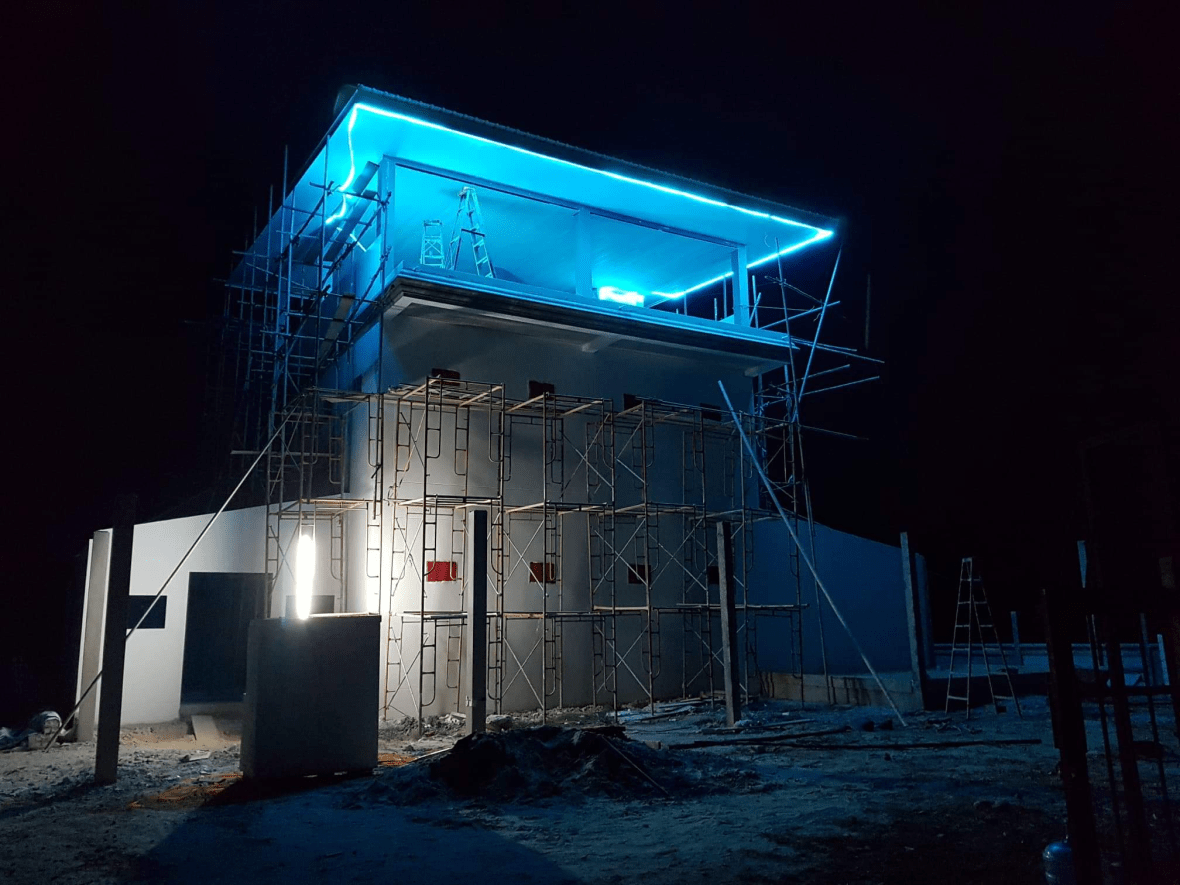
 LEDs starting to go in
 Starting to build the Mechanical Room
 Waxed Loft Style paint for the interior
 Control box for my solar pump – now an ant house – another problem with building in the tropics


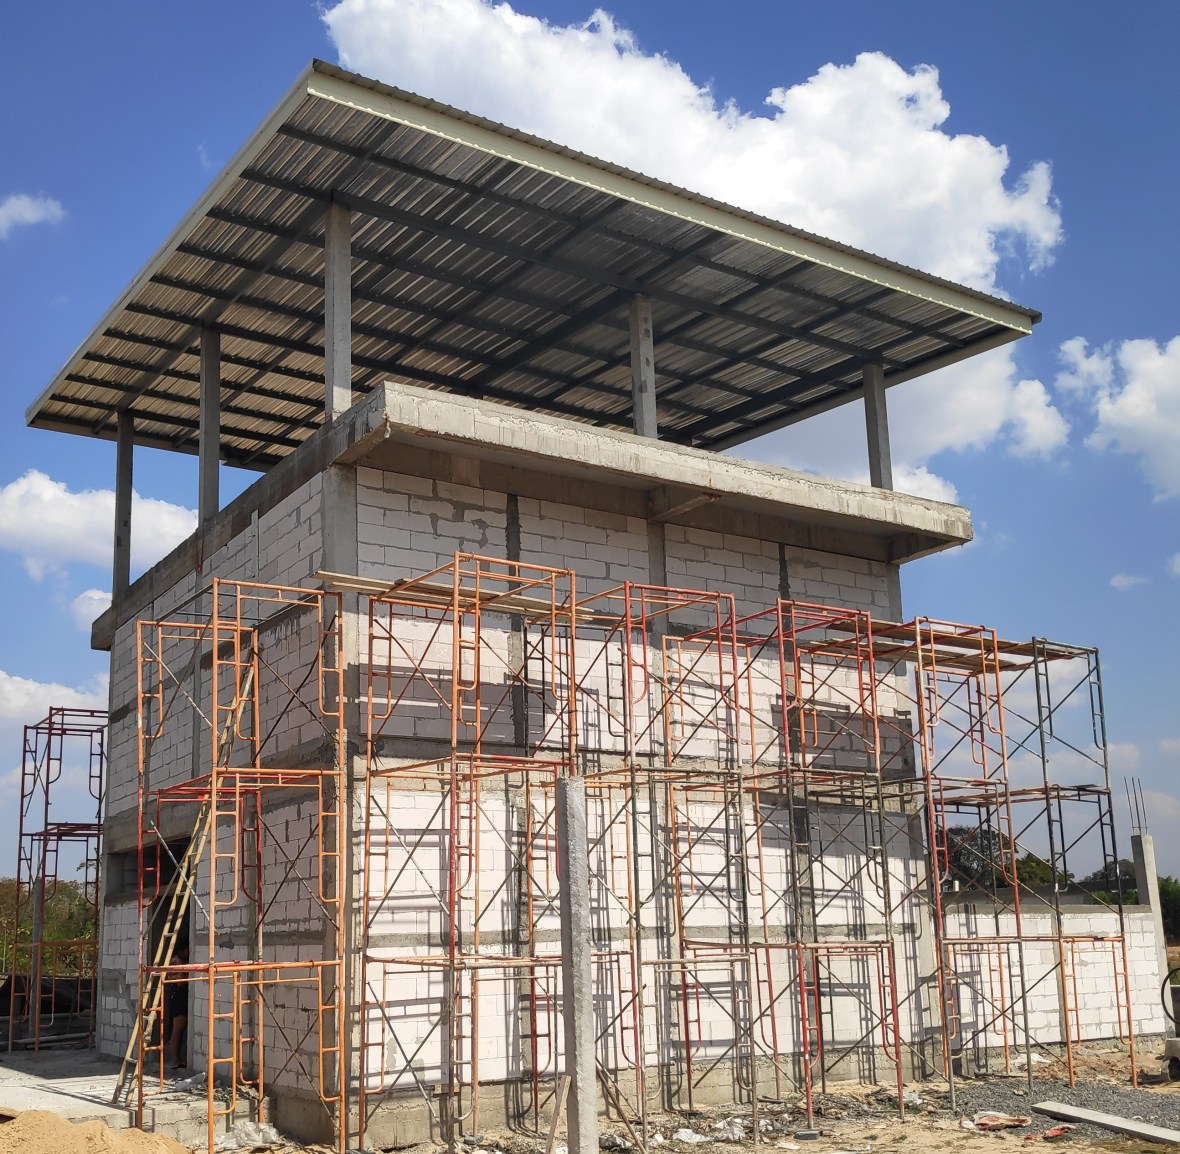
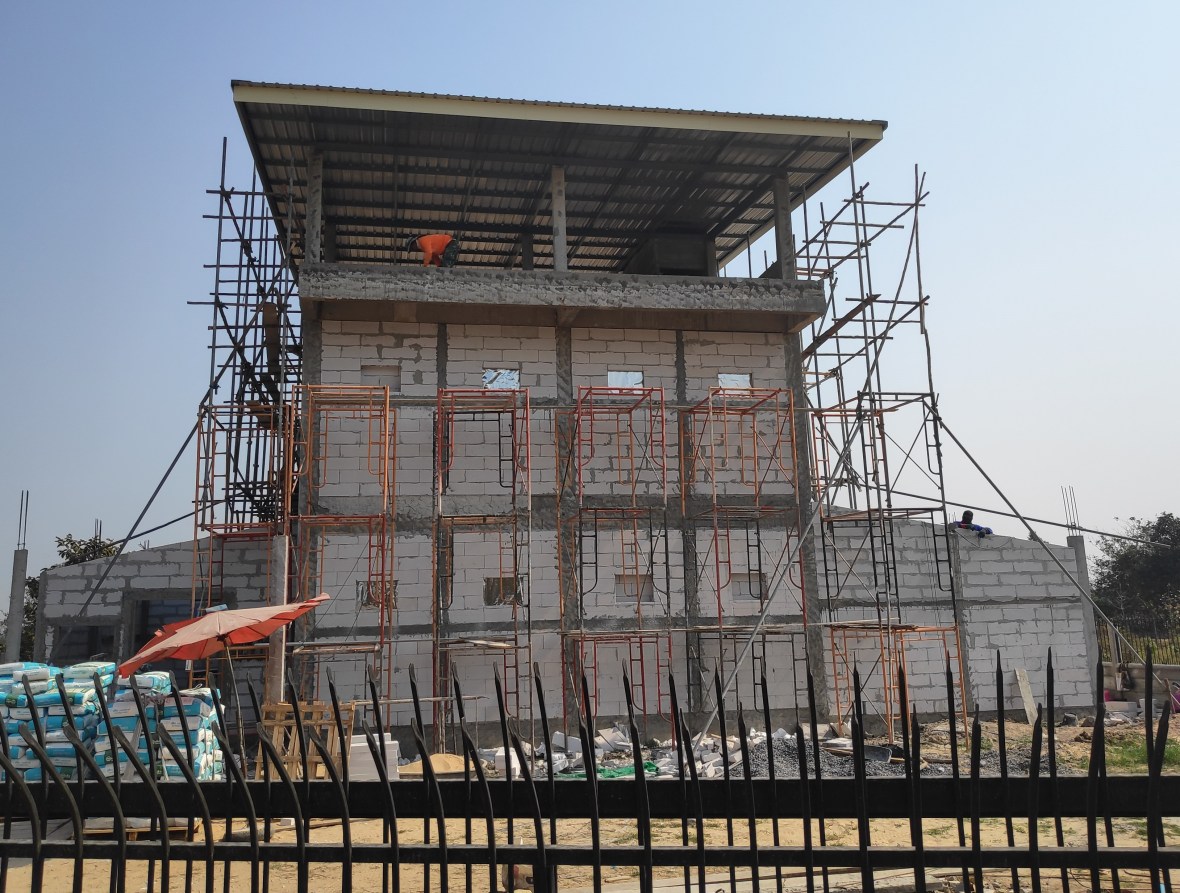
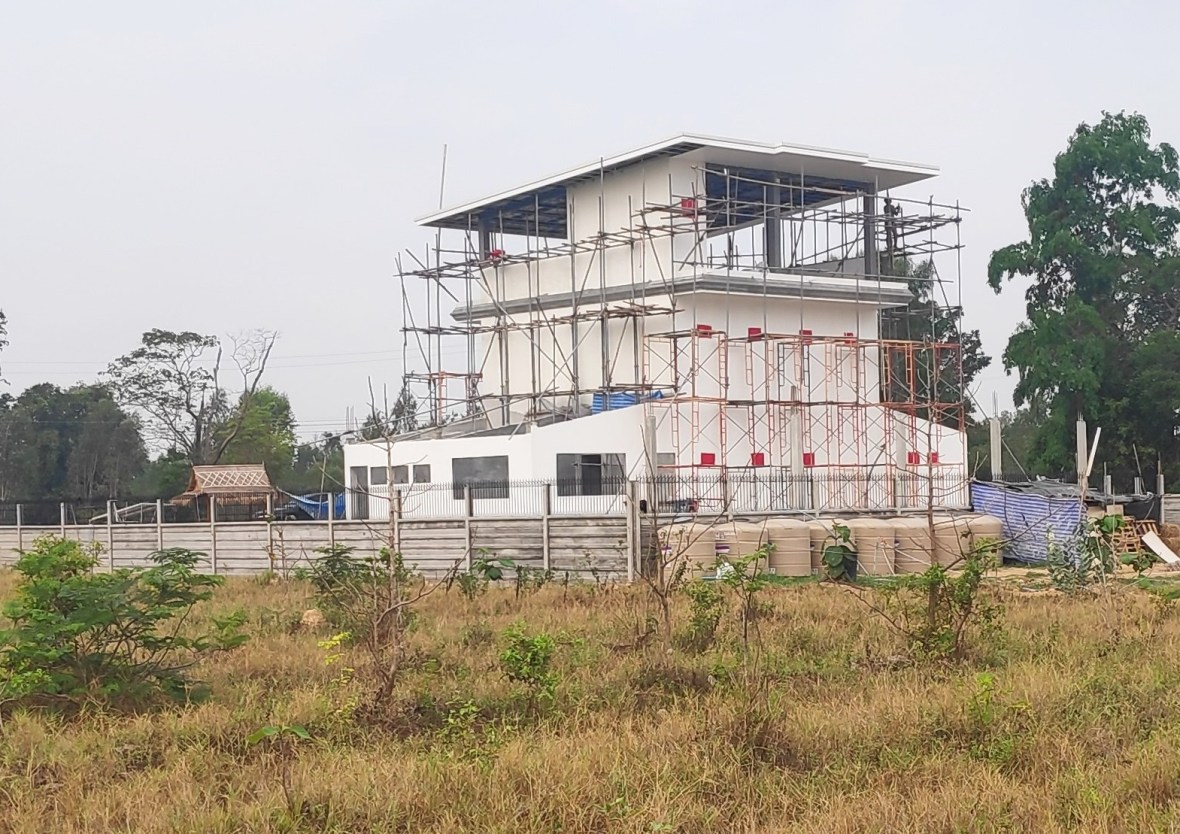
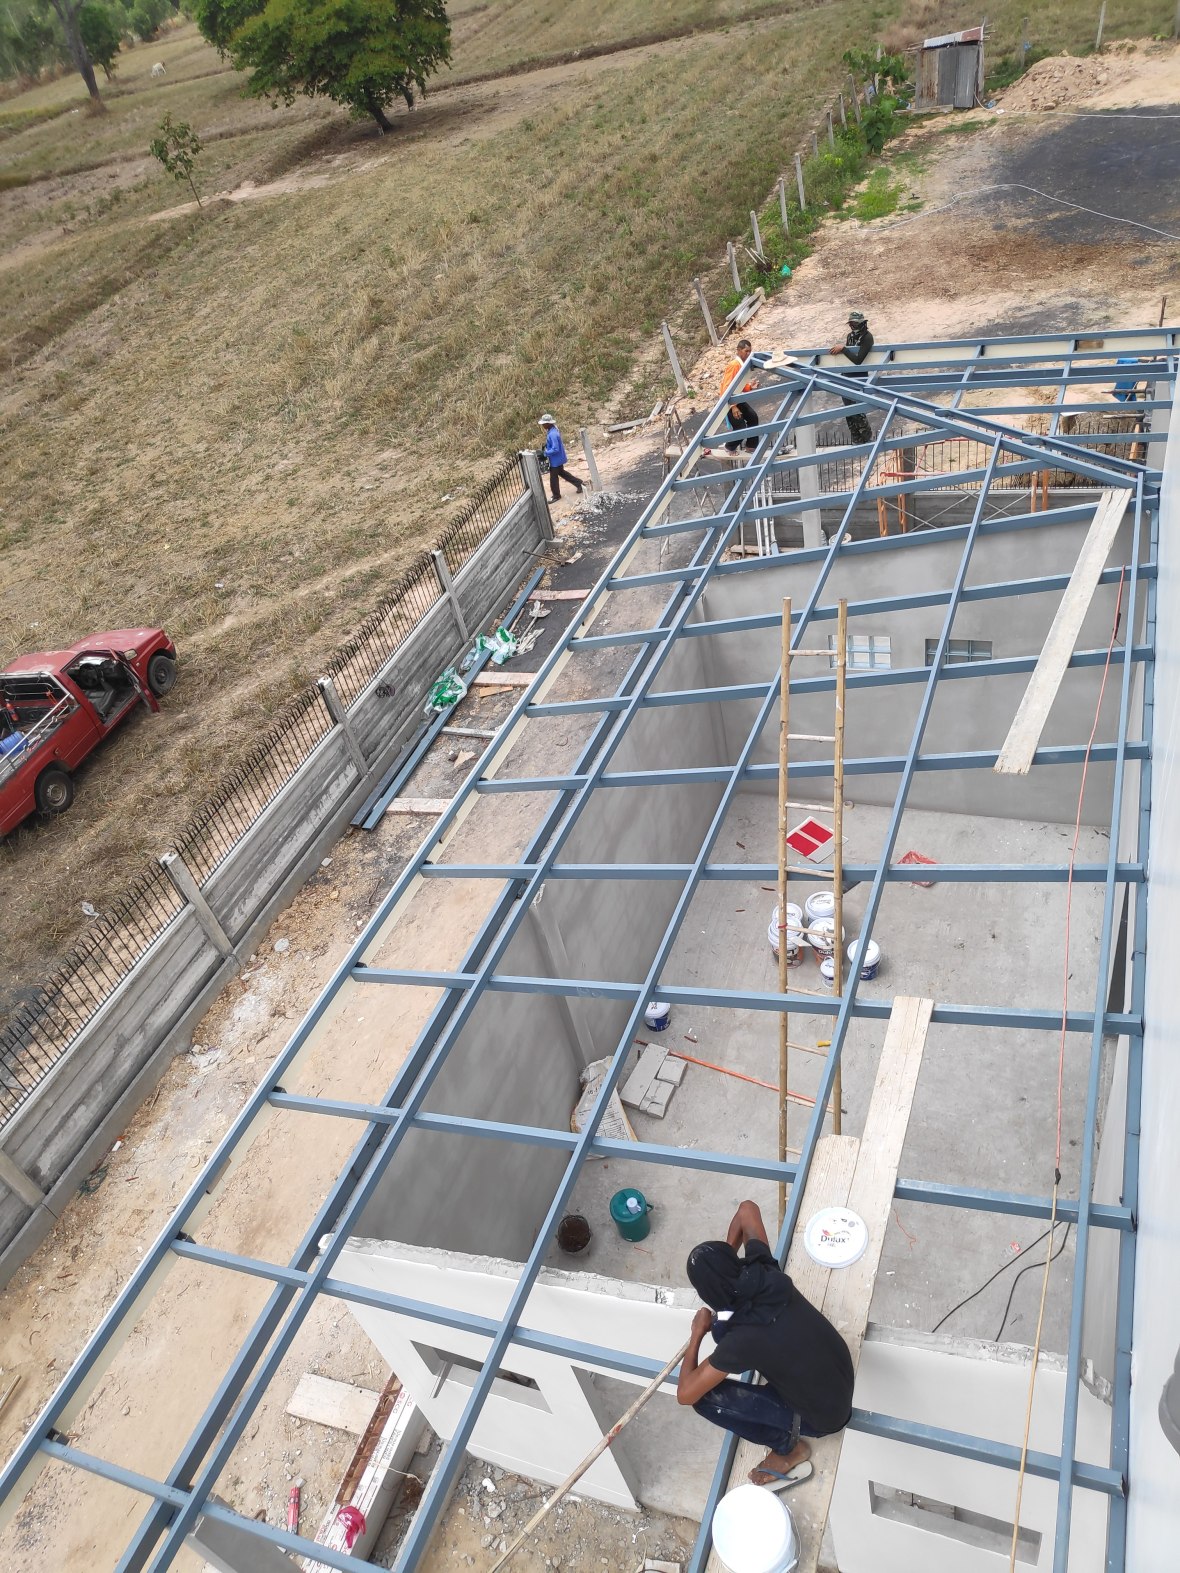
 Scaffolding comes down and the steel for the wrap around roof on the first floor starts to go in.


 Bought a little Christmas tree to put on top of my house – great difficulty was had trying to explain what it was and why I wanted it.

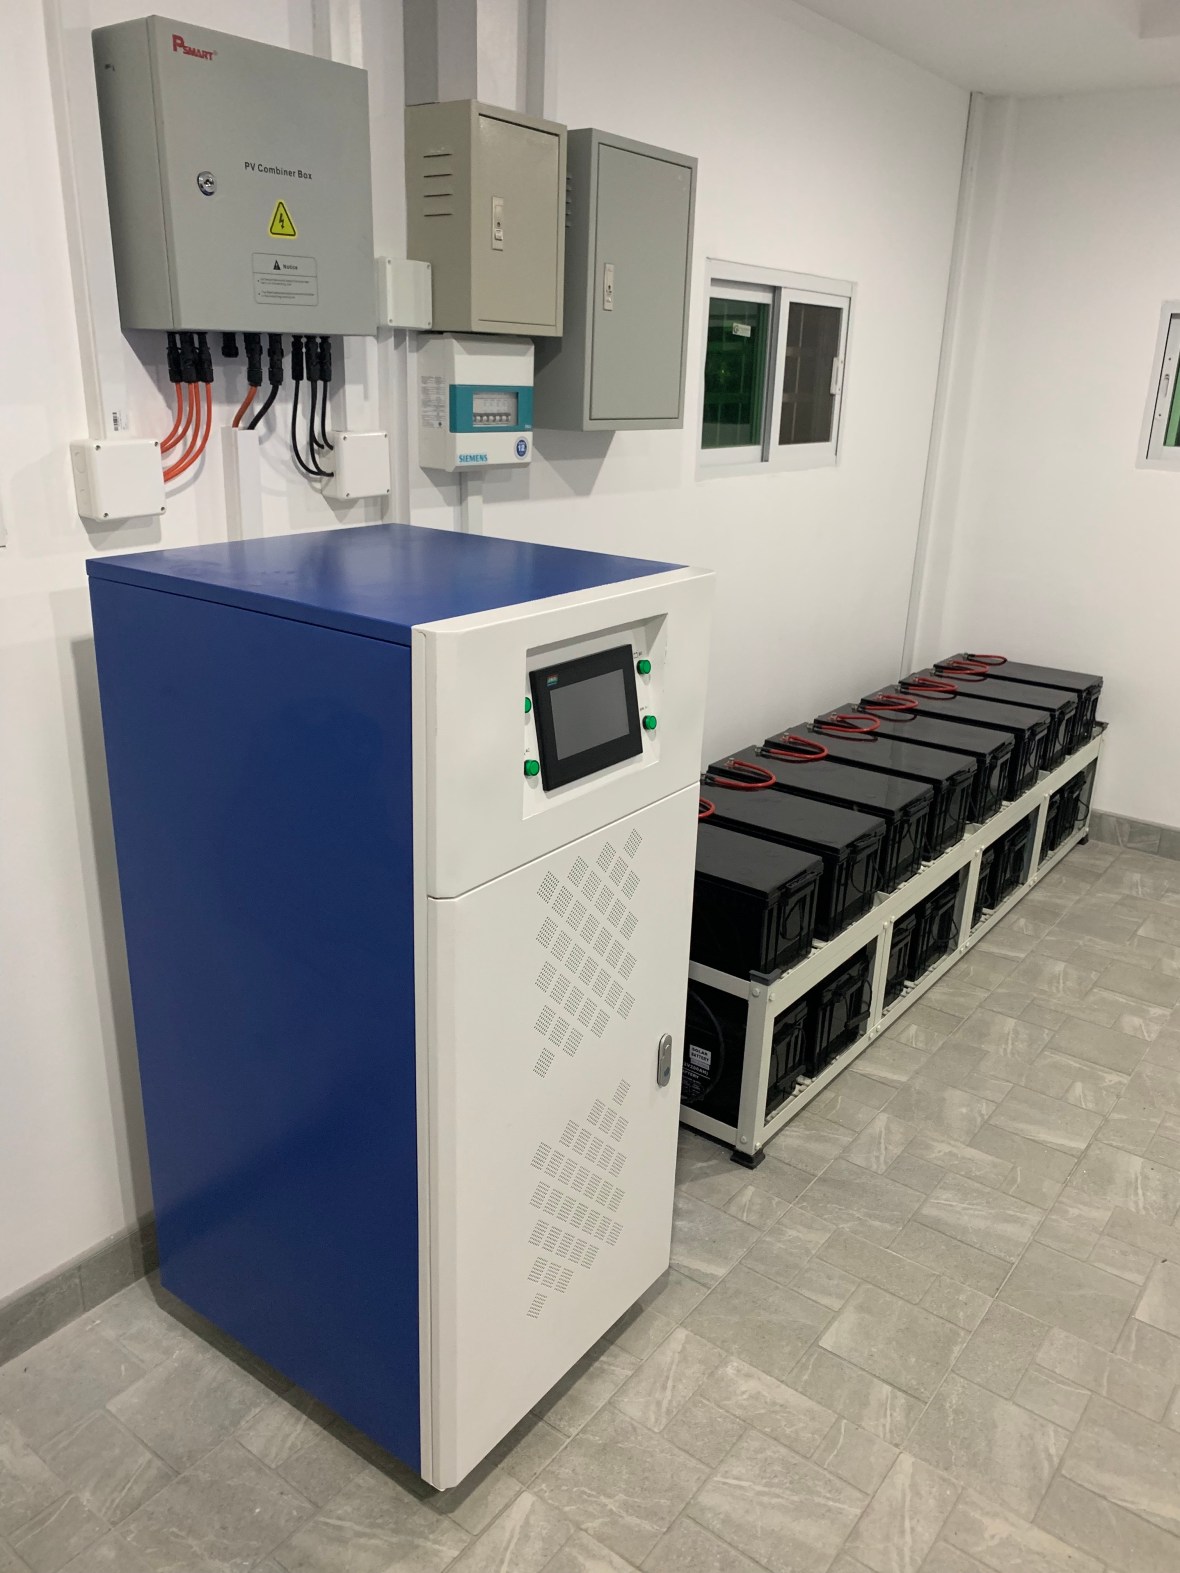
 The Mechanical Room is almost complete. 5m x 4m this room will house the invertors and batteries as well as additional electrical components for the solar system. It will also have filters for the whole house water system and a drinking water filter system. One item that will not be in the mechanical room is the Energy Recovery Ventilator. The ERV needs to live within the airconditioned envelope of the house.
 Why you need to paint the outside walls of your house white.
Purchase of Steel and fitting for the wrap around roof on the ground floor. This includes the roof for 2 bathrooms, the kitchen, the porch, car port at the front of the house as well as the covered area at the back of the house: ฿295,000.
to find he had brought in the “B Team” to do tiling on the second floor and they were doing a very poor job of it. We asked if we could stick to the agreed tilers, he said yes but
the next morning he was jack hammering all the tiles off on the second floor, and they were unusable. There was a lot of shouting, mostly from him and we have not seen him since.


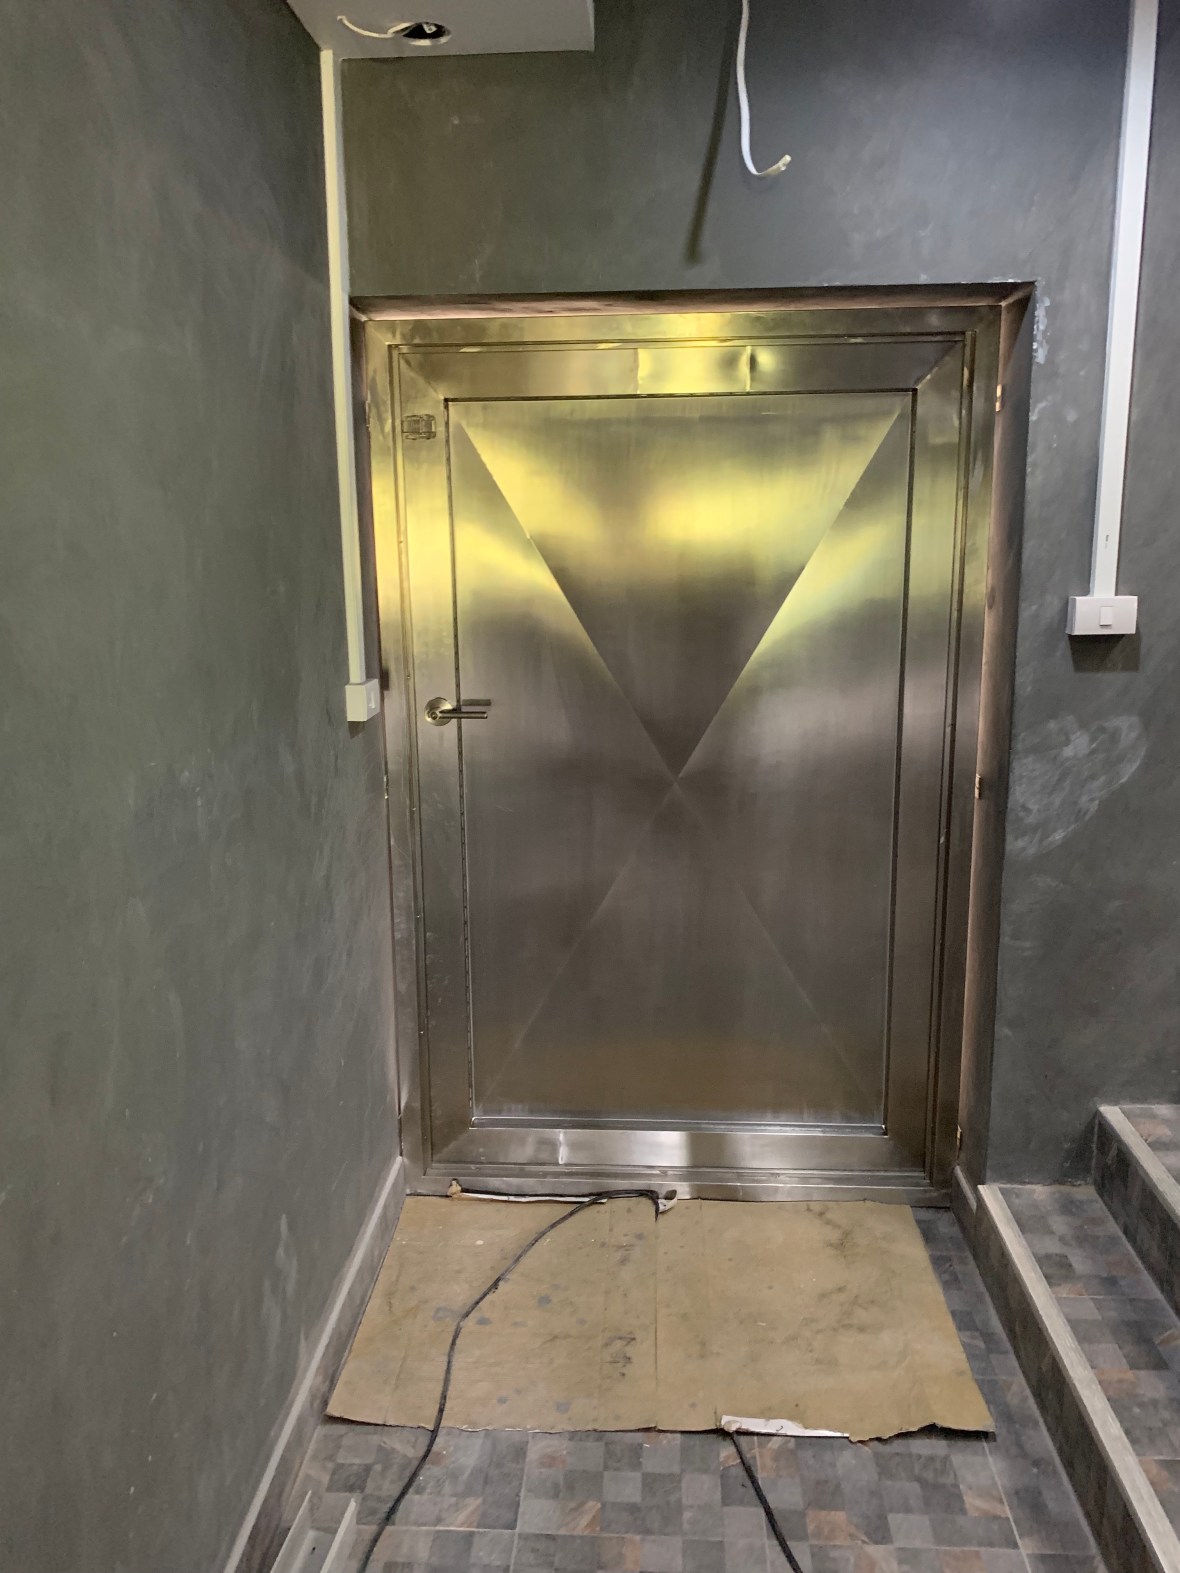
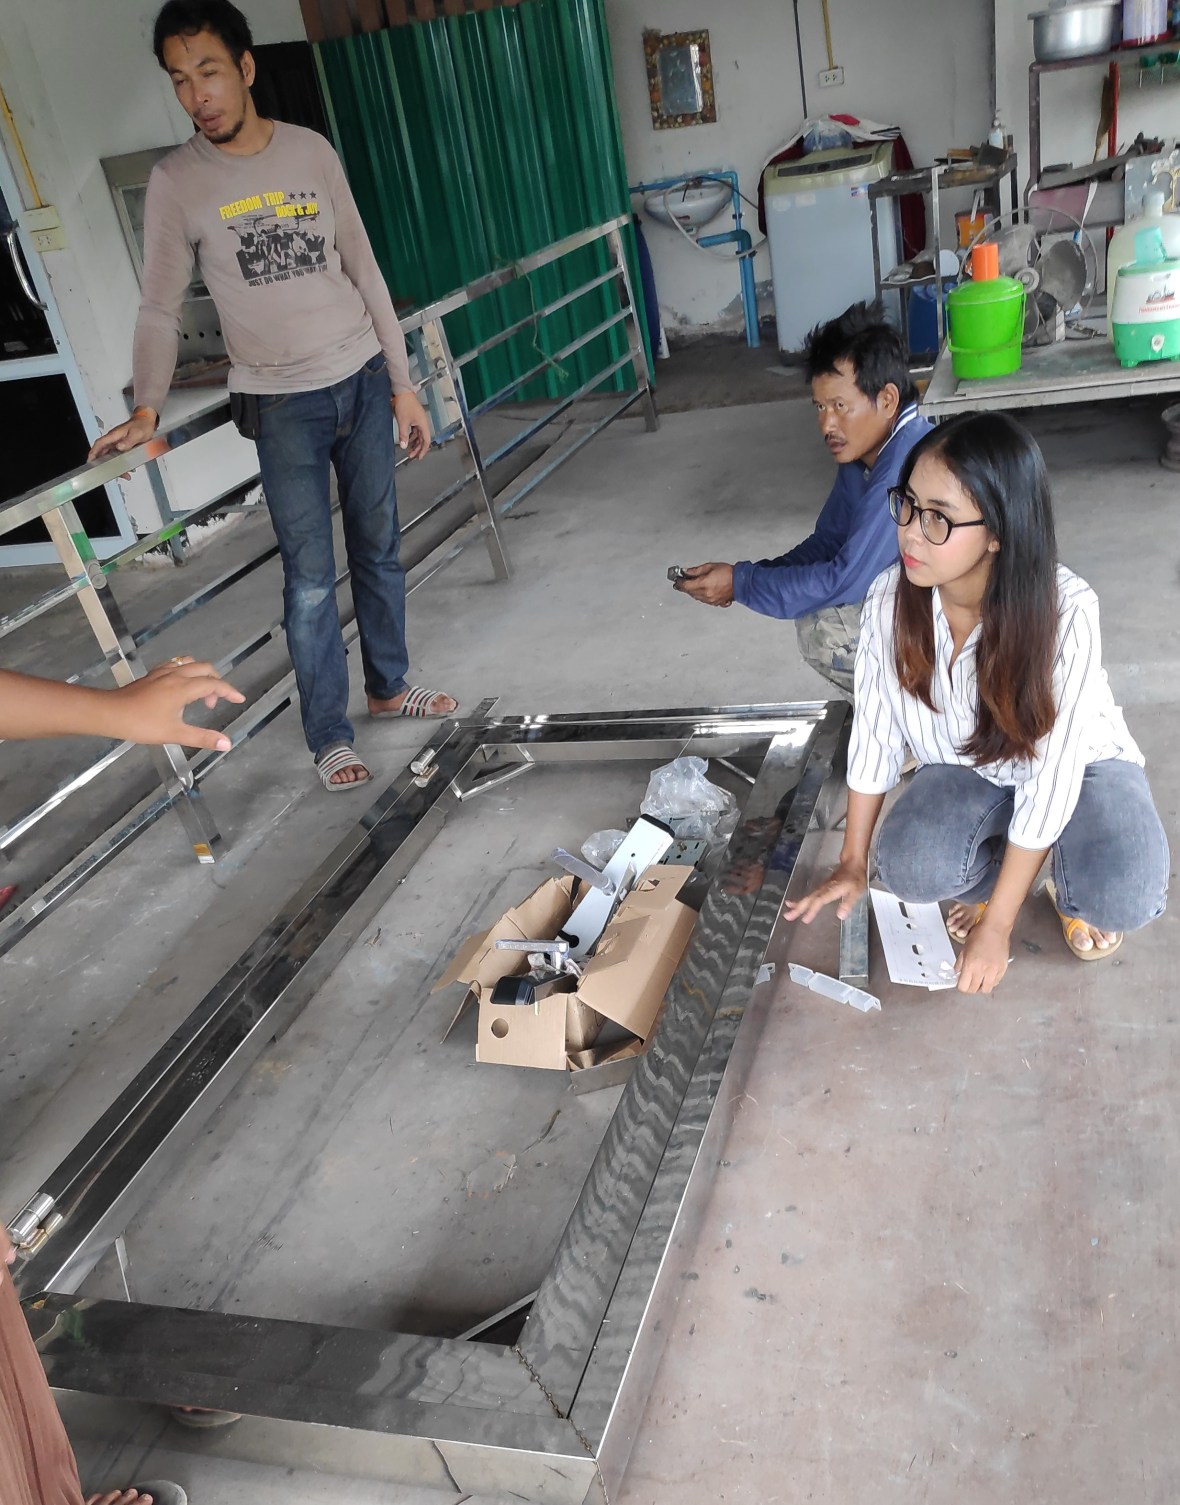 Visit to our stainless fabricators. They are making up the first of our stainless security doors. They have taken our biometric door lock to fit for us. The girl with the glasses, speaks excellent English and has made the whole process very easy. In the background is the stainless railings for the third floor.

 Stainless Security Door on the third floor with Biometric Lock
 New Stainless Railings
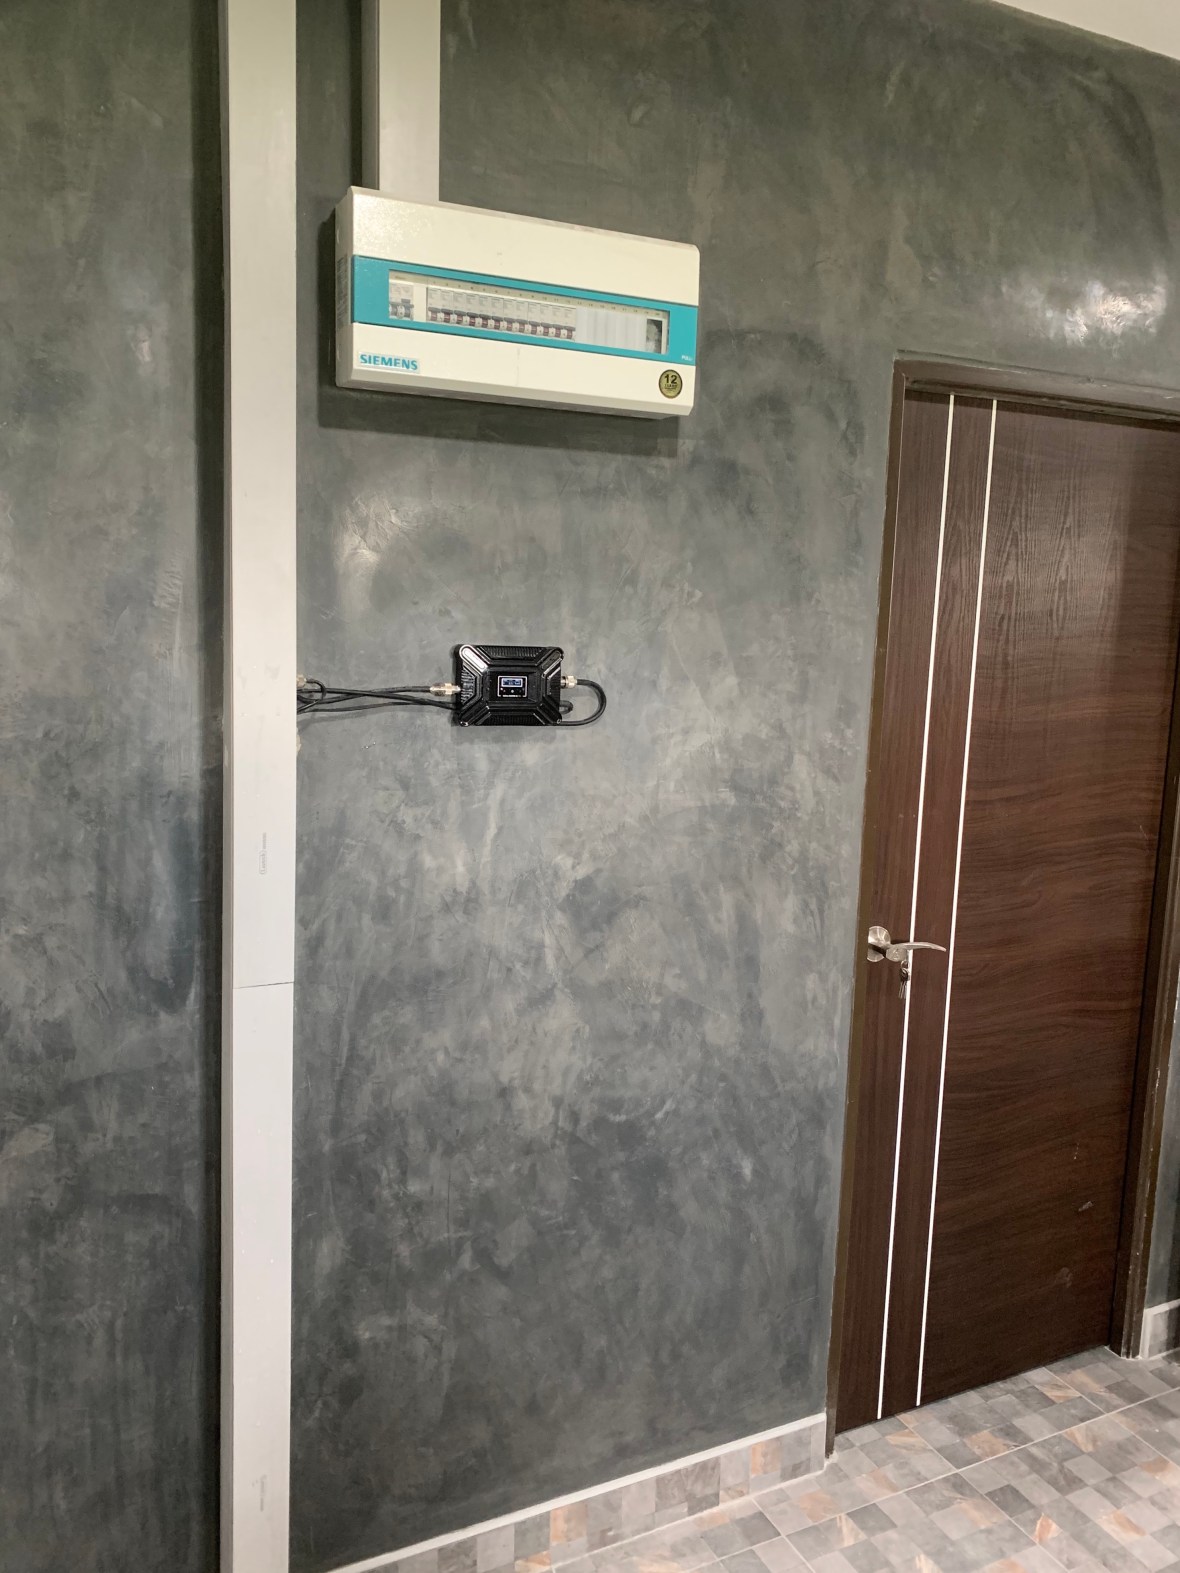
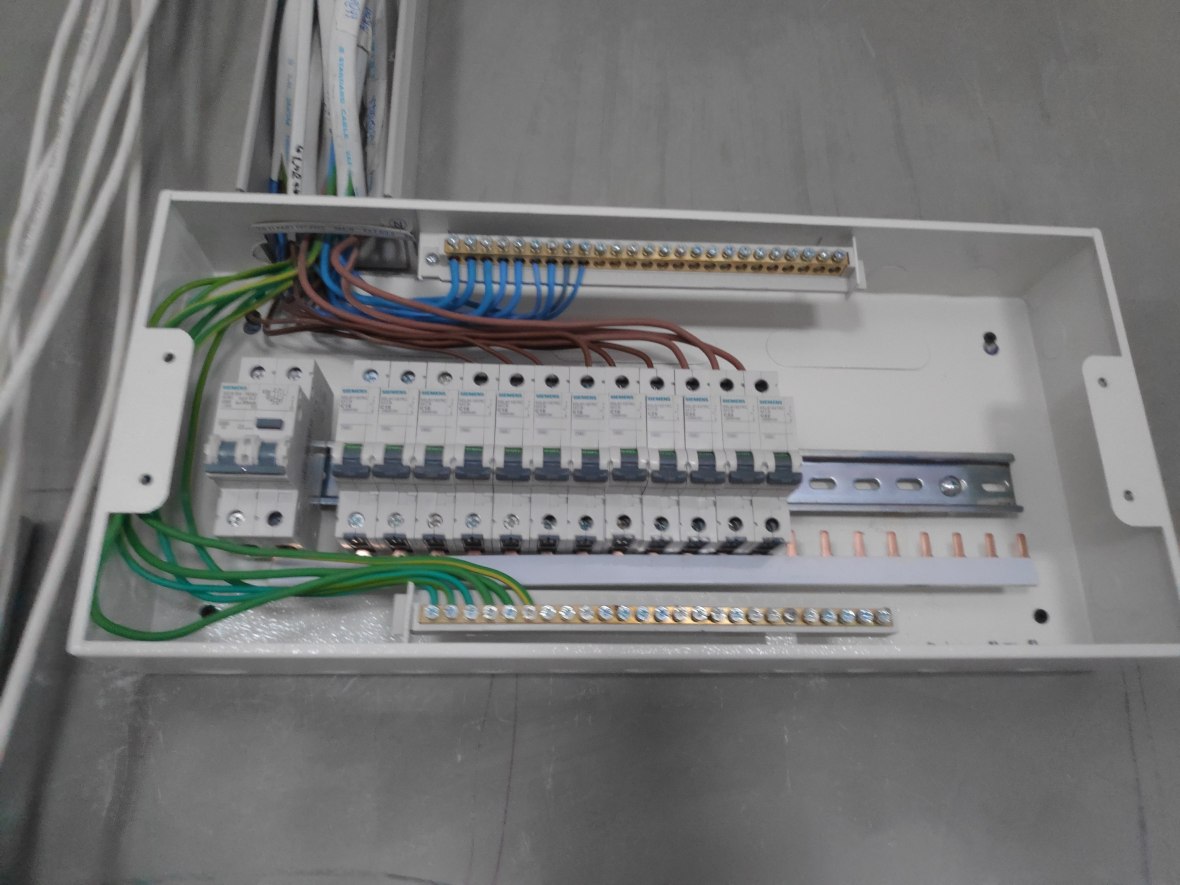 Nice neat job on the wiring for one of my three consumer units.

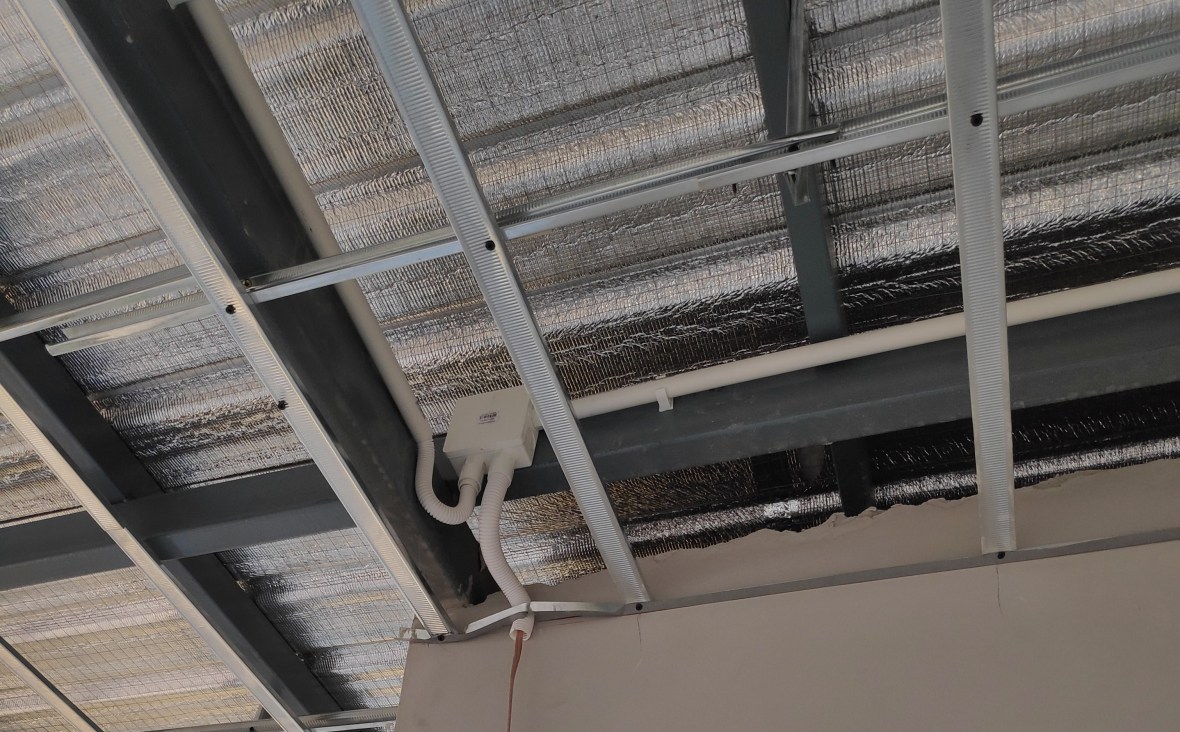
 Ducting for the energy recovery ventilator, which brings fresh air to all rooms. I had to install all the ventilation system myself as it was too complicated to explain to the Thai builders, who had never seen anything like it before.
 I personally installed approximately 300m of Cat 6 cable for home networking with another 100m or so being installed by the security camera company.
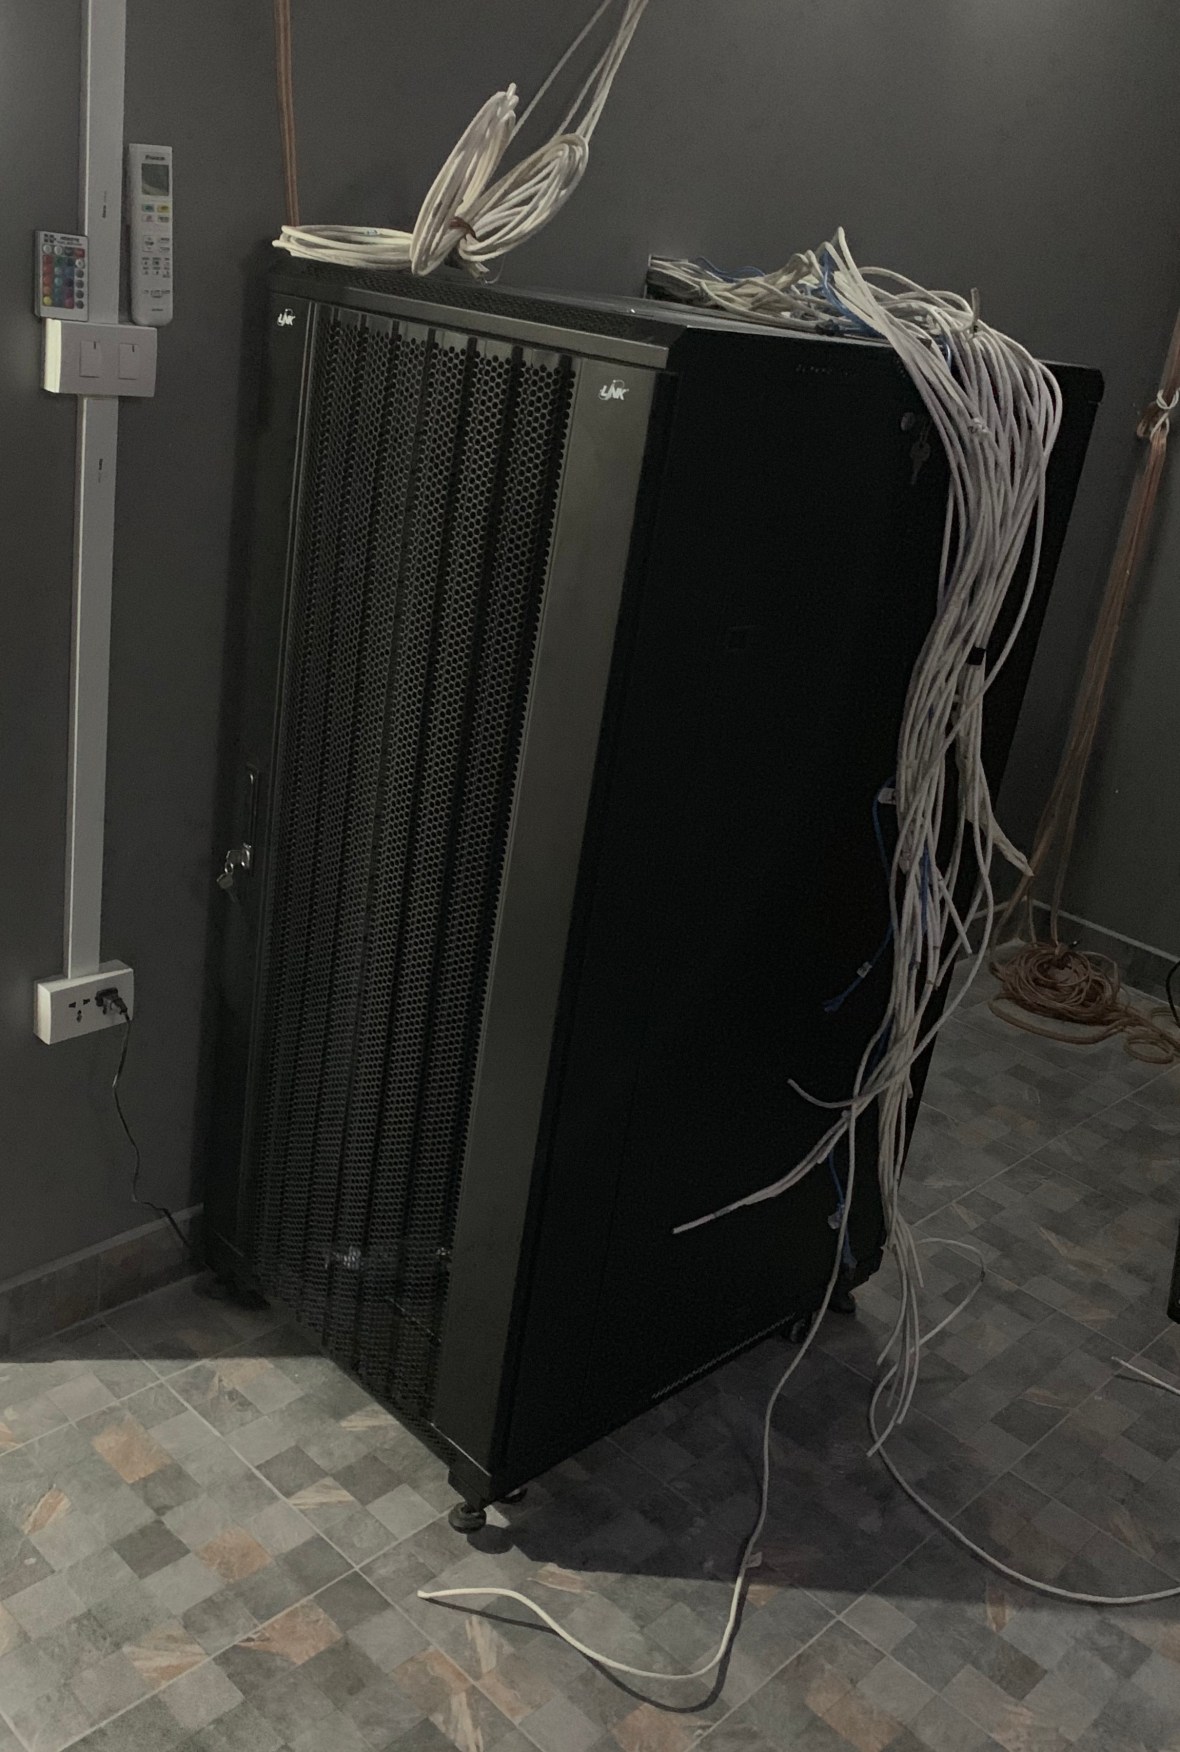
 27U Network Server Rack – This is a floor standing cabinet, which probably takes up no more room than the usual 6U wall mounted rack.
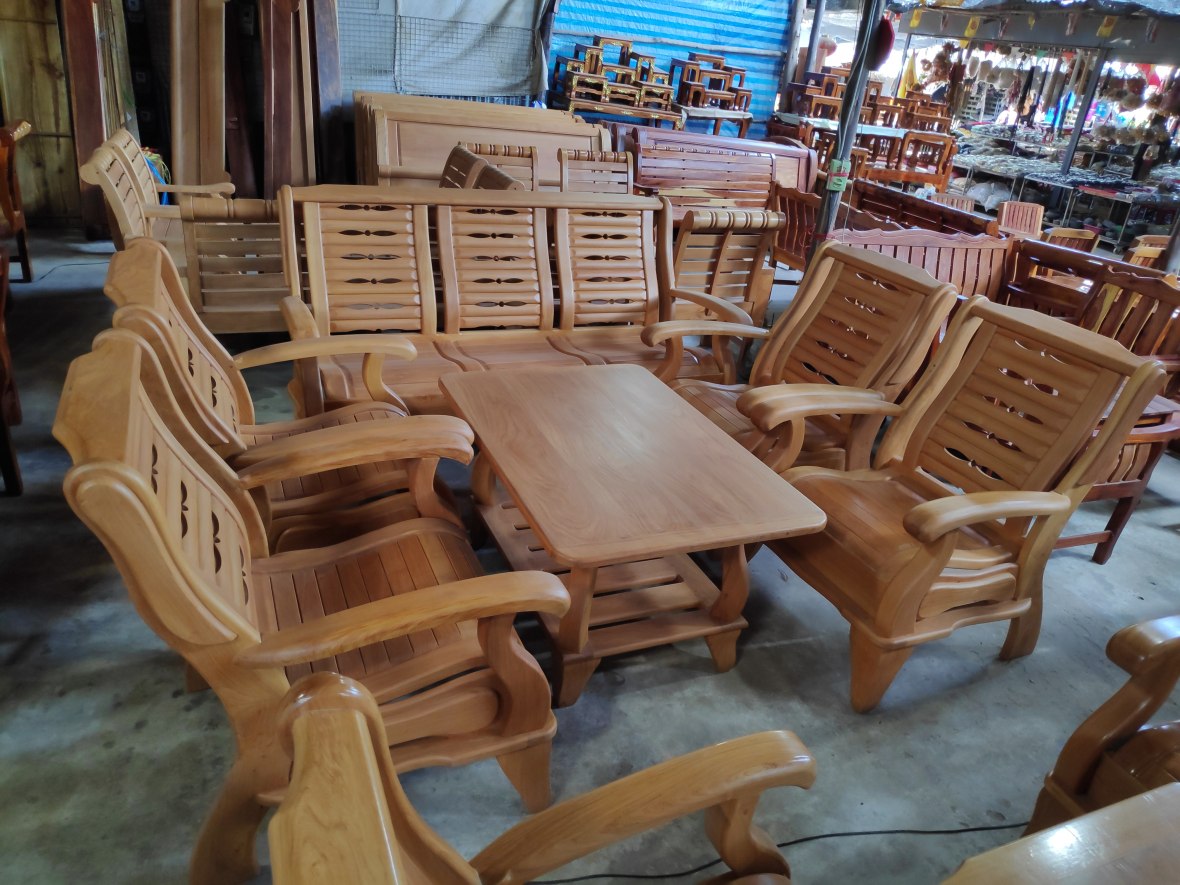 Bought some furniture for the third floor from the Cambodian market ฿30,000
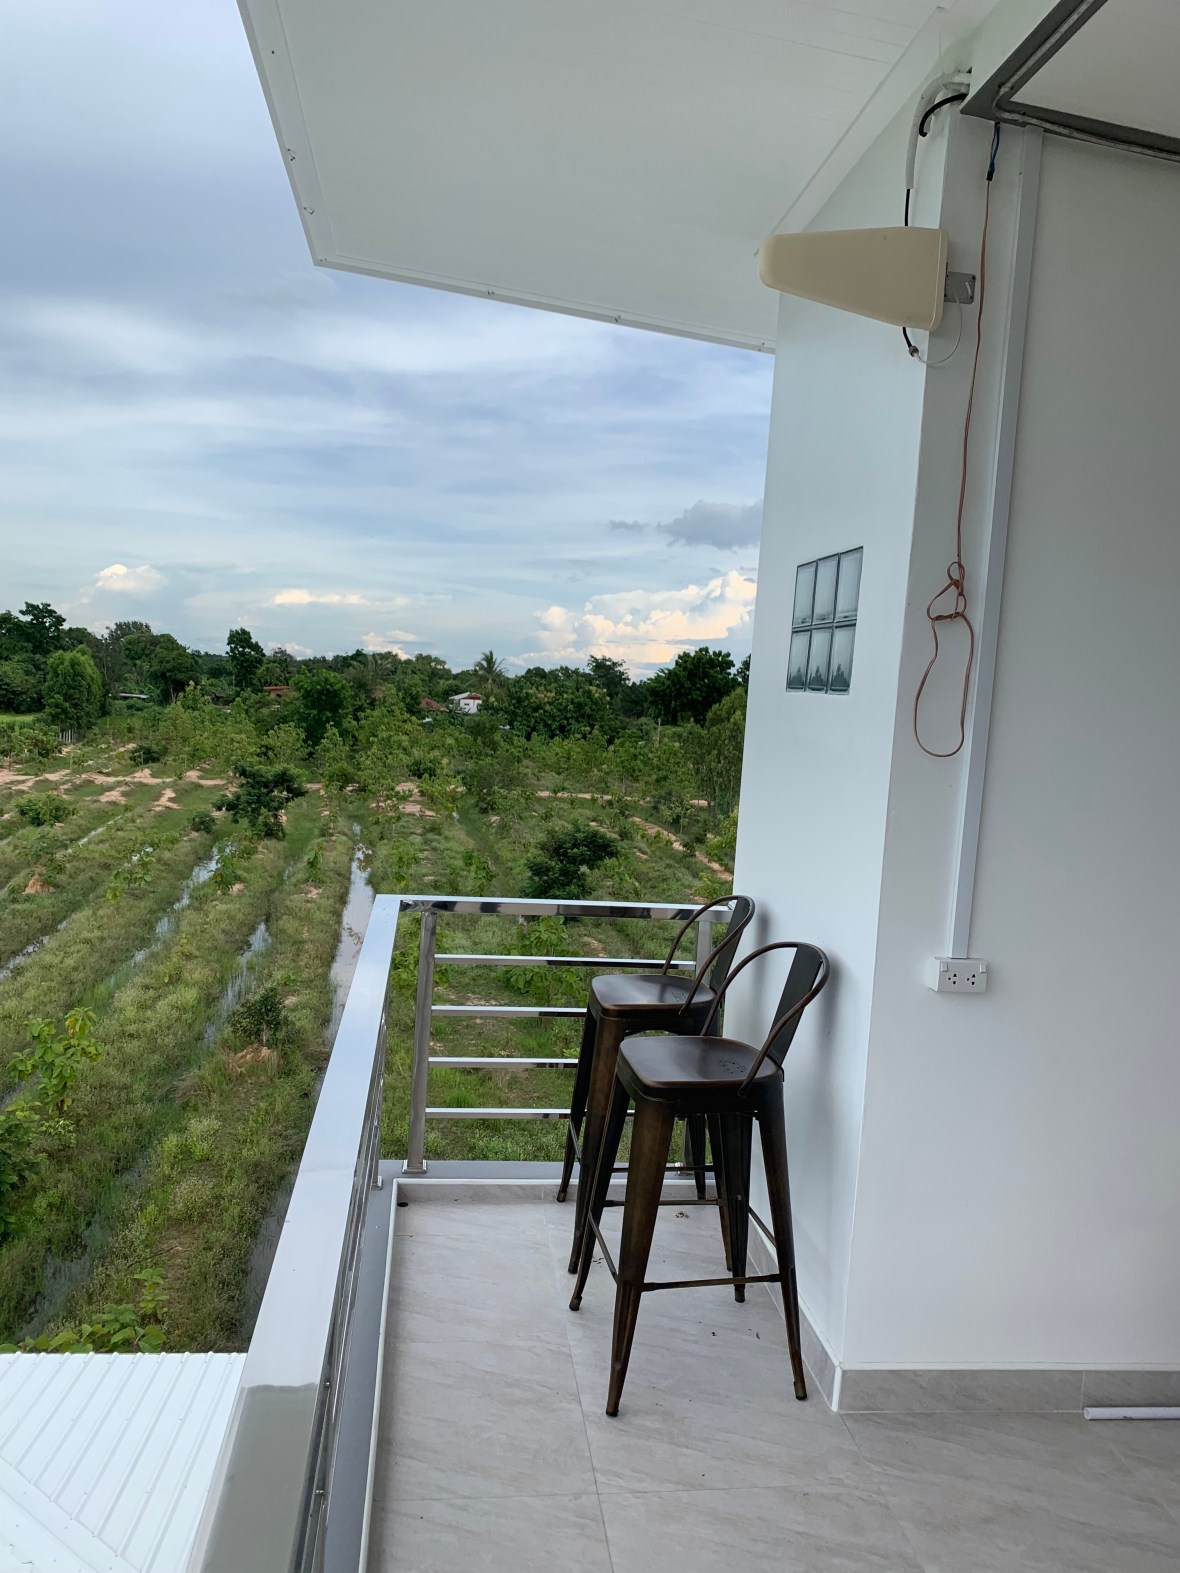
 Nice place to watch a tropical storm
 Visited Piyanas HiFi store in Bangkok to demo some kit for the home cinema
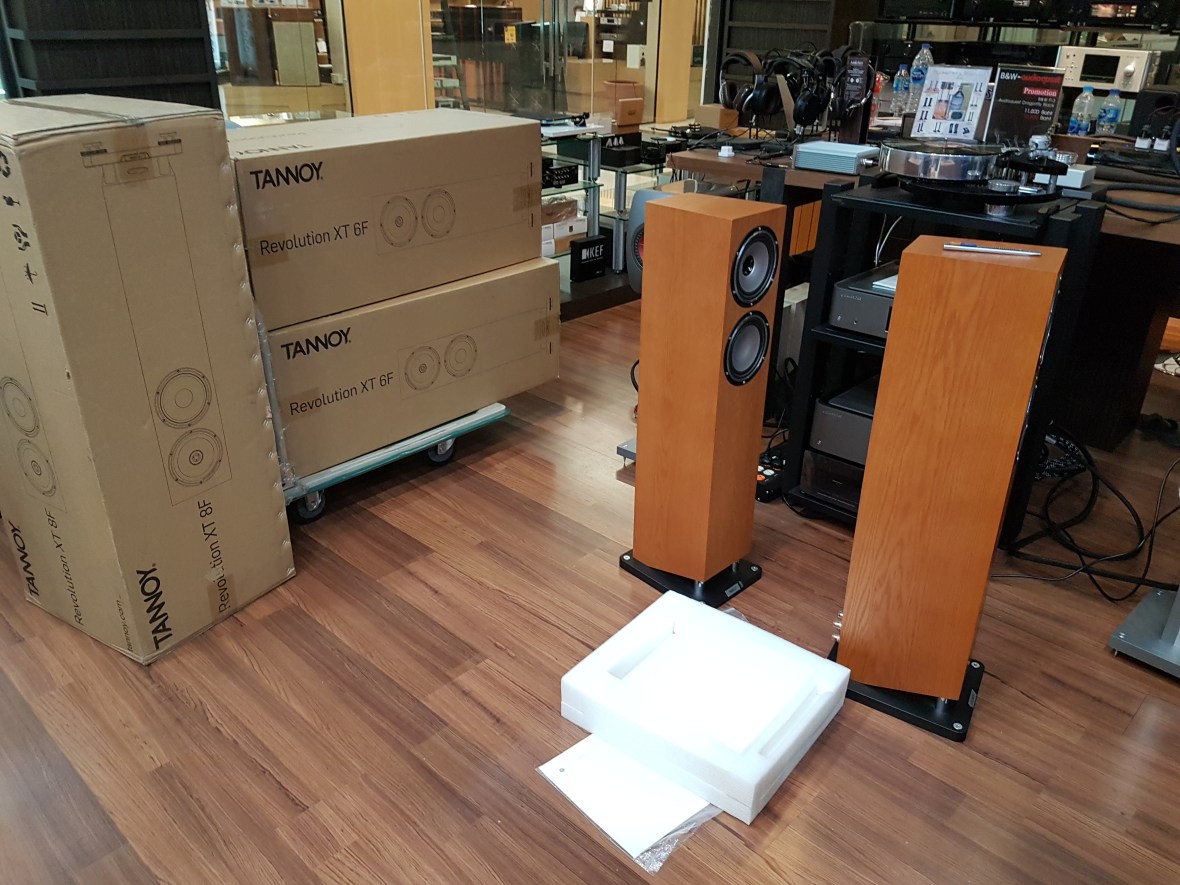
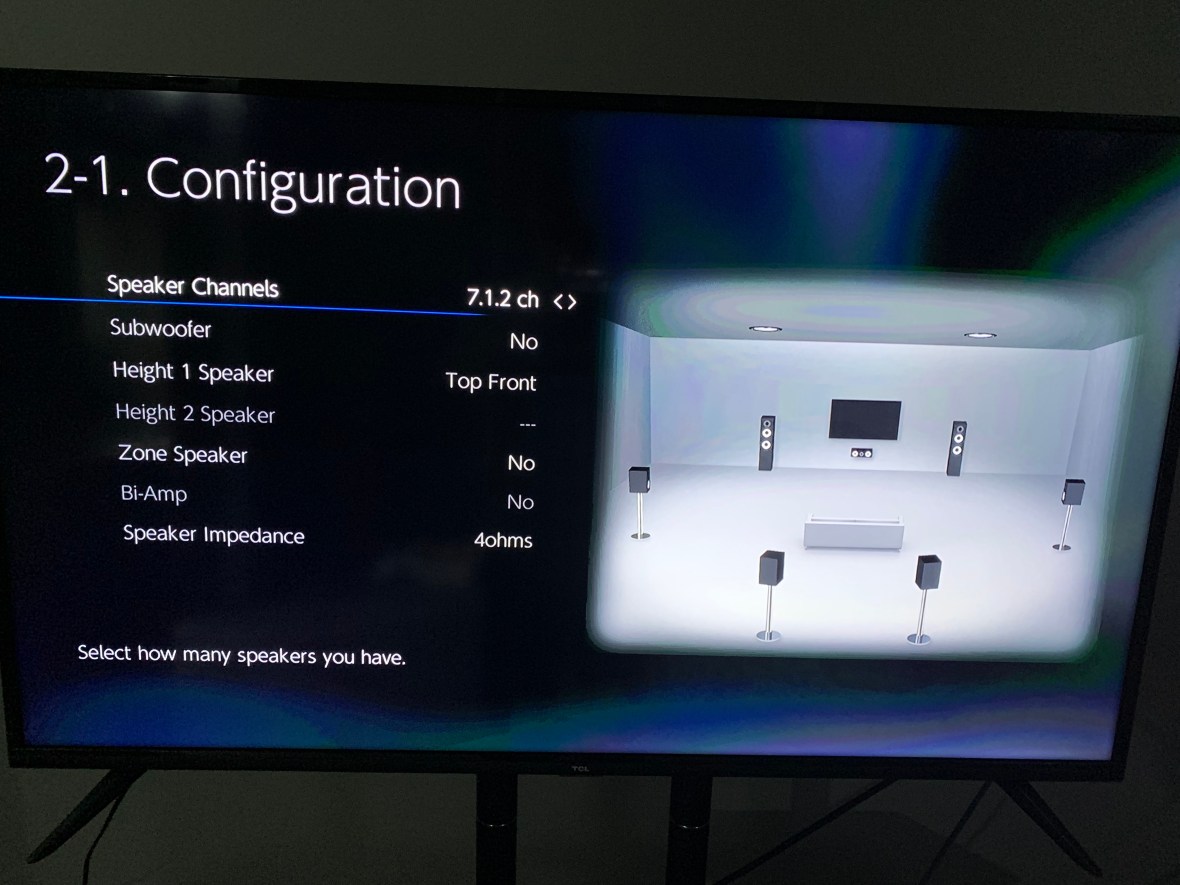
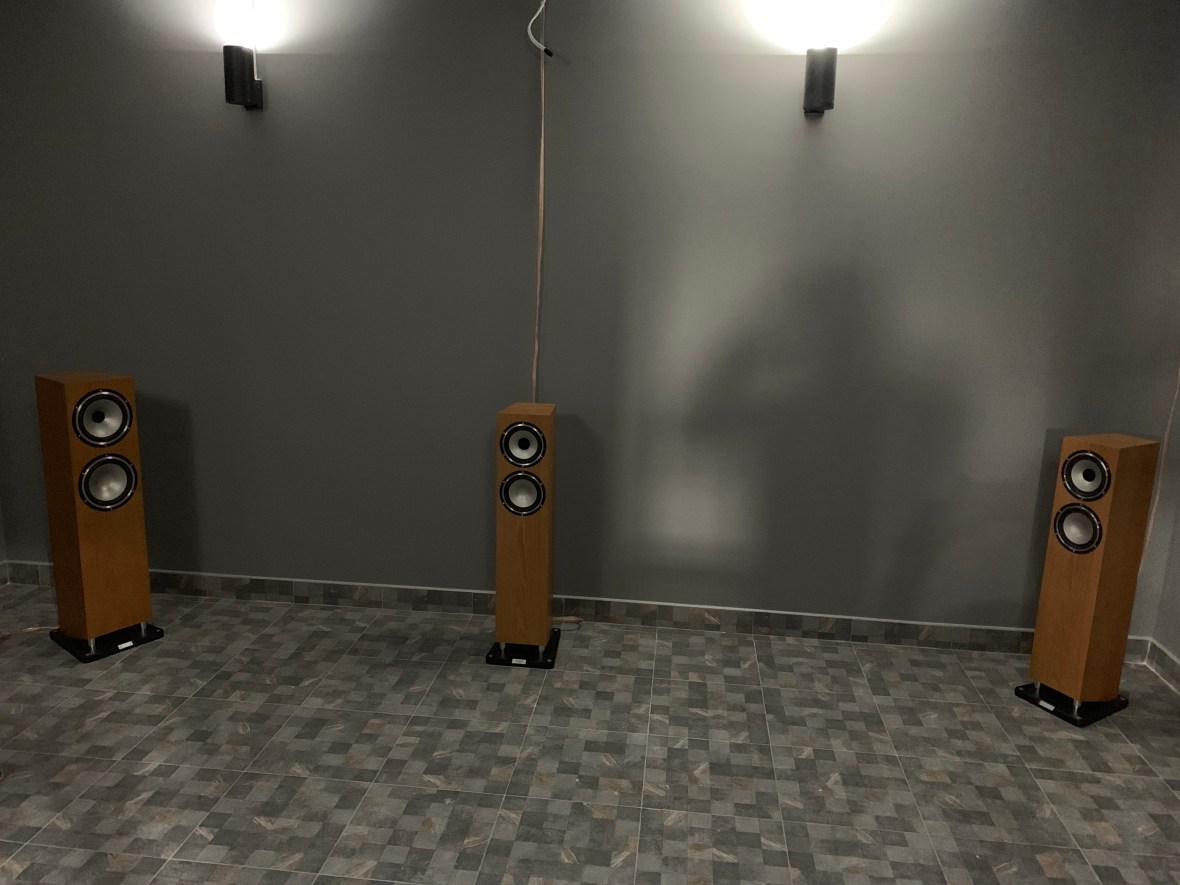
TANNOY REVOLUTION XT-8F x2 front speakers with TANNOY : REVOLUTION XT-C x1 center channel. TANNOY : REVOLUTION XT-6F x4 for side and surround.
You can hear the REVOLUTION XT-8F here and a review of them here
https://www.whathifi.com/tannoy/revolution-xt8f/review
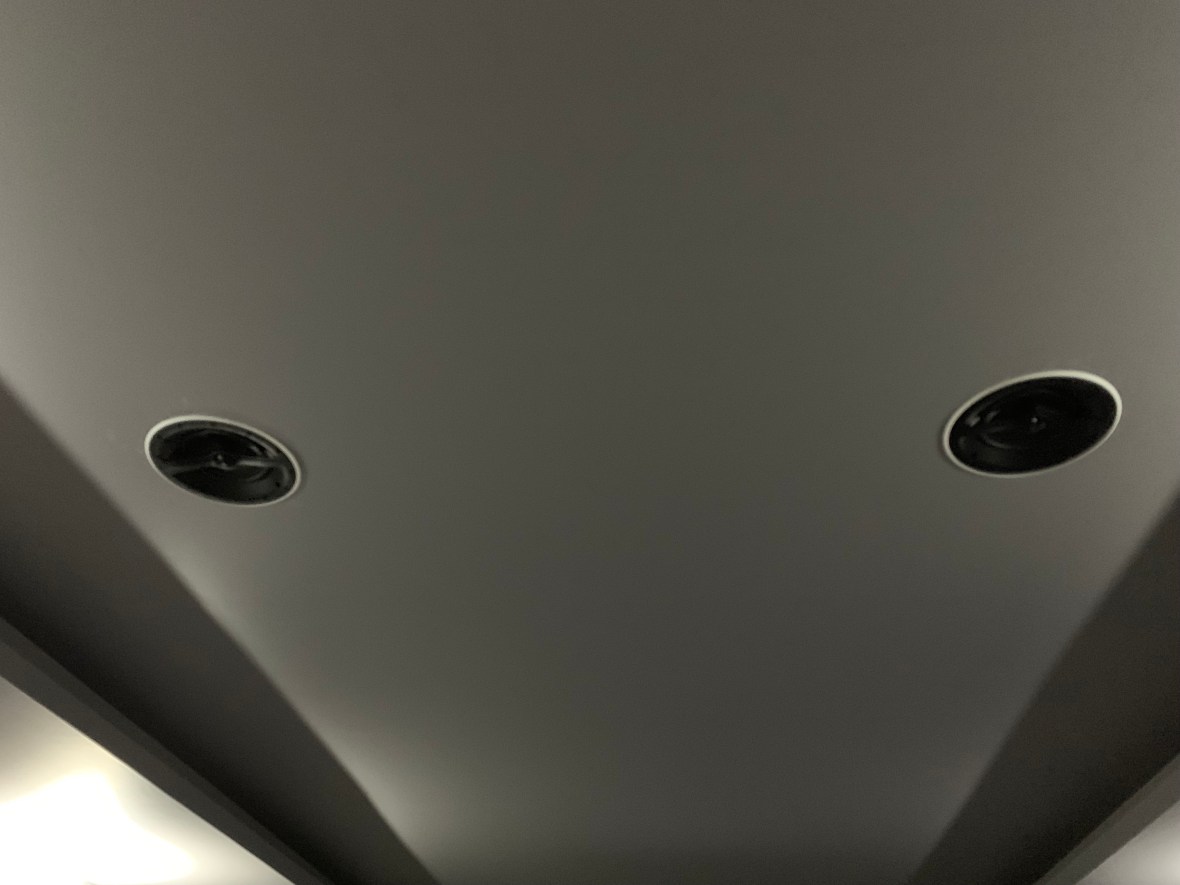
B&W CCM-362 x2 IN-CEILING speakers to support Dolby Atmos

A/V Receiver: ONKYO : TX-RZ730

Total cost ฿163,600
 Having listened to the CAMBRIDGE AUDIO :EDGE-NQ Network Player with Preamplifier and CAMBRIDGE AUDIO : EDGE-W Power Amp they will definitely be my next purchase, but at ฿258,000 it will have to wait until the house is finished.
I did demo a pair of REL Acoustics subs but will wait until I have accessed the cinema room dynamics before purchasing.
An Introduction to the Edge Series Cambridge Audio
We attended the Architect Show in Bangkok

Bought a Sliding gate automation system which we will be installing later

 Bought some Mr Ken Fans with DC Motors and got a show discount
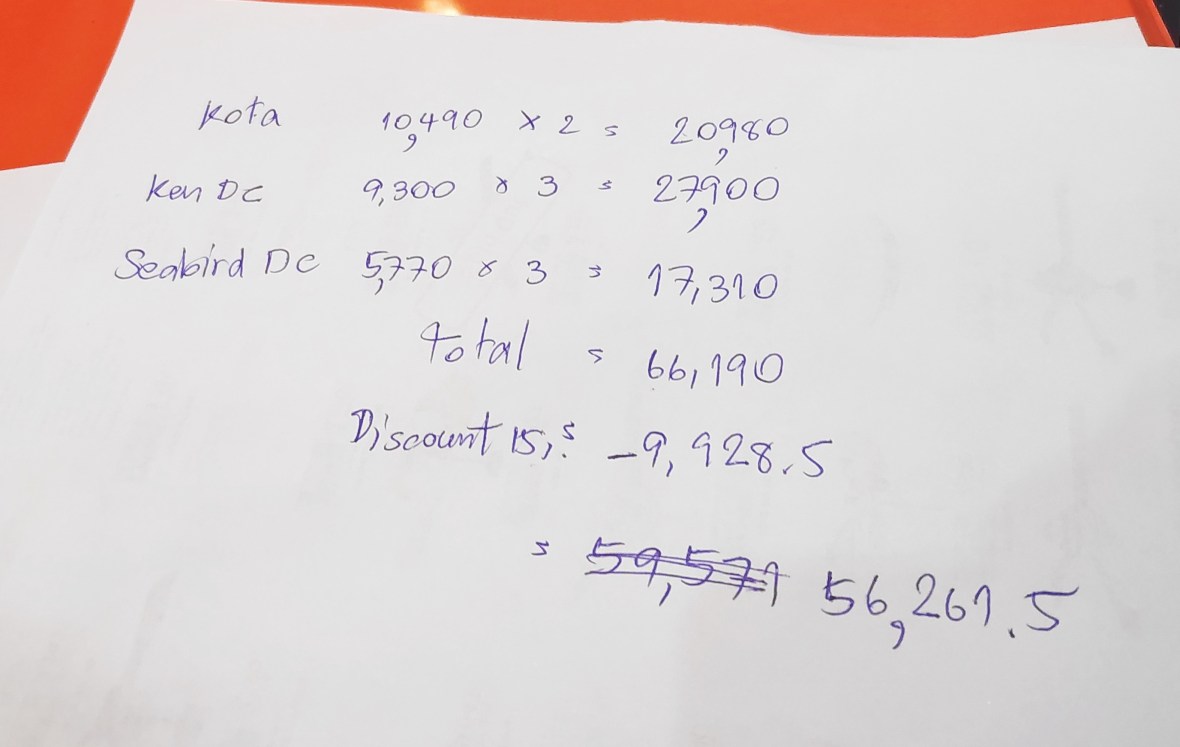
The fans are beautiful, very efficient and very quite. As they all have DC motors, they are very efficient.


Lots of smart home kit available:


 I was even able to pick up a smart controller for my Energy Recovery Ventilator (top)
The stainless steel doors have been installed: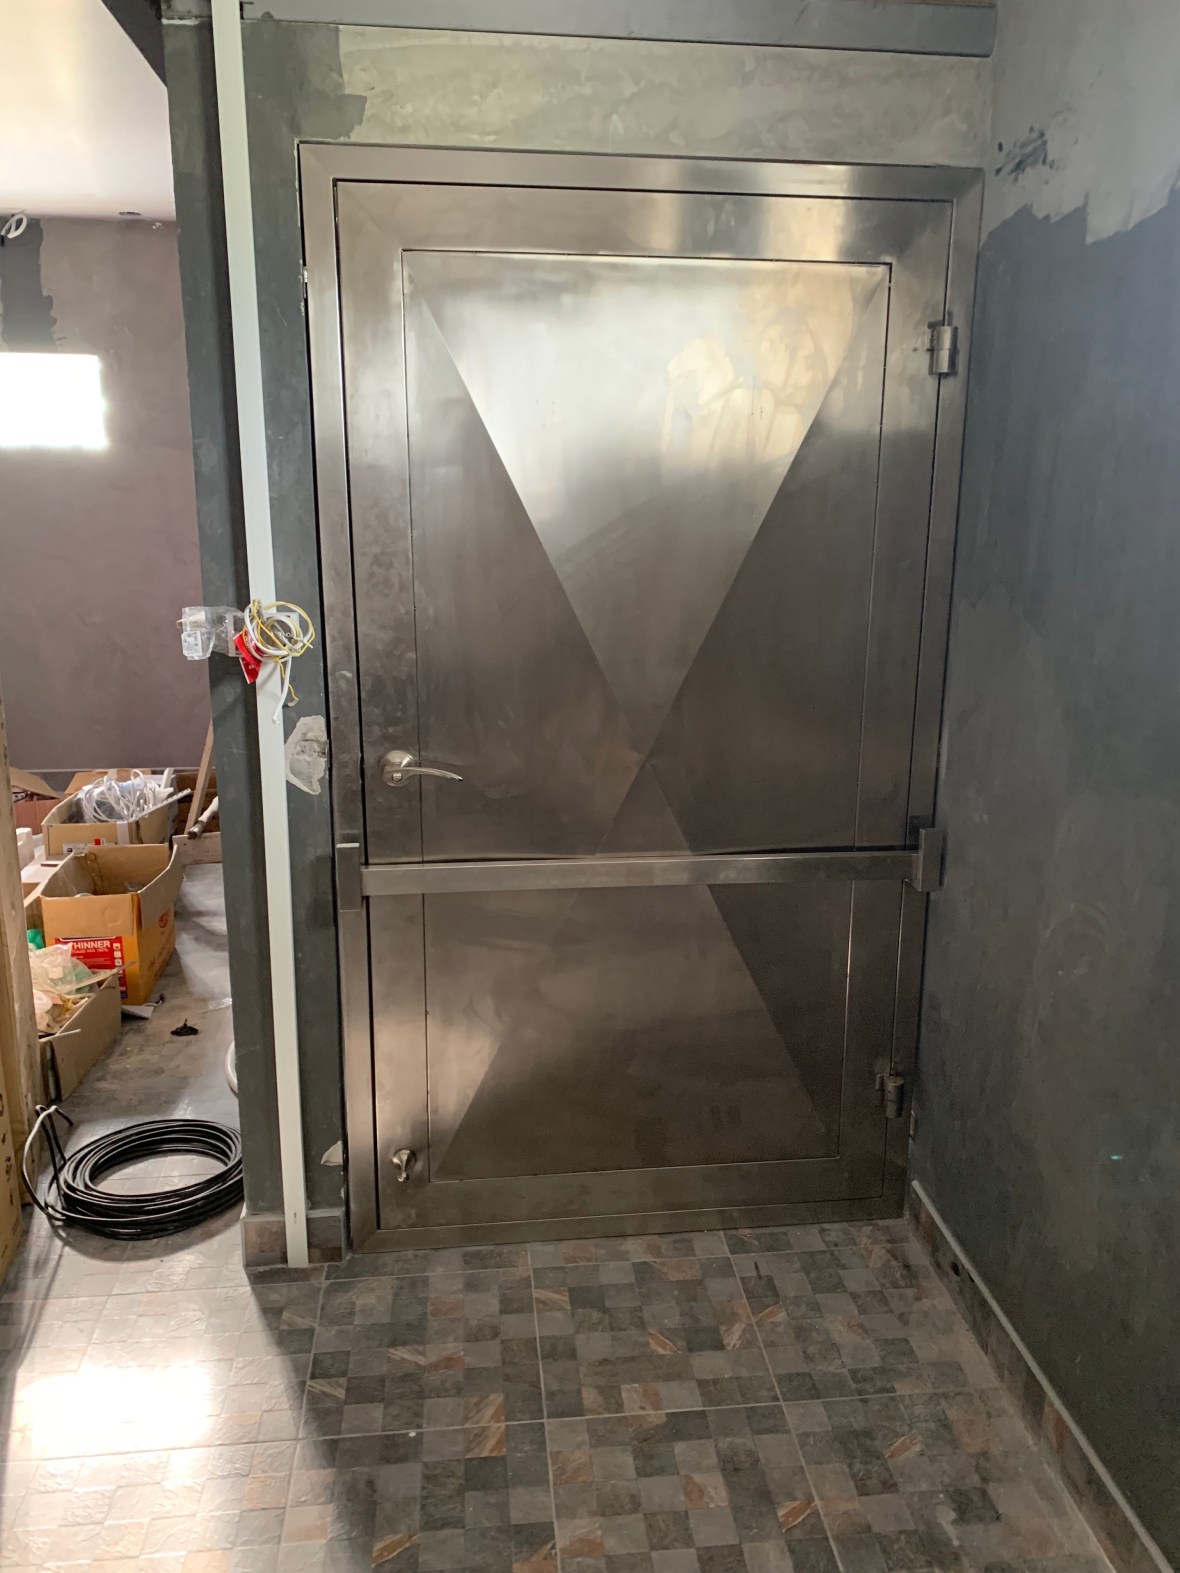


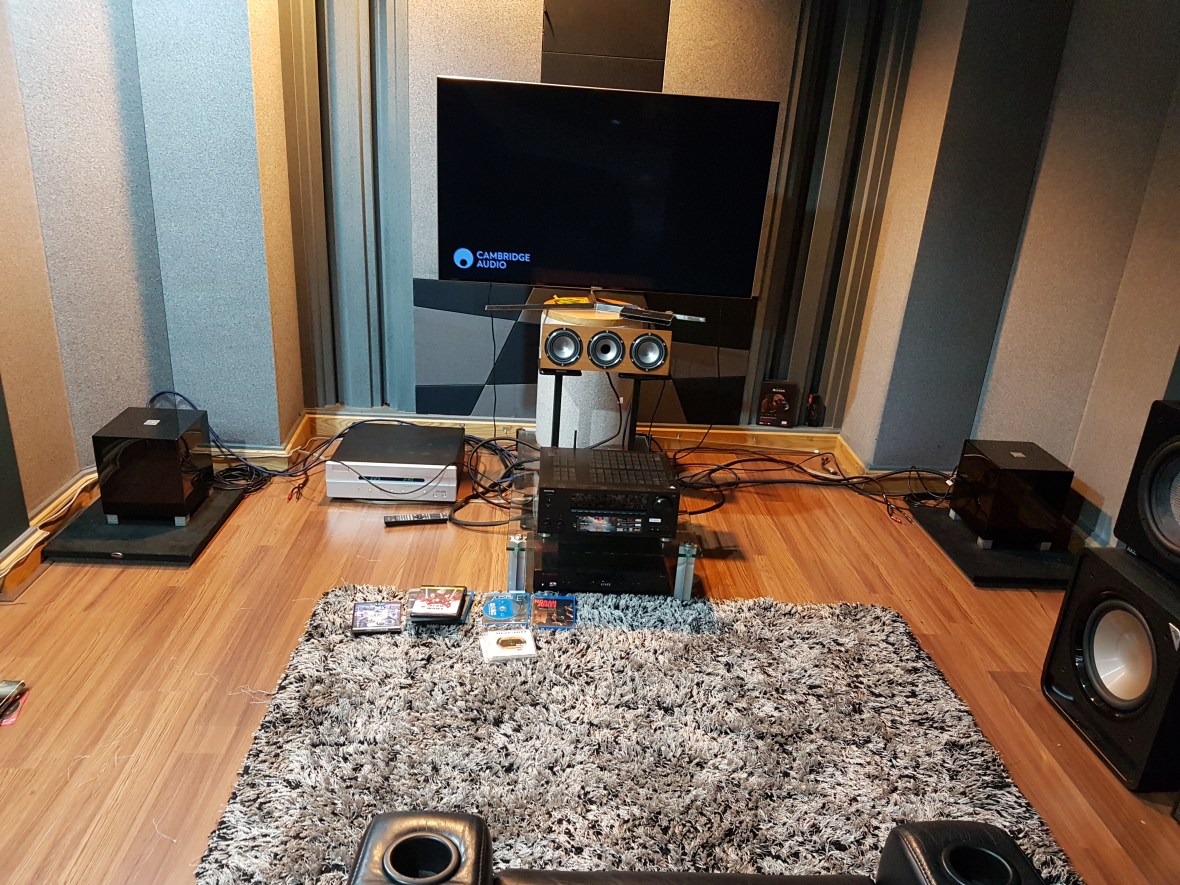
Did a little testing of the home theater today. I did a calibration for the 7 Tannoy speakers and the B&W Dolby Atmos ceiling speakers. I have ordered the screen but not the projector (The prices are falling all the time) so we used a 50 inch 4K TV I was planning to use with security camera feeds. I am not sure I need subs, the Tannoy 8s have great bass. We have bought some acoustic foam and will be using roomeqwizard.com acoustics analysis software for measuring and analyzing the room and loudspeaker responses, before placement. My girlfriend’s brother who is an engineer came to help, he wanted to know what the sound was like, because he said for the same money, he could buy a Thai mobile disco system that would fill a 6 wheel truck!


Interior doors going in:
And the rest of the windows outside the main block:
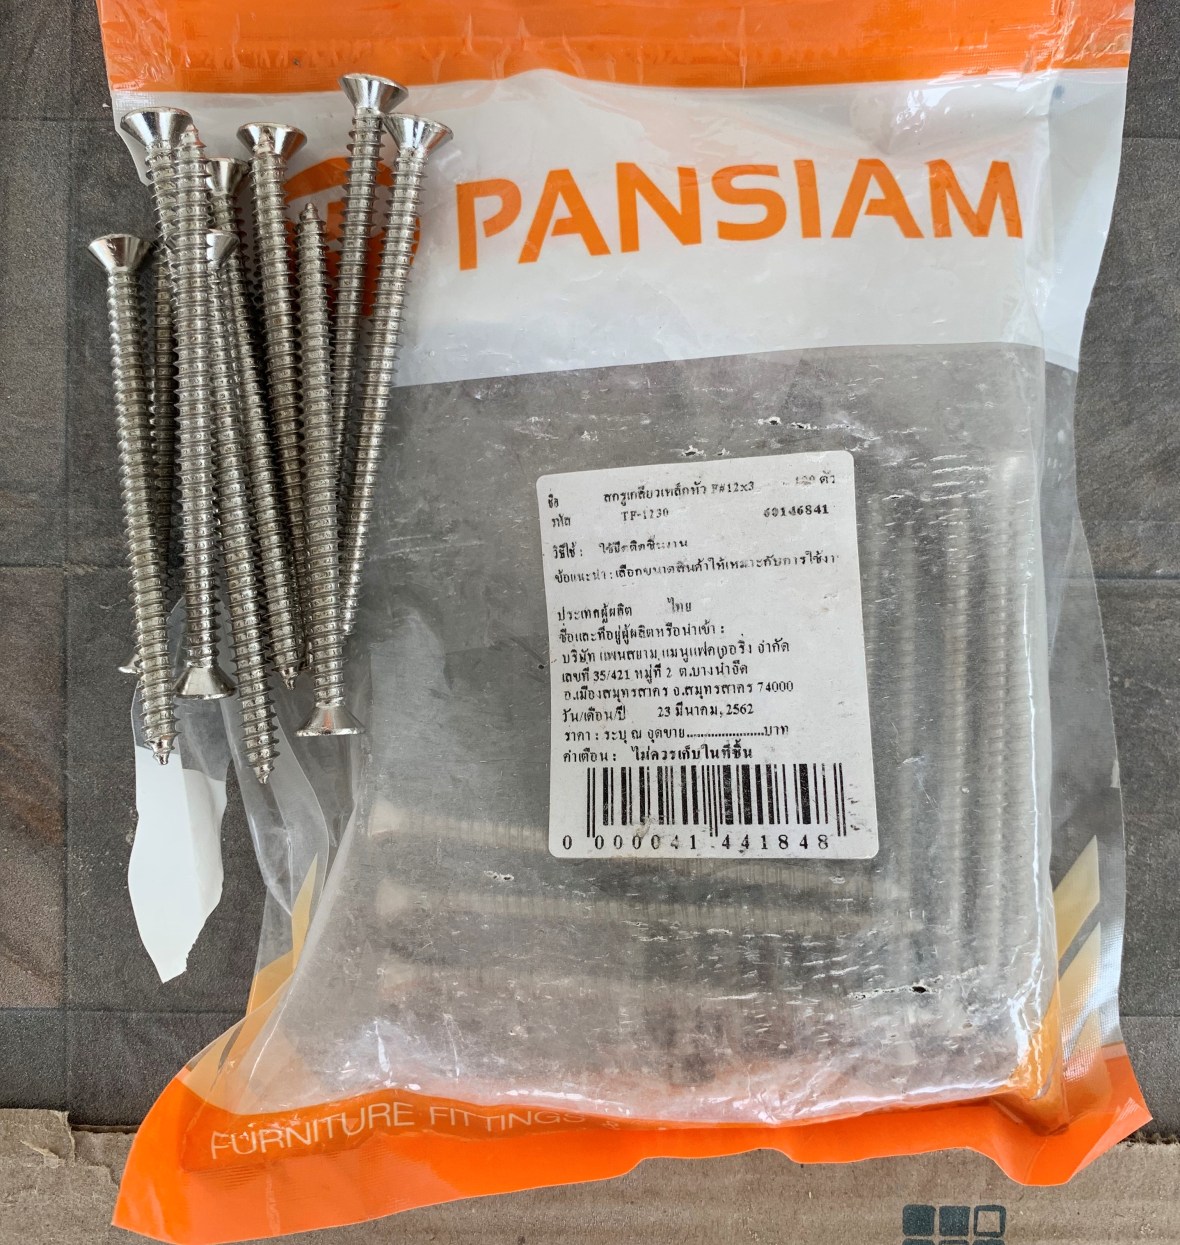 With extra longs screws into the concrete.
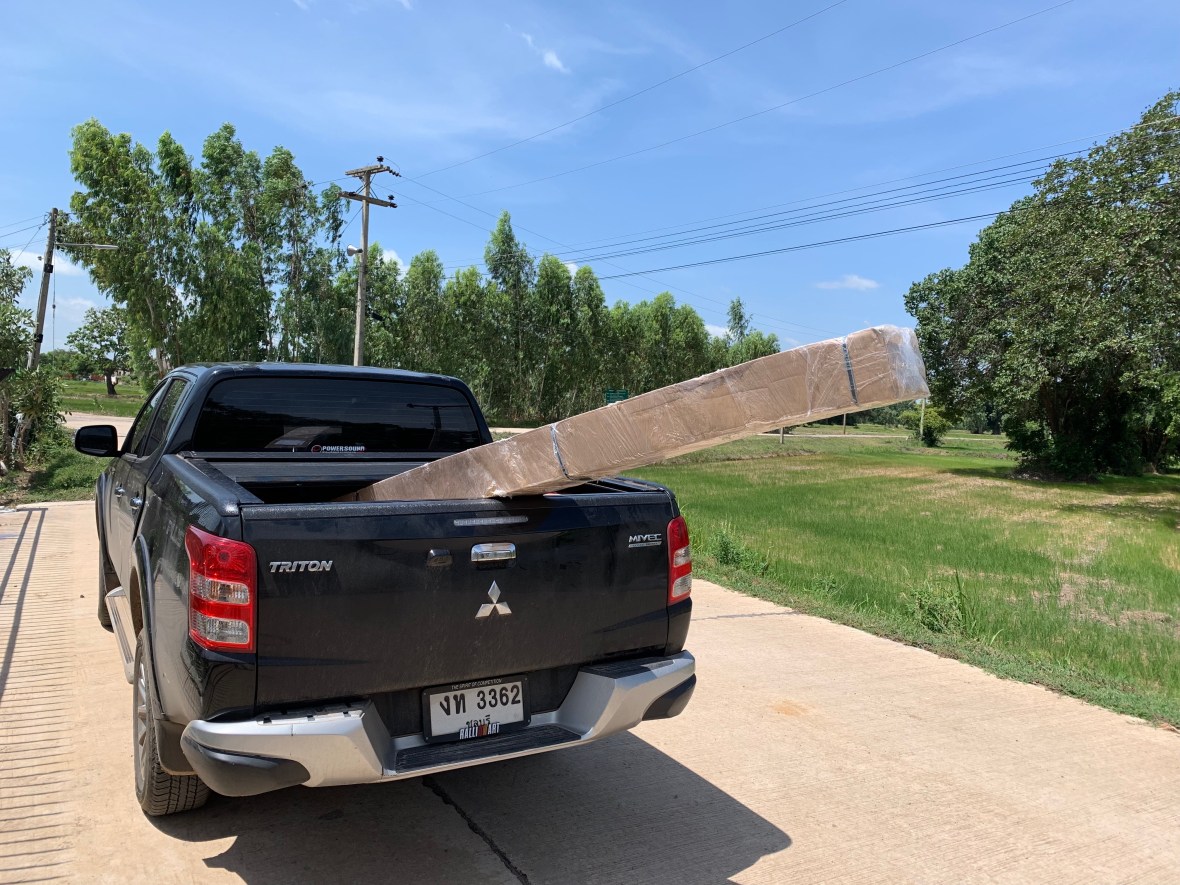
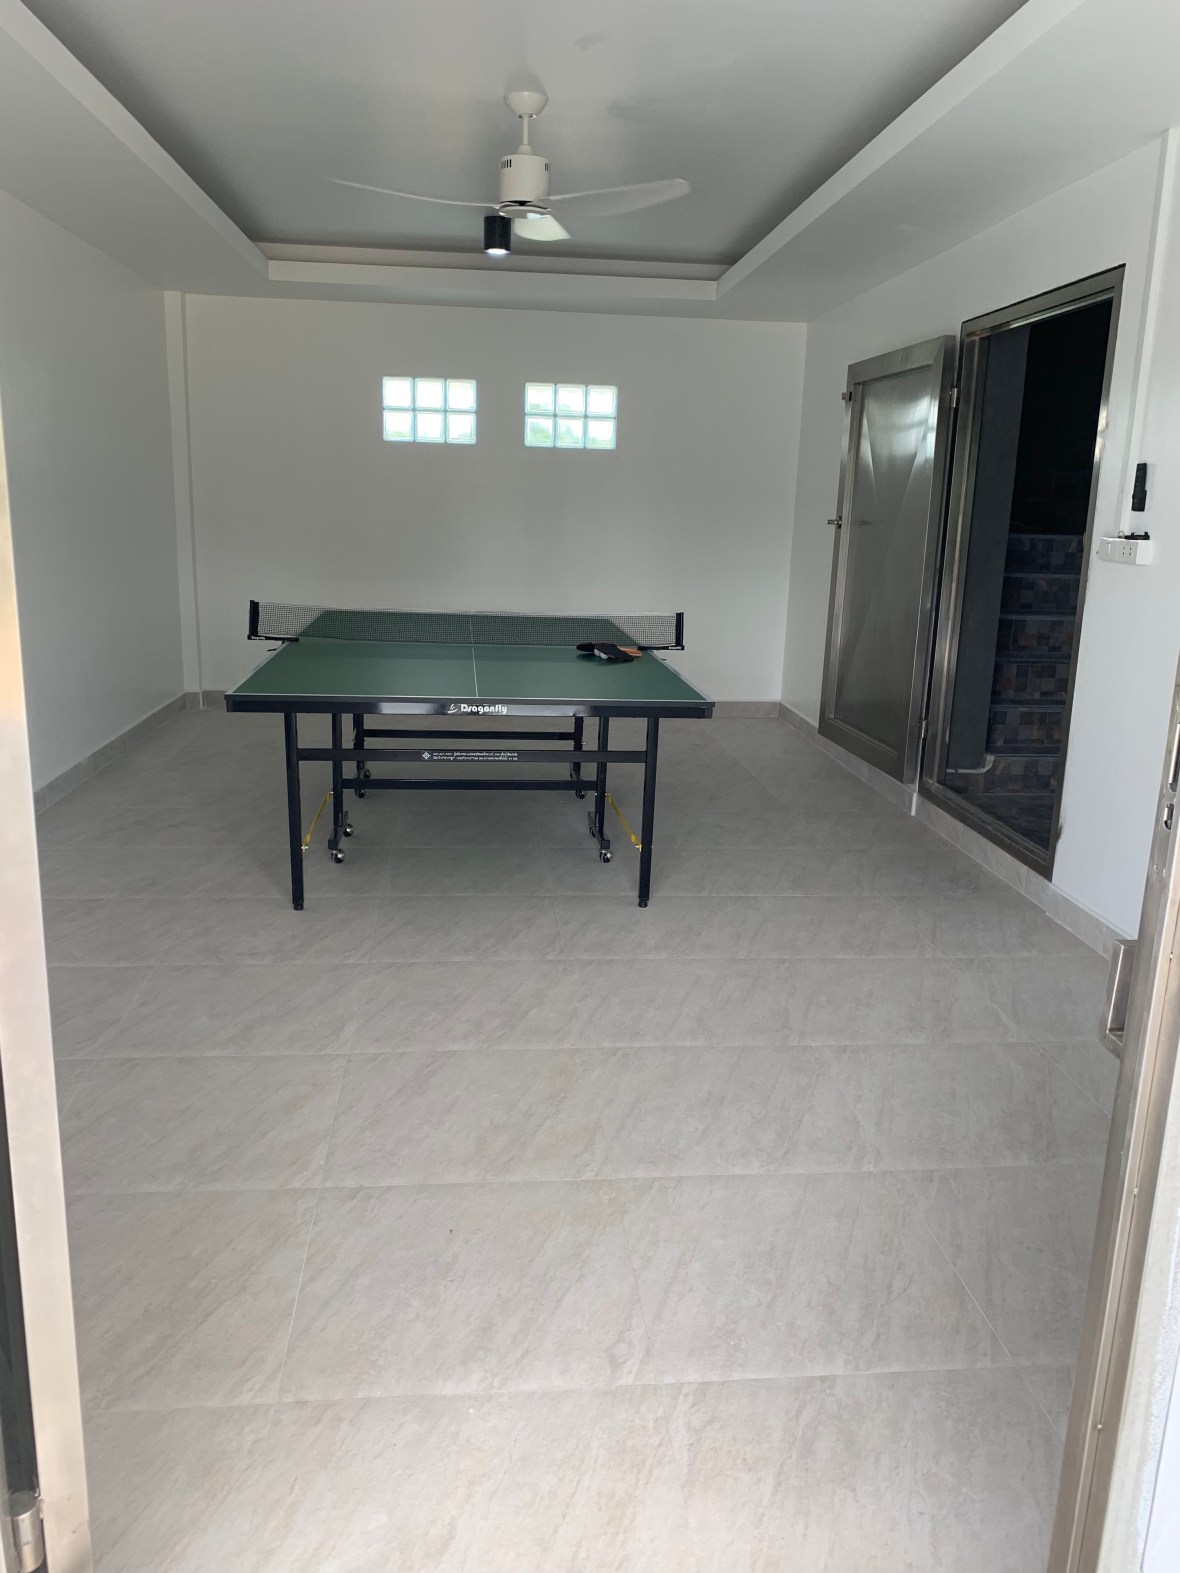 The house must be nearly finished if I am buying ping pong tables!
Air-conditioning:
Aircon serves two purposes, firstly to cool and secondly to dehumidify the house. I briefly considered using DC aircon units, but they require dedicated solar panels and dedicated batteries, they are also very expensive to buy in Thailand. So DC aircon for a spare bedroom would have solar panels and batteries that were not being used if the room was empty. I prefer to pool my solar production and storage to use it where it is needed.
The main concern with running aircon off a solar system is how to run aircon at night off batteries. My system utilizes a hybrid inverter so I can always pull from the grid if I need more power. However, I want to design my house to be off grid for normal use.
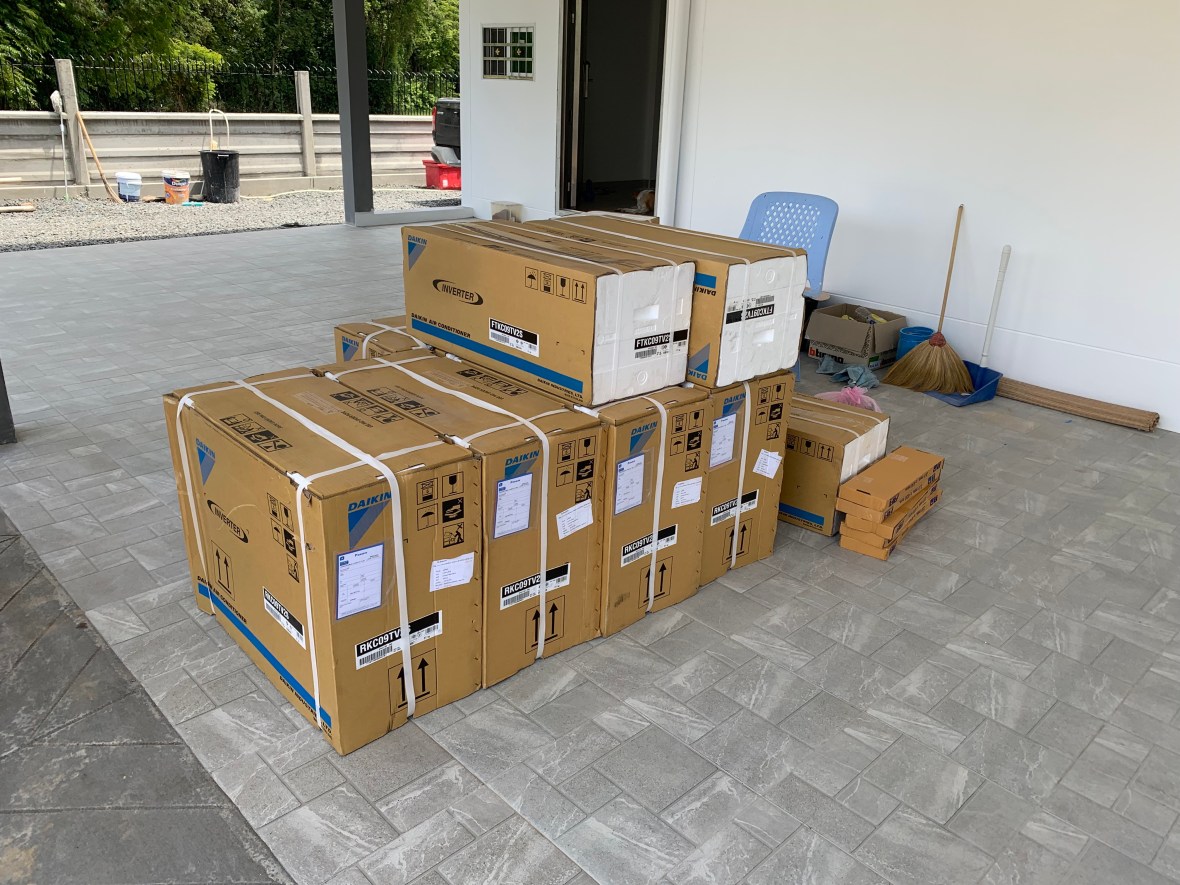
The choice of aircon units: I chose the smallest BTU units I could find using the smallest number of watts. I chose 8,500 BTU Daikin Super Smile Inverter II it uses 640w in normally running and an “intelligent eye” system which tracks movement and reduces power if the room is unoccupied. 5 units installed was ฿100,000.
These Daikens use is an environmentally friendly refrigerant called R32. It possesses a cooling capacity greater than Coolant R410A used in most units in Thailand, reducing strain on the compressor. This results in rapid cooling and energy efficiency.
Each refrigerant has a Global Warming Potential (GWP) with CO2 used as the base. CO2 has a GWP of 1. R410A has a GWP of 2,088 meaning that if one kilogram is released into the atmosphere it would have 2,088 times the harmful effect of one kilogram of CO2. R32 has a GWP of 675.


 Aircon installation in a thunderstorm.
The next question that will come up is why fit the compressors at the front of the house and not at the back? The front of the house is where the vehicles will be parked, it is the south facing aspect of the house, while the back of the house is the north side and we will be eating on the back patio. I do not want it heated up by the compressors blowing. For my design, Form Follows Function.
I have tried to use dropped ceilings wherever possible to give me the option to use concealed lighting. With LED strips, the colour can be changed to match your mood.

The ensuite bathroom is outside the conditioned space, so there is little cooling costs apart from a fan and auto extractor fan.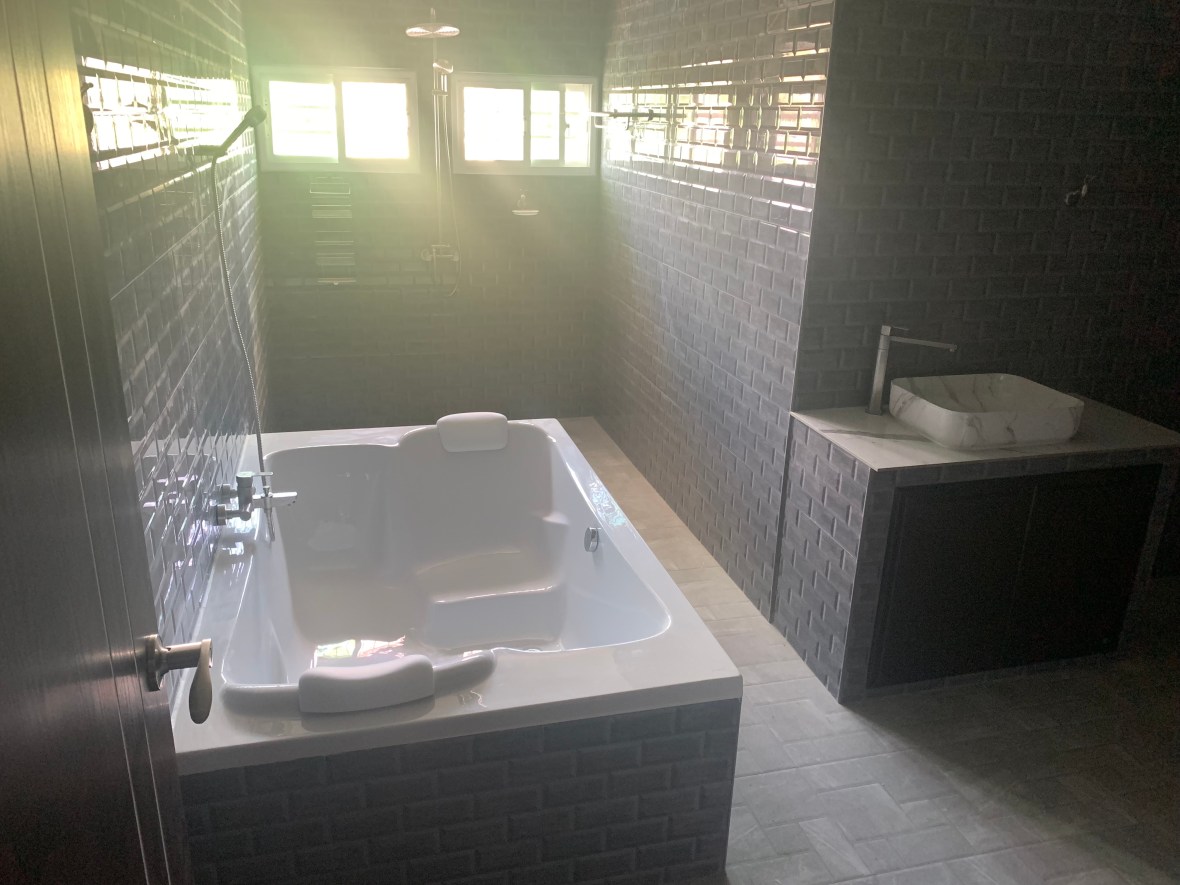


Hot water is free, so a bath is not a luxury and the waste water is recycled to water the garden.
The unusual shape of the master bathroom was due to wanting to have a guest bathroom with an access door on the outside of the house.

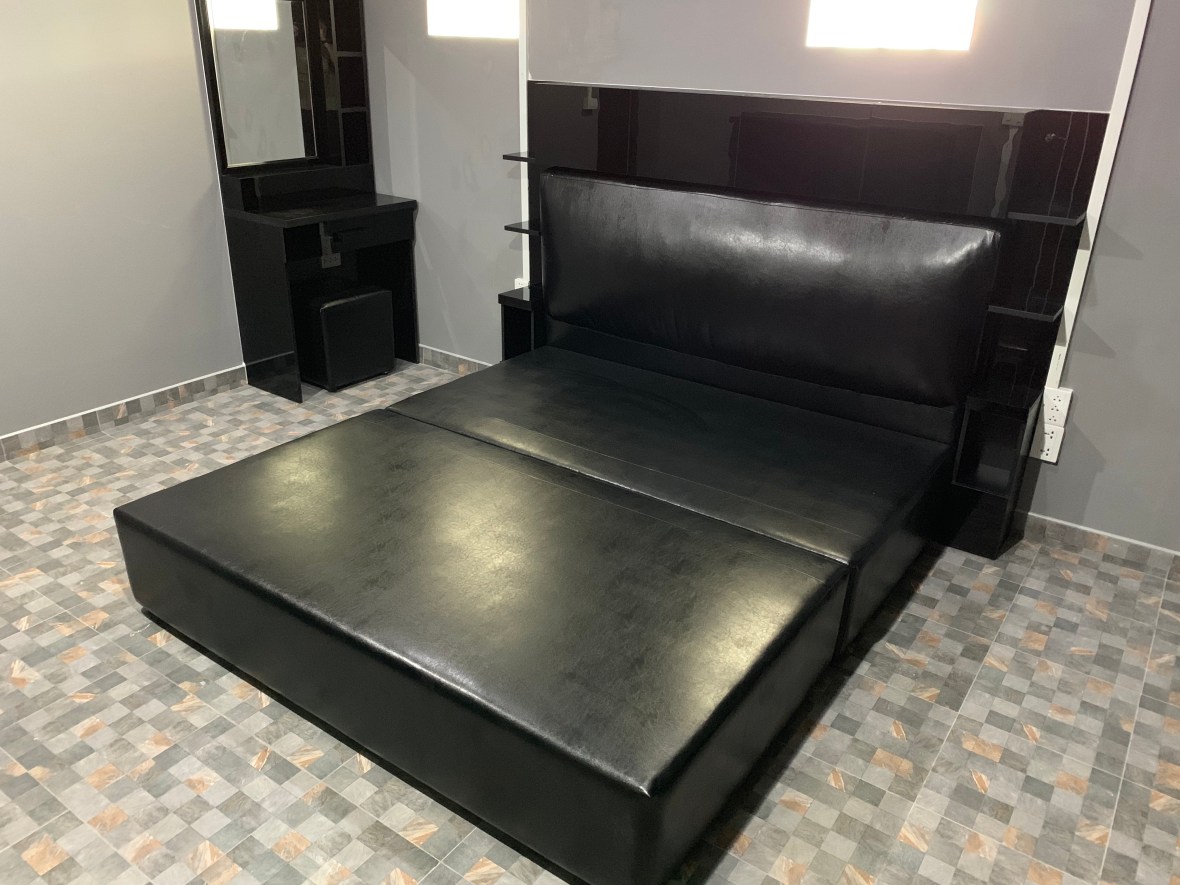
Built-in black acrylic bedroom furniture by Ice Furniture in Buriram :


First night staying in the house: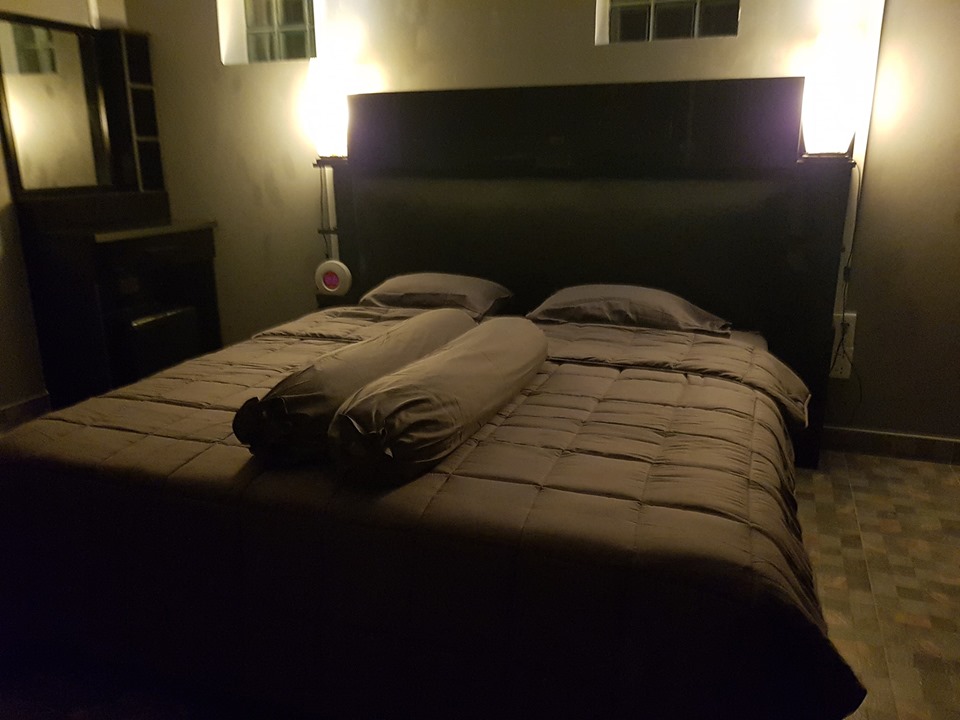
Solar Thermal hot water system worked great:

View back to the house from the pond at dusk:
The rainwater overflow combined with the rains we have had this month have done a lot to fill the pond
Starting to work on the networking:
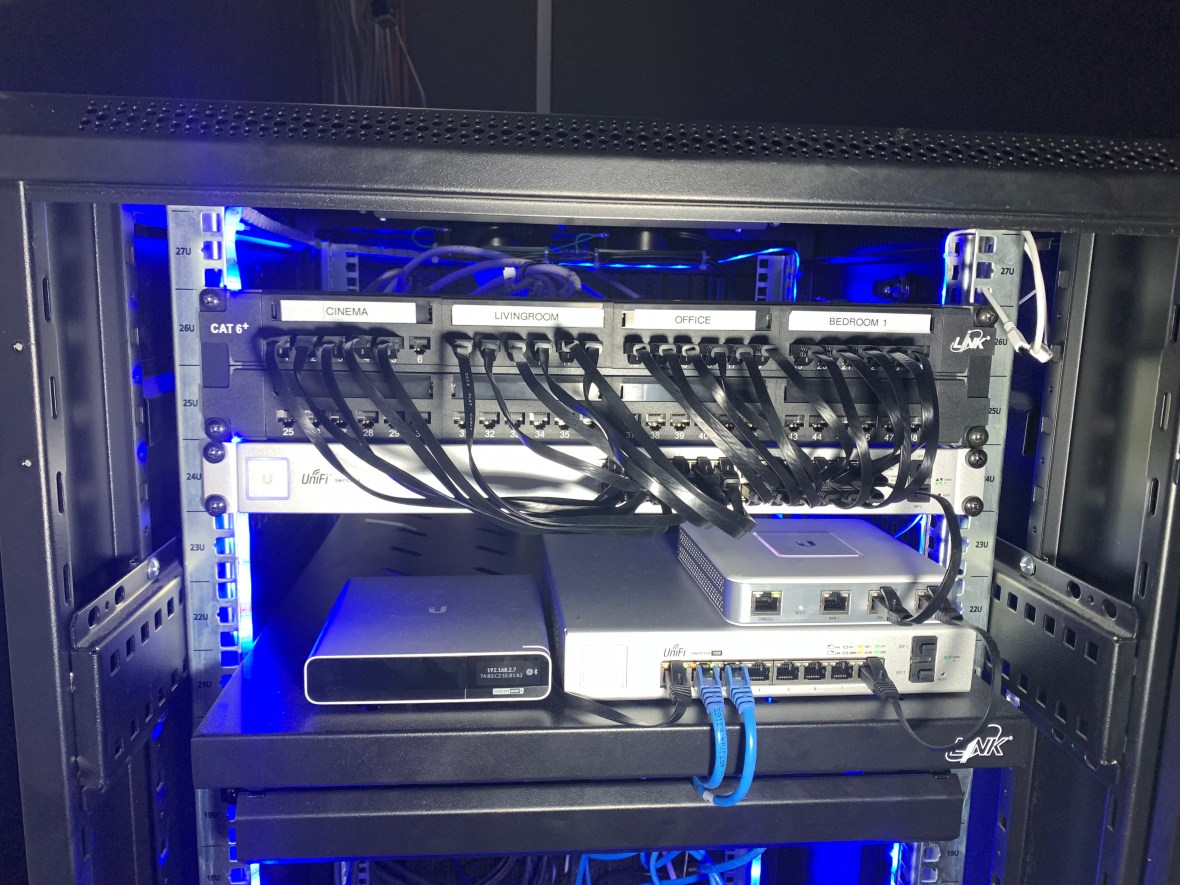
All the network cables end up on the second floor outside the Home Theater. The cables are all labeled at both ends and bundled by room.
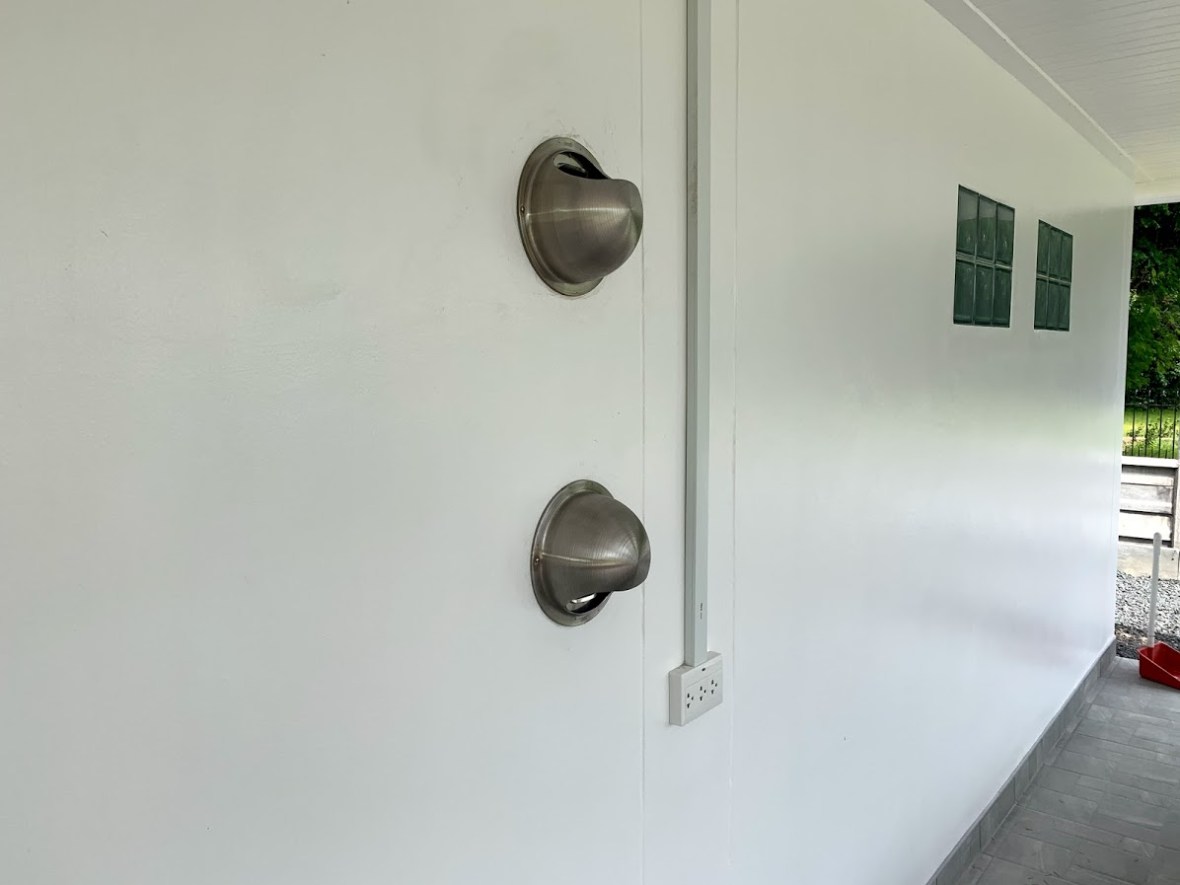
The first job was to tidy up the cables and then them punch through to the home cinema. Then set up the 3G Booster. Due to the fact that I have silver foil in the walls and the roof, the building is basically a Faraday Cage , which is great if you are worried about an EMP (electromagnetic pulse) but not so great if you are trying to get a 3G signal from inside the house. So I have an antenna on on third third floor pointing at the cell tower:
linked to a booster box and 3G aerials on the second and ground floors:
The next job for me was to terminate the network cables into a patch panel in my network cabinet:
I initially installed the patch panel backwards, so that I could see more clearly what I was doing and have a firm base to punch down the cables.

Label the cables going into the patch panel and the corresponding keystone jacks for the wall sockets

Then strip the cable and punch it down into the patch panel
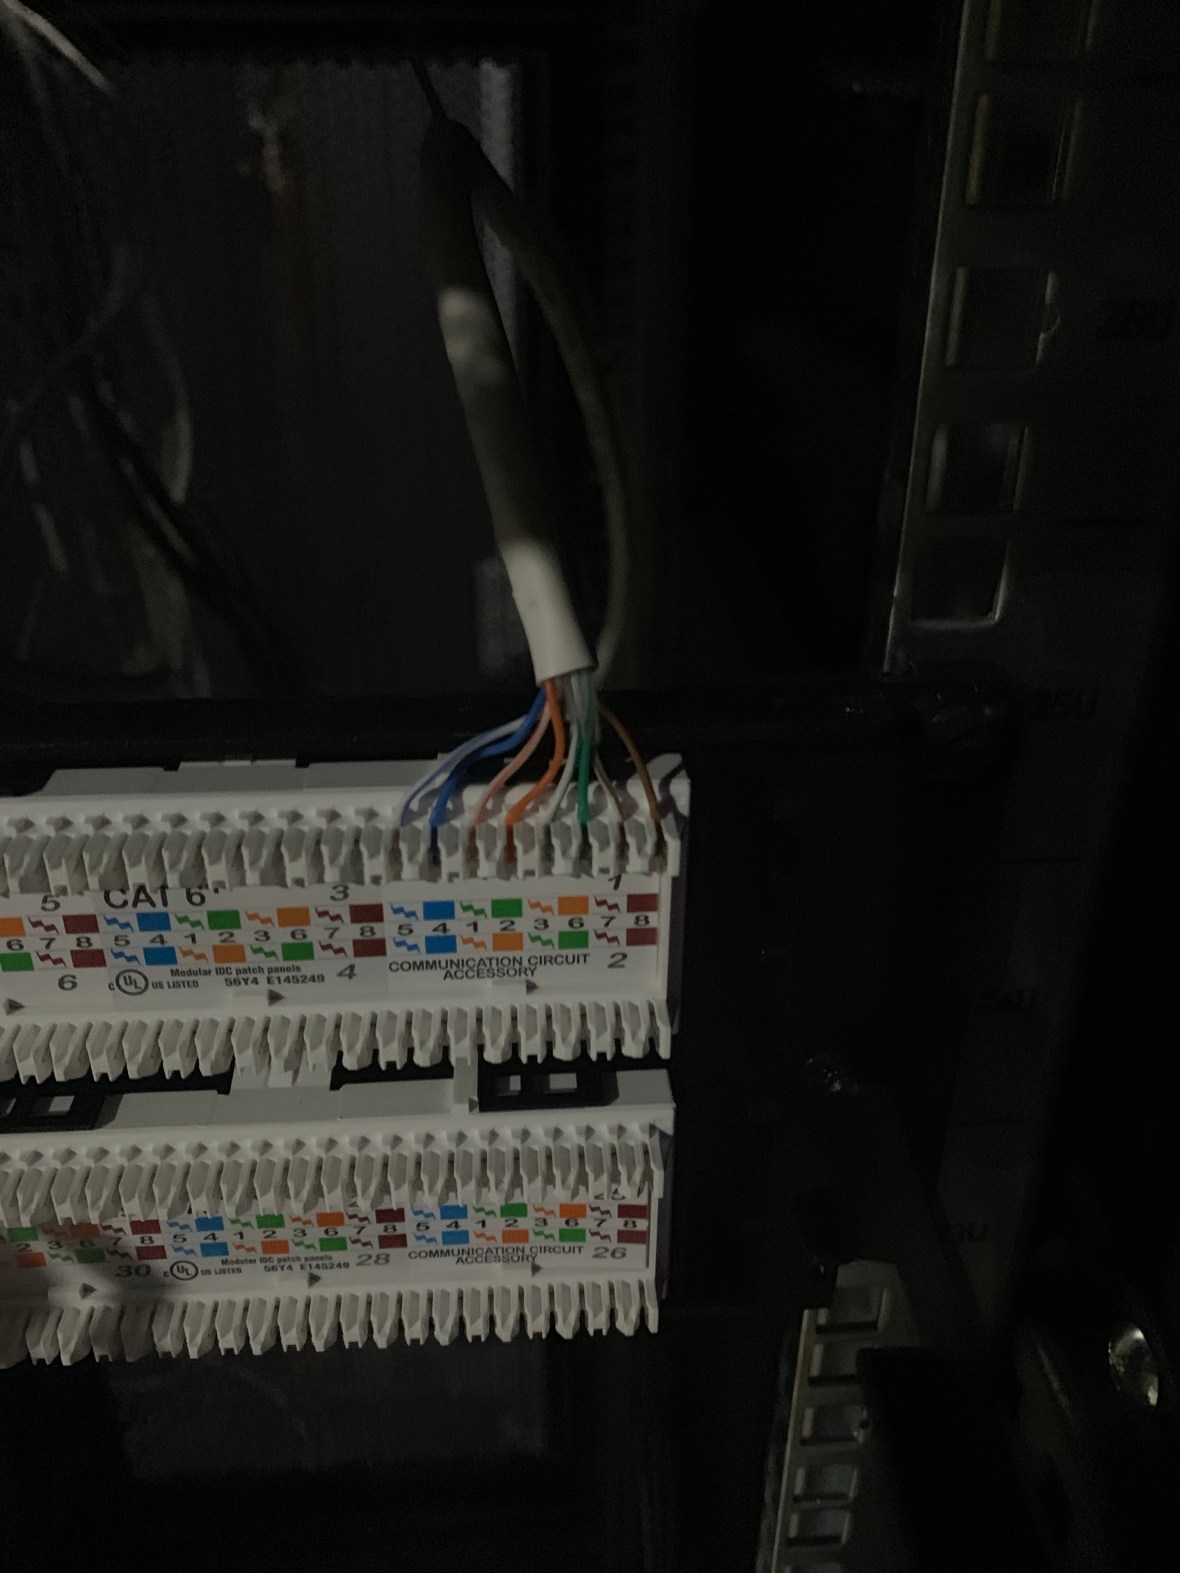
Then repeat at the other end in the wall plate keystone jack then test the connection


Below you can see that I have now installed the patch panel the correct way round and labeled all the rooms. Neat ribbon patch cables link the patch panel to the switch.


Network points – the other end from the patch panel, installed in rooms.
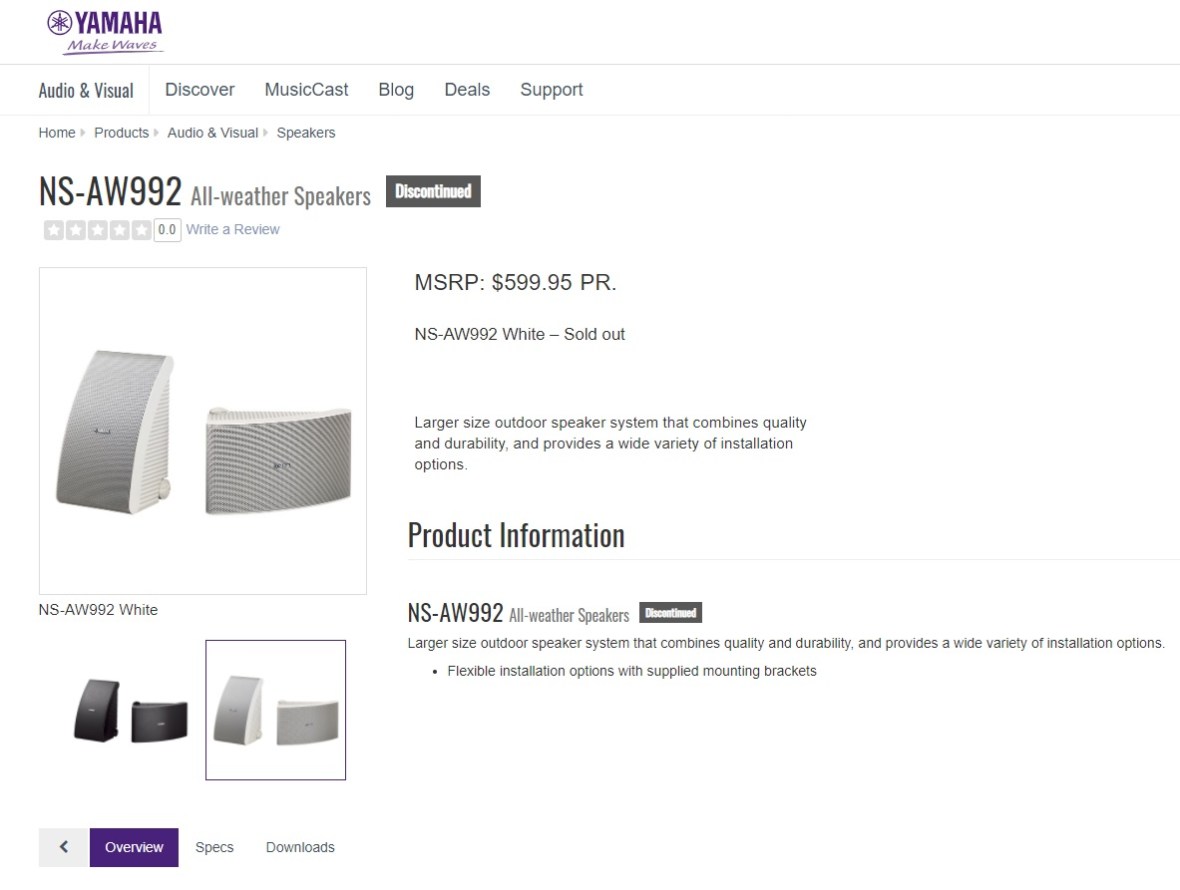
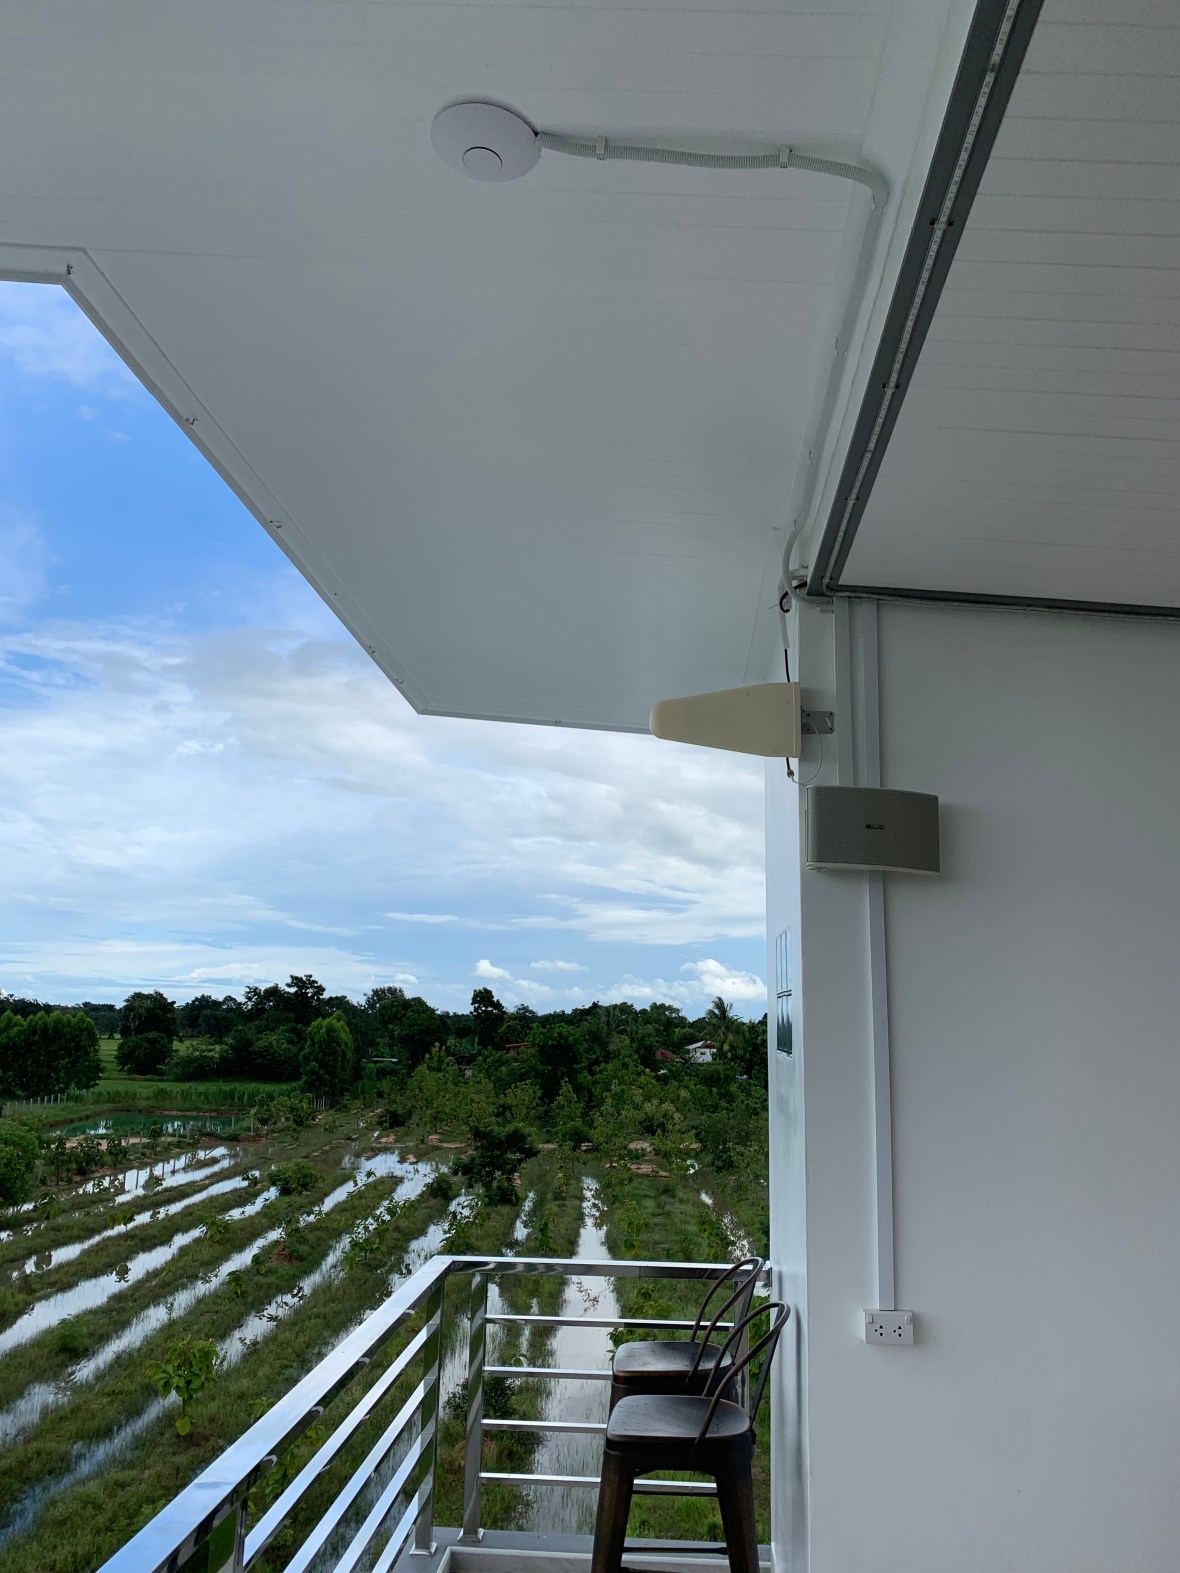 Long range WiFi access point installed on the third floor to give WiFi out to the pond and to the family house several hundred meters away. Also installed, a pair of Yamaha waterproof speakers.
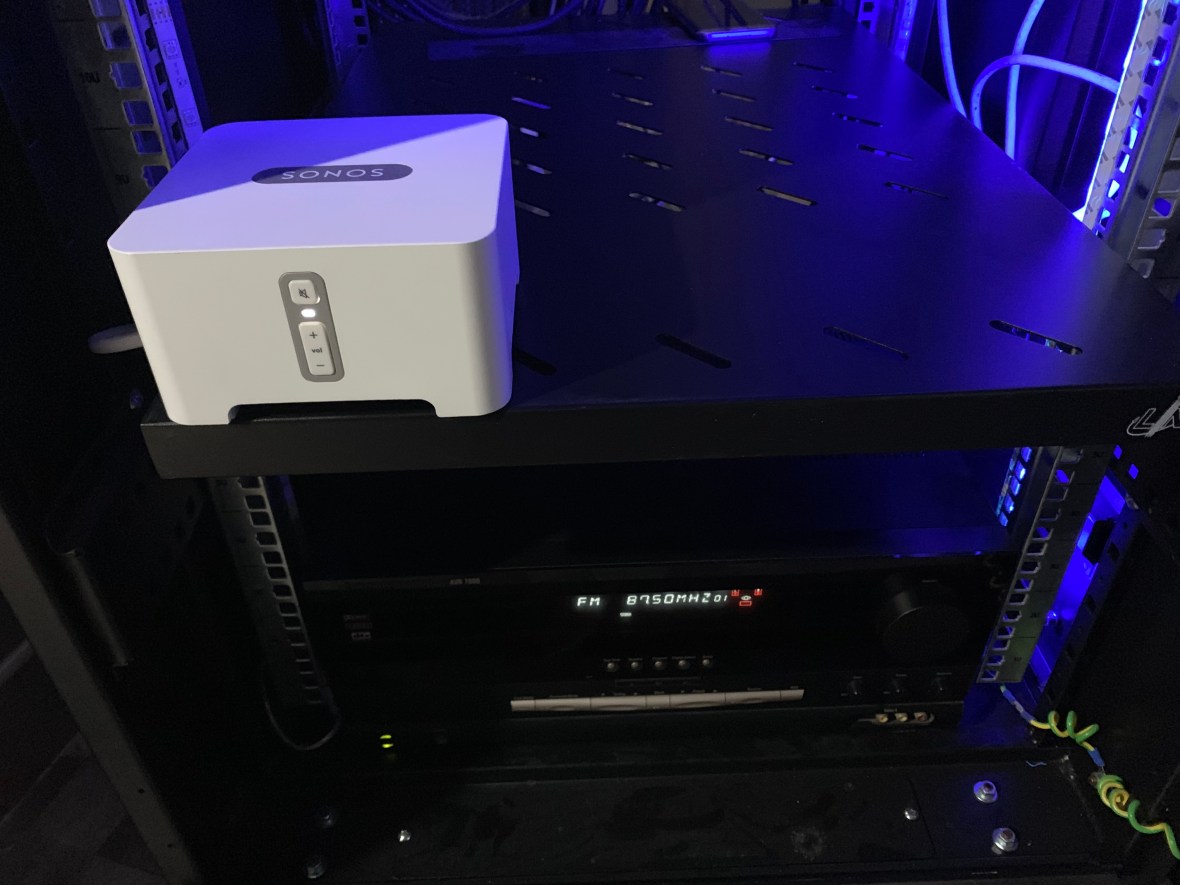 The Yamaha speakers are linked to an amp in the Networks Cabinet and a Sonos Connect Network Music player, which allows music to be accessed from the network and controlled from an app on your phone.
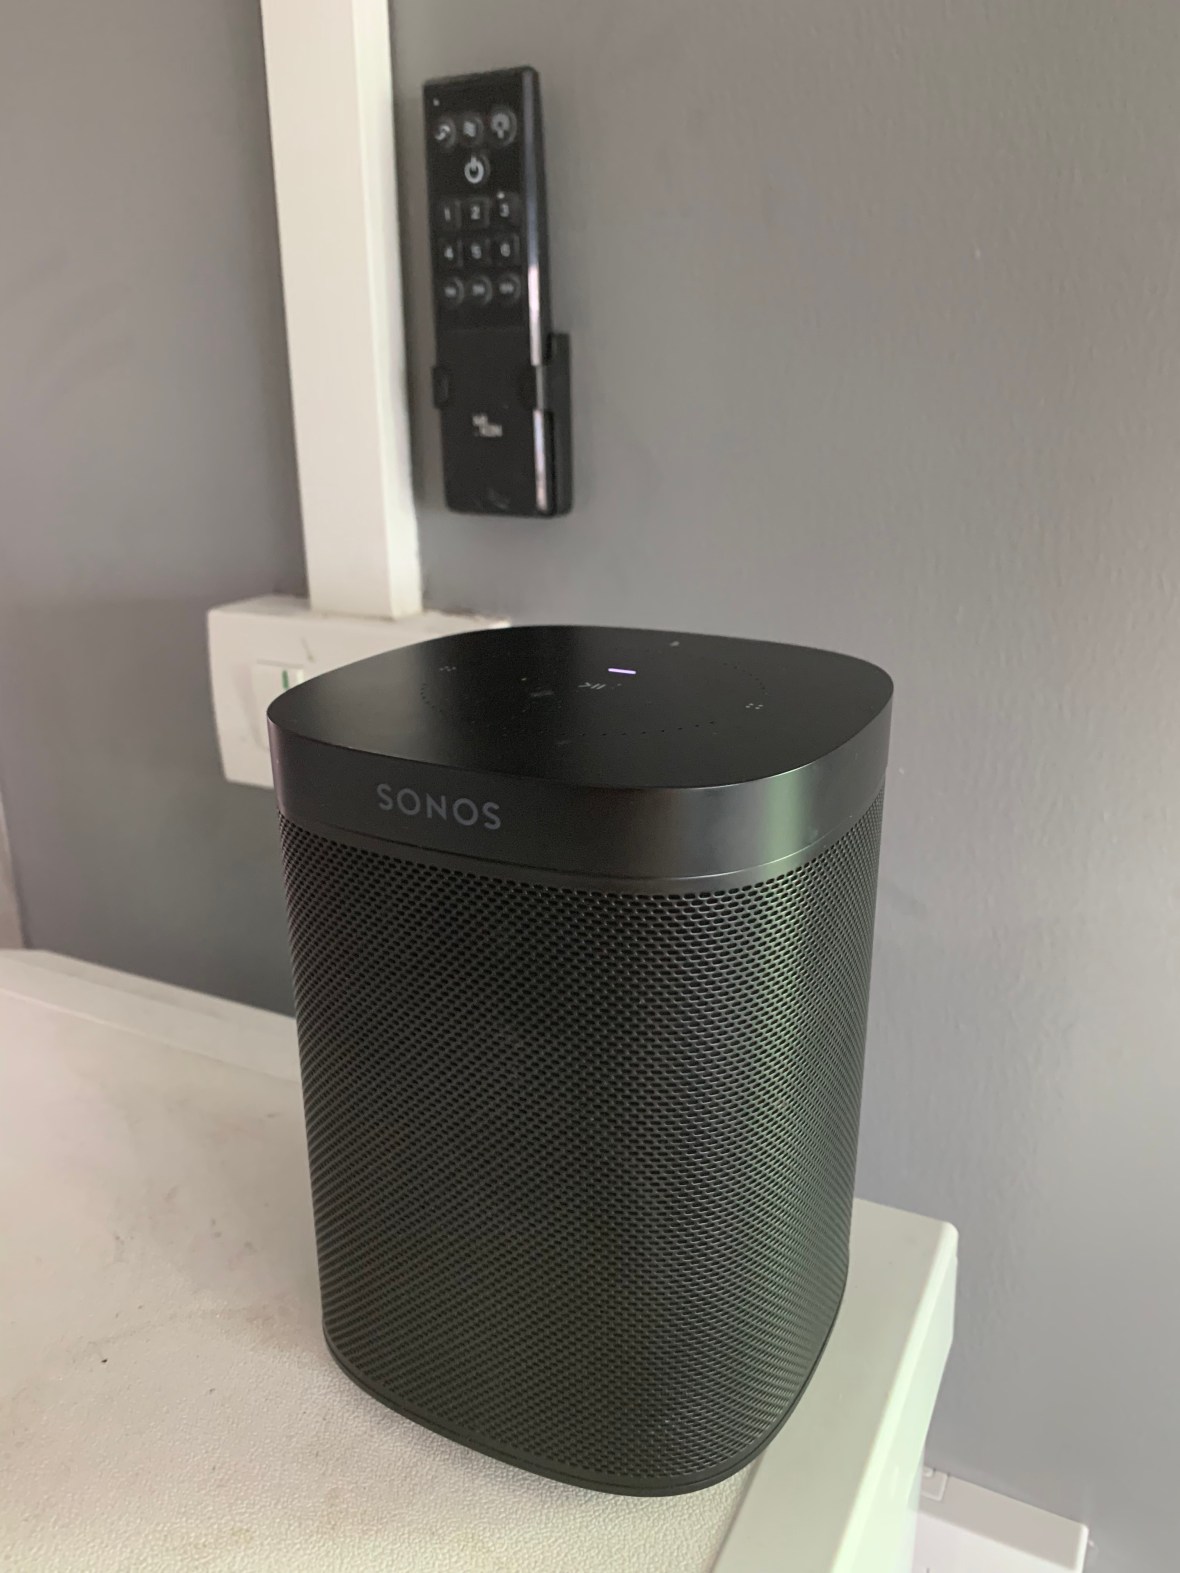
I also have a Sonos One smart speaker in the kitchen which can also play music from my network or from my Tidal HiFi streaming and YouTube Music subscriptions:

“Fishing Fiber” running fiber-optic cable from the network cabinet on the second floor out to the street. My Internet Service Provider made a connection to their system in the street. Then my fiber-optic cable ran underground to the house. The I.S.P. then connected the other end of the fiber to their Gigabit fiber modem in my cinema server rack.

 Cables are run in conduits in the ceilings and underground, all with prepared pull through lines. Life is easier if you plan ahead.

Another thing that you normally only see in commercial buildings are inspection hatches to give access to wiring in the ceilings. Practical always wins over pretty in this house.
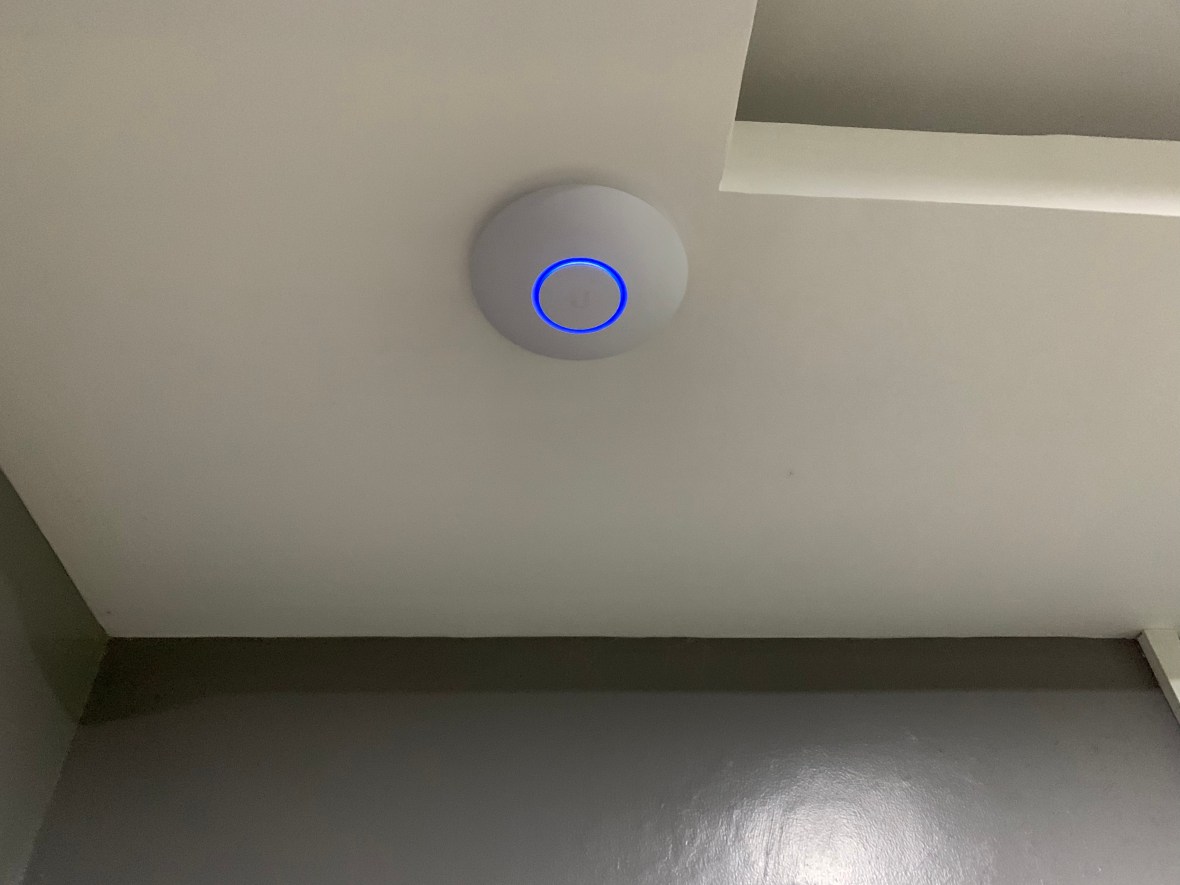
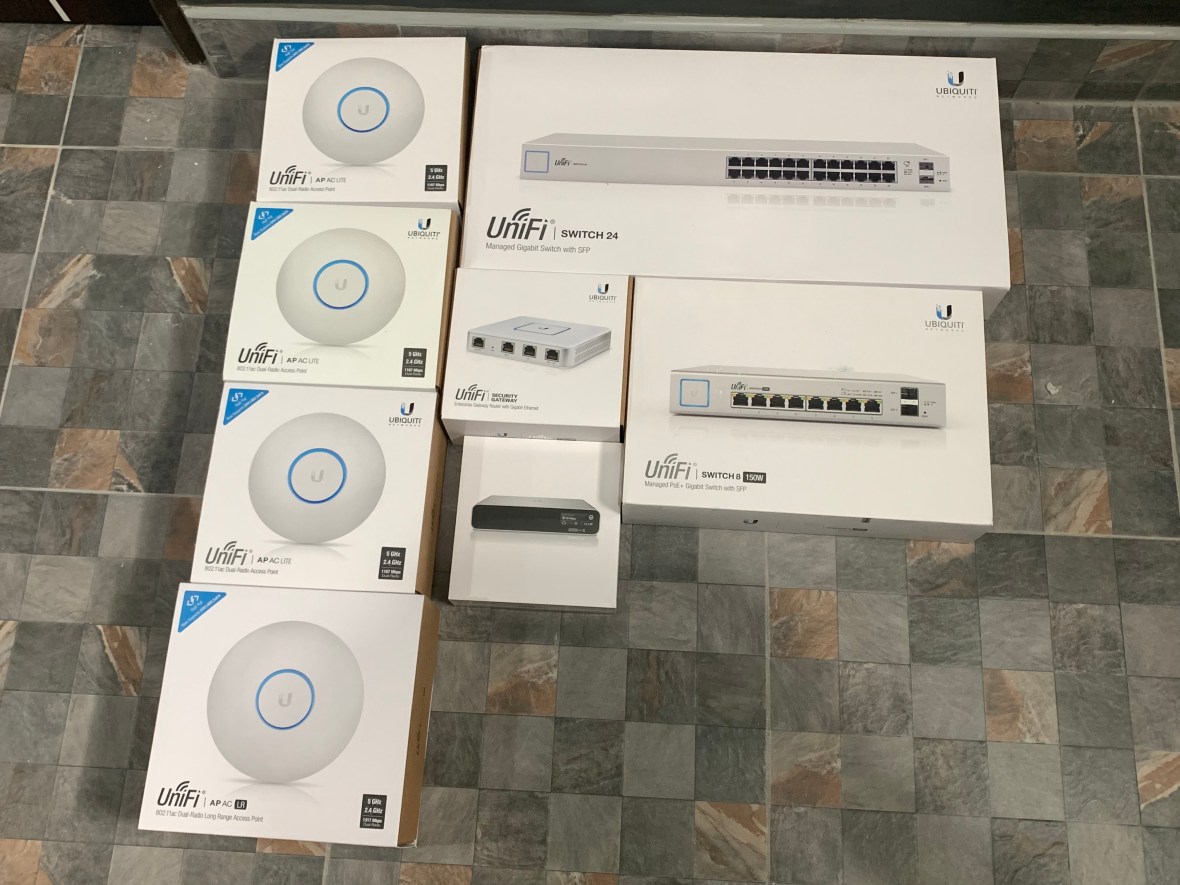
1 Gigabit/Second Fiber broadband connected and all 5 Ubiquiti WiFi access points showing blue LEDs that they are connected.
Kitchen, not completely finished at this stage. The cabinets have the same black acrylic as in the bedroom with green Indian marble worktops and brushed stainless fittings, sinks and cook-tops:
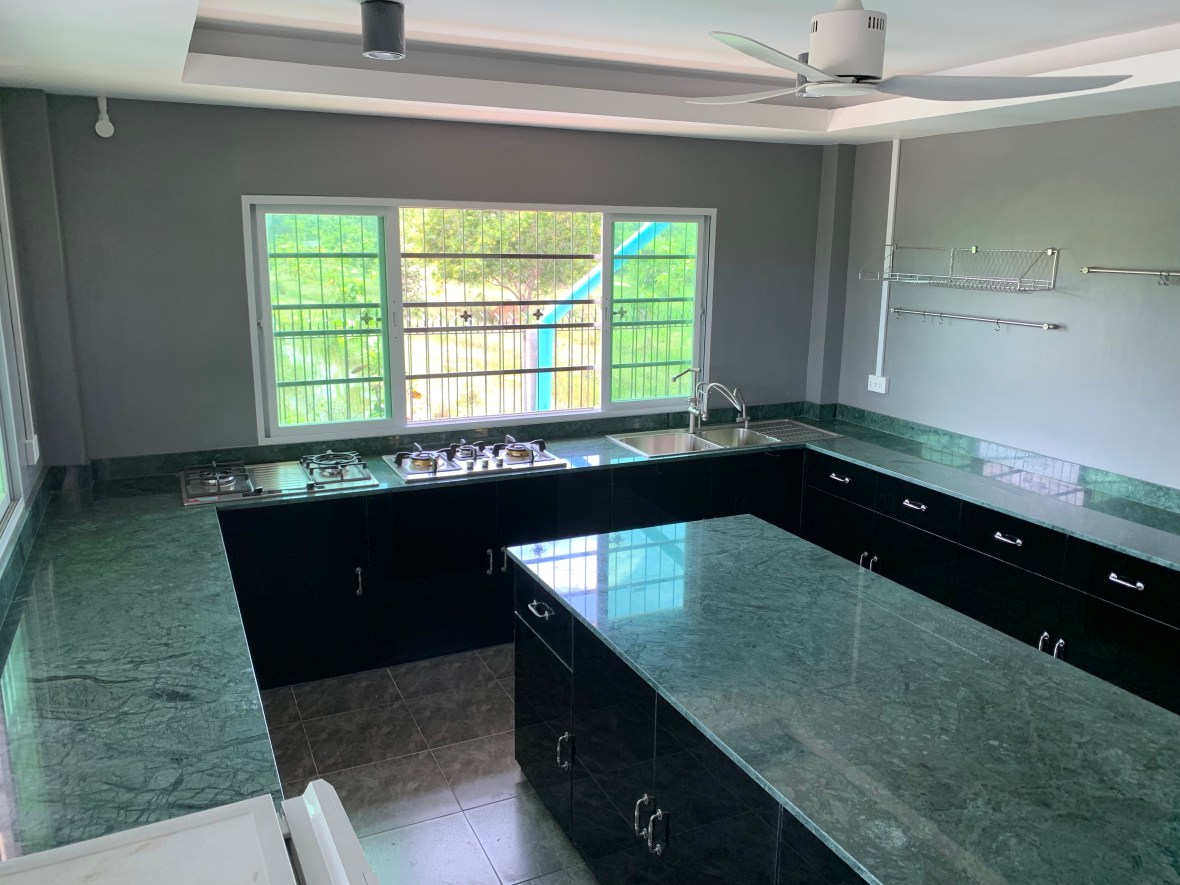

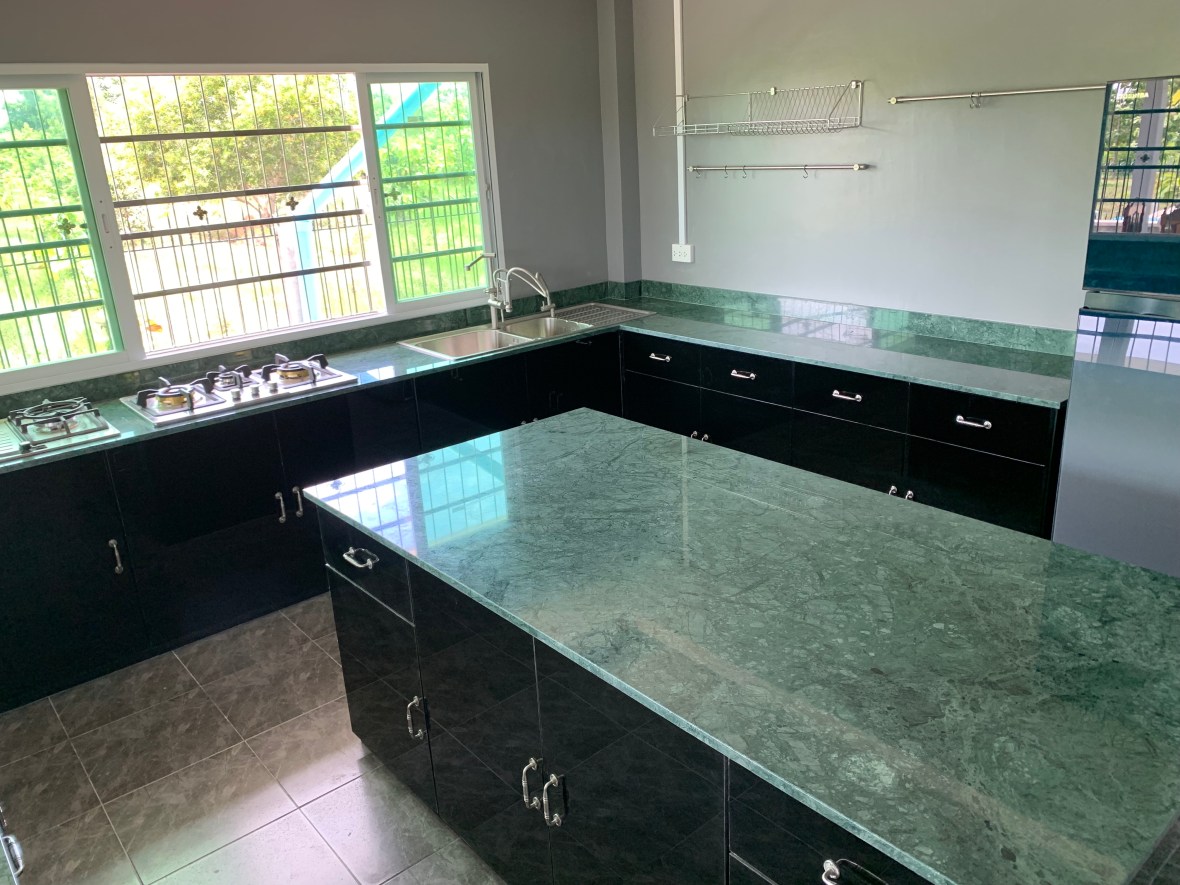


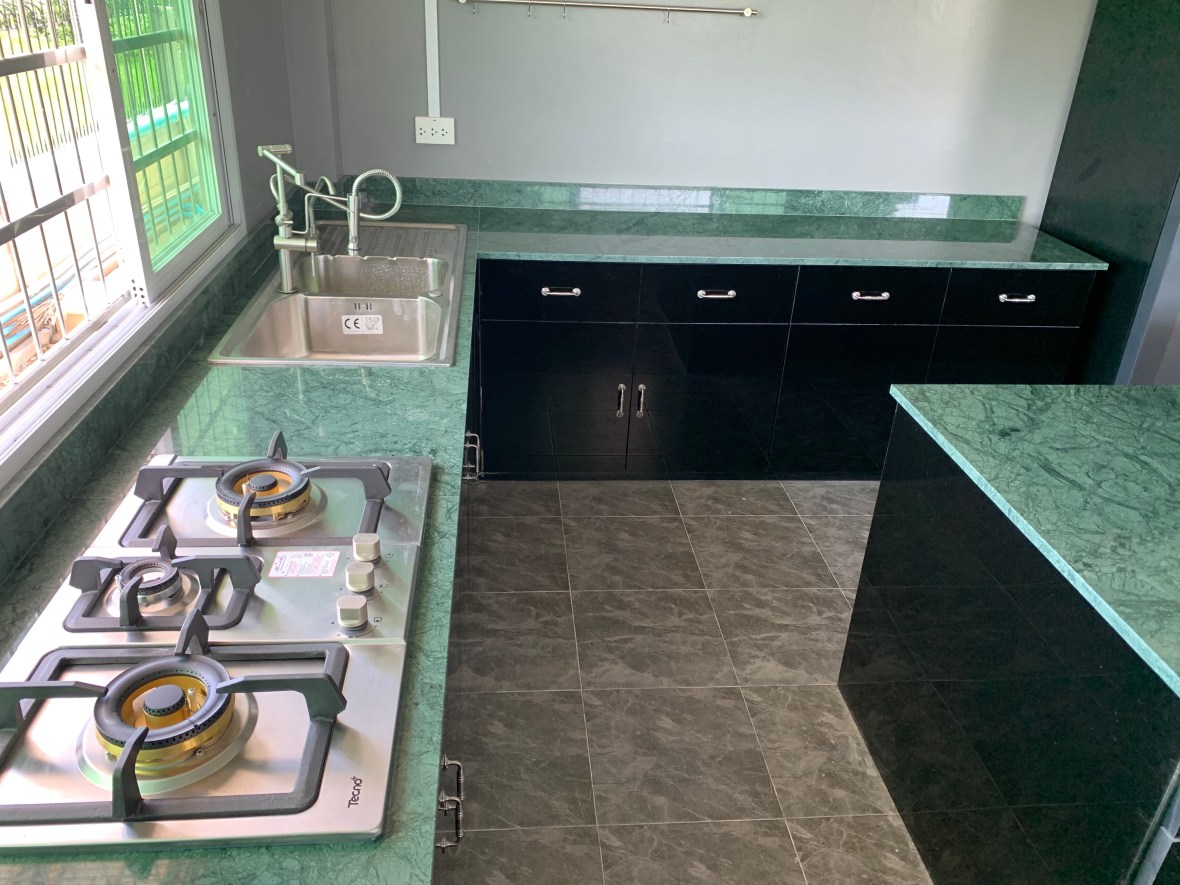
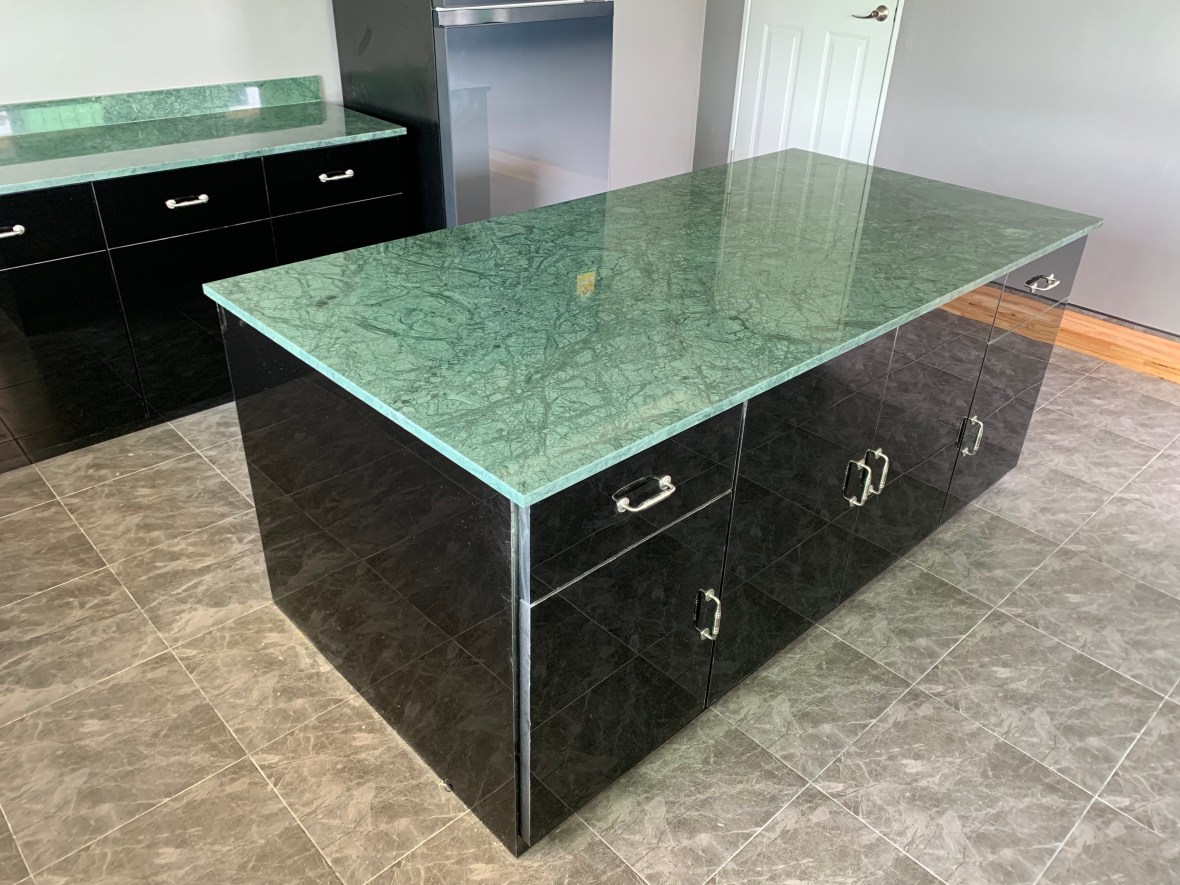


The island is recessed to accommodate seating.
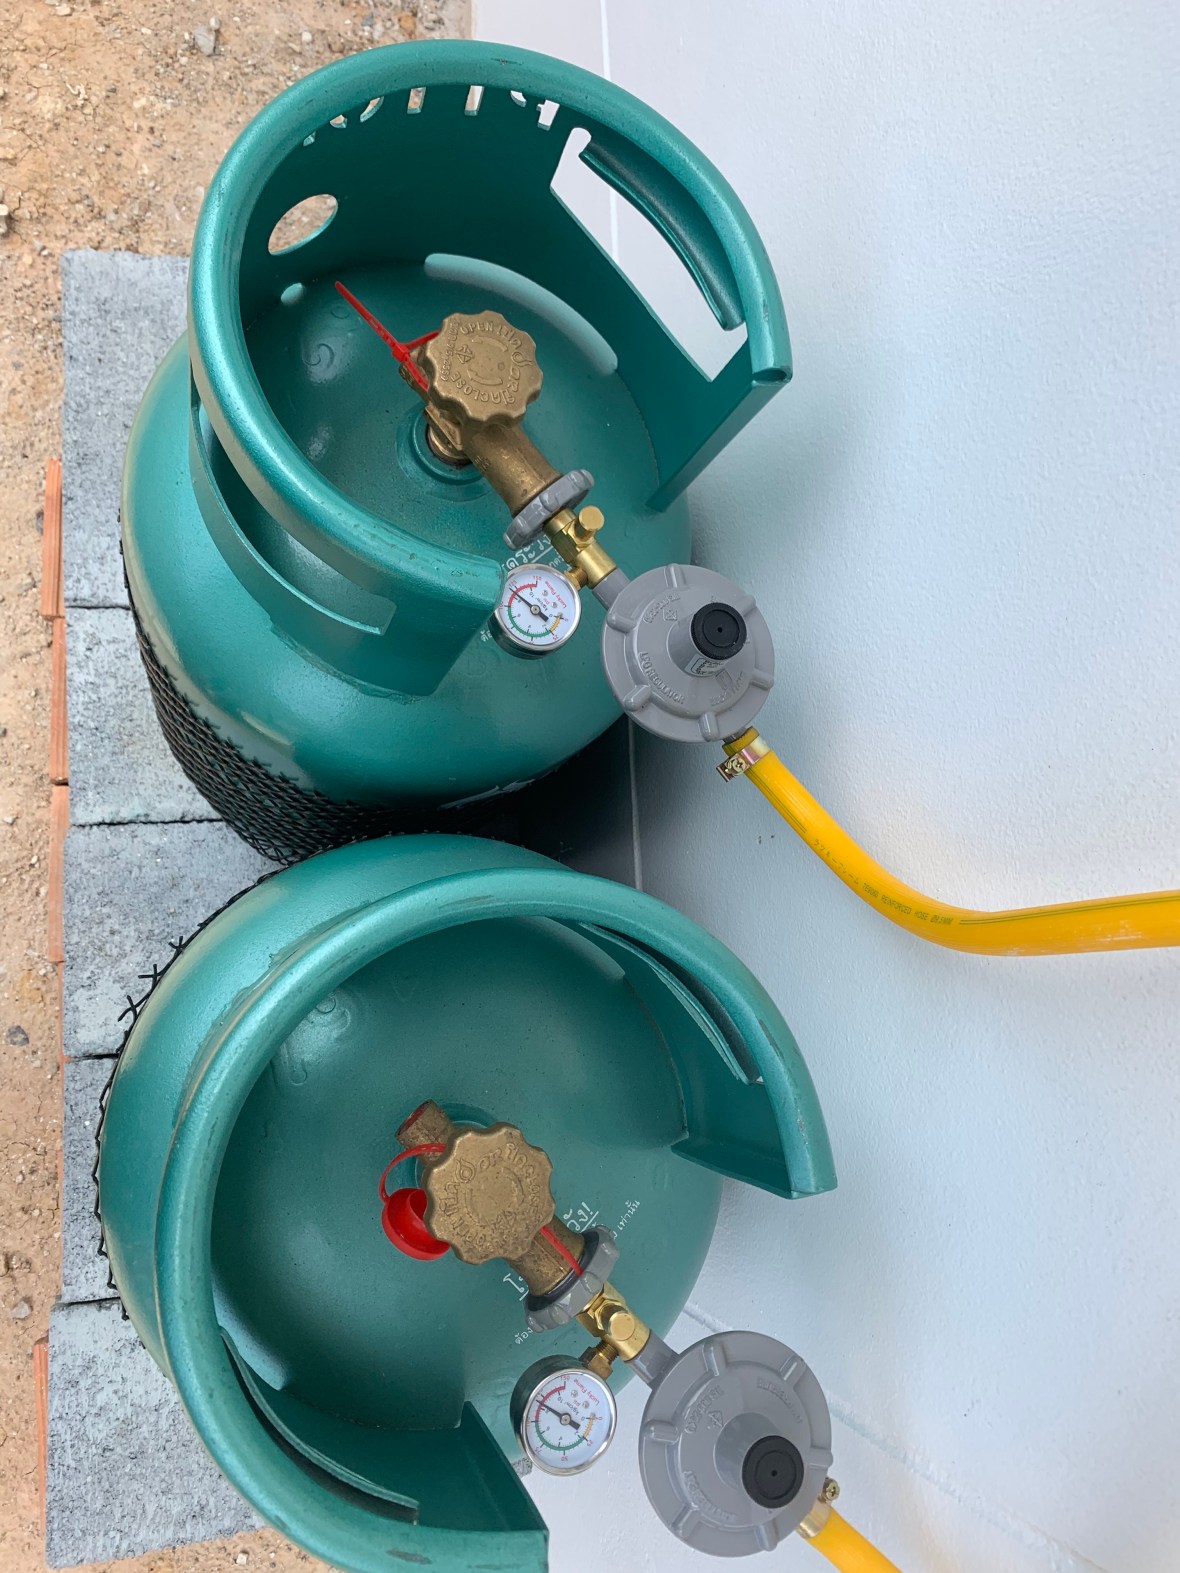
The gas tanks are outside and have valve gauges to take the guesswork out of determining how full they are.
Solar Installation:
The system is Off Grid Hybrid
Solar panels are Monocrystalline 350W X32 = 11.2kW
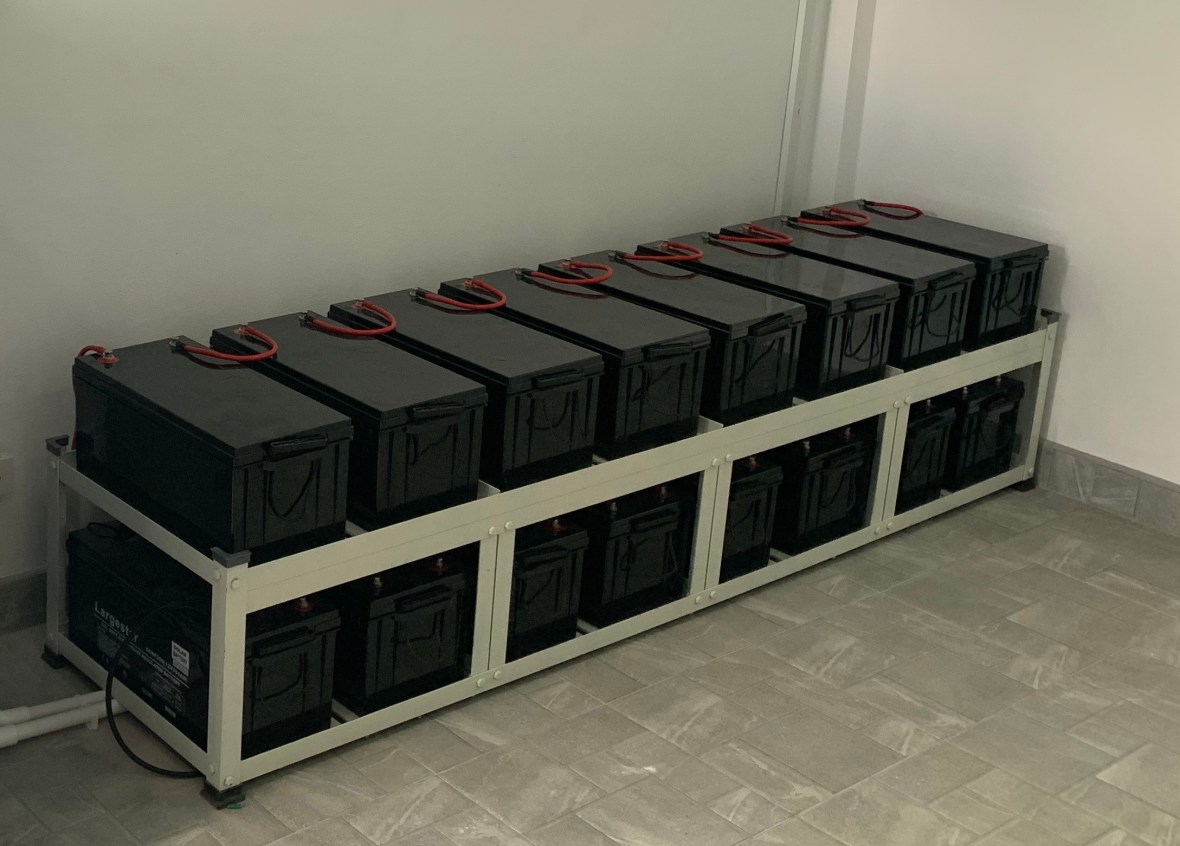
Deep Cycle Gel Batteries 12V 200AH X 16 = 38.4kWH
(A Tesla Powerwall 2 has a capacity of 13.5 kilowatt-hours)


Clamps and brackets:


32 x 350 watt = 11.2kw for home electrics and 2 x 320 for solar well pump
Inverter and Battery Bank. 10kW Hybrid Inverter and 16 Deep Cycle Gel Batteries 12V 200AH = 38.4kWH


Having panels on all sides of the house we are producing power whenever the sun shines
6am and already producing more power than we are consuming

By midday all panels are in full sun producing 11kw
Electricity bills are now just the service charge of ฿49 or £1.20/$1.50 per month
Security cameras installed: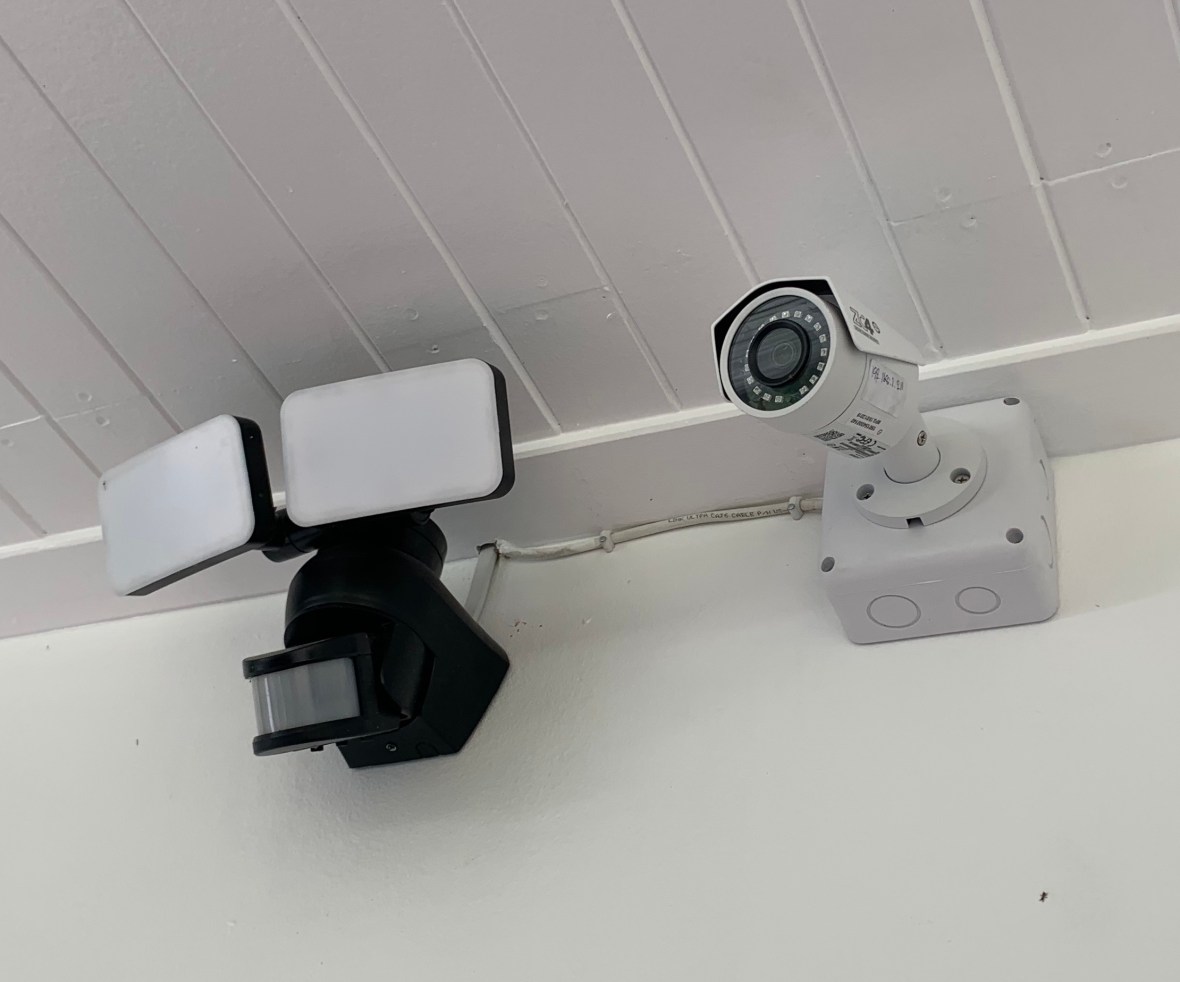

Camera display in the office and also available on the living-room TV as a virtual window.
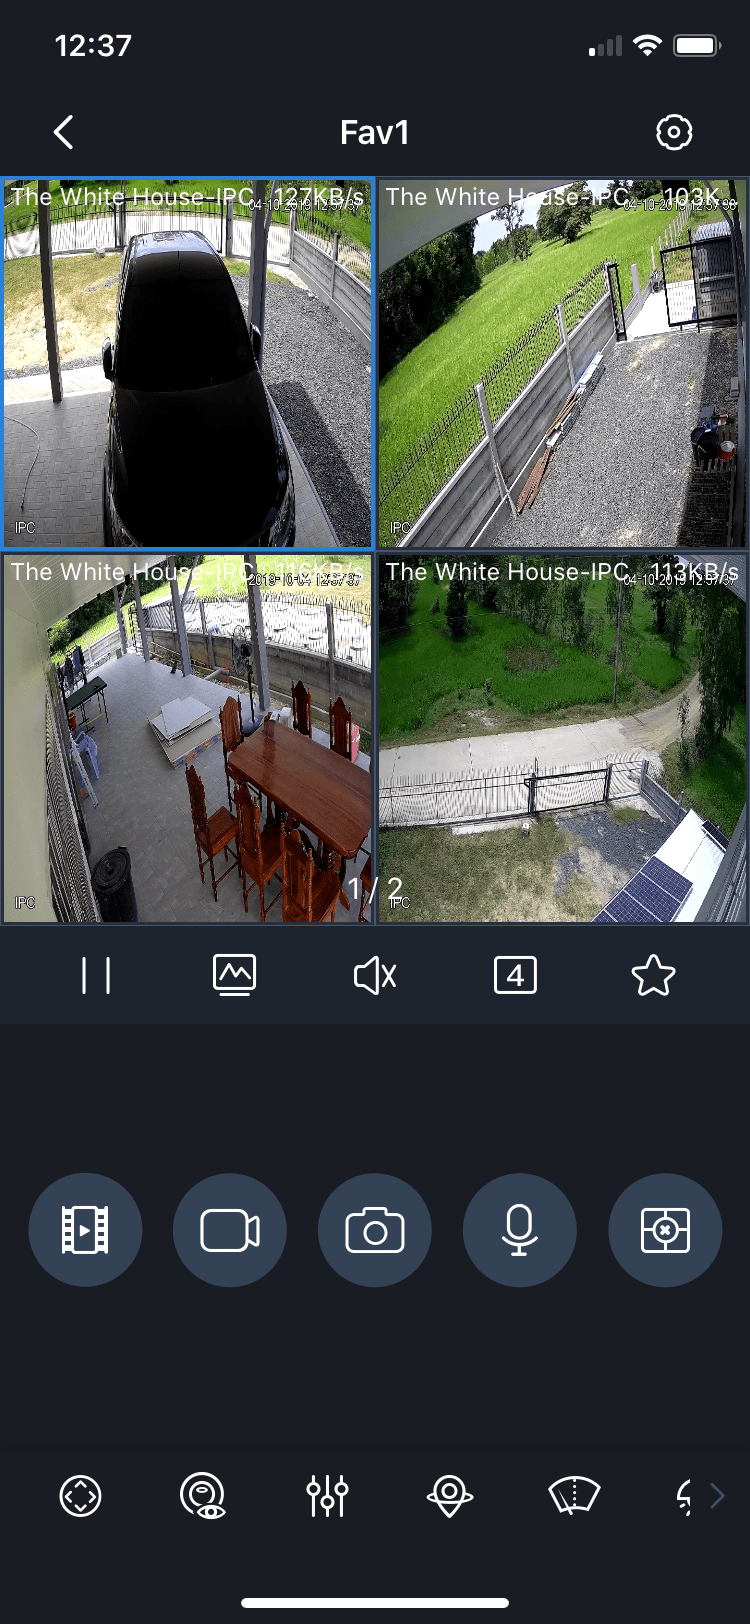
There is a mobile app to view the camera feeds when away from the house.
Infrared for night time security:

An update on the Energy Recovery Ventilator, before all all the ducting is boxed in.
The more you insulate, the more you need to ventilate.
The inter core of my building is a conditioned space, with windows that are sealed shut and doors with 4 frames and airtight seals around the top, bottom and sides.
So it is important to bring fresh air in and take stale air out. The fresh air is cooled by outgoing air-conditioned air, then filtered. Incoming humid air passes humidity to the dry expelled air.
The ERV will cool incoming air, filter it and reduce its moisture content.

Air exhaust and intake

Controller set to heat exchange.
There is still some concern that with such a tightly sealed house, C02 levels could build up
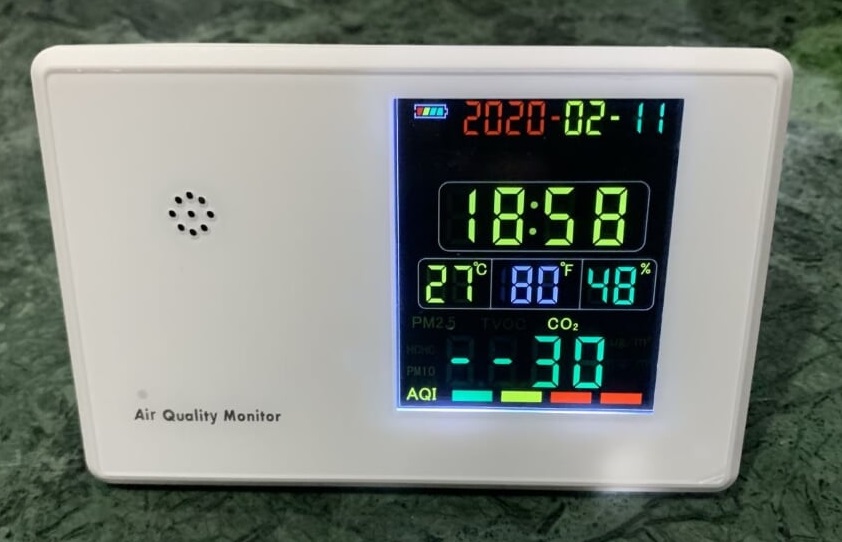
So we monitor CO2 levels

As well as atmospheric particulate matter at 2.5 micrometers
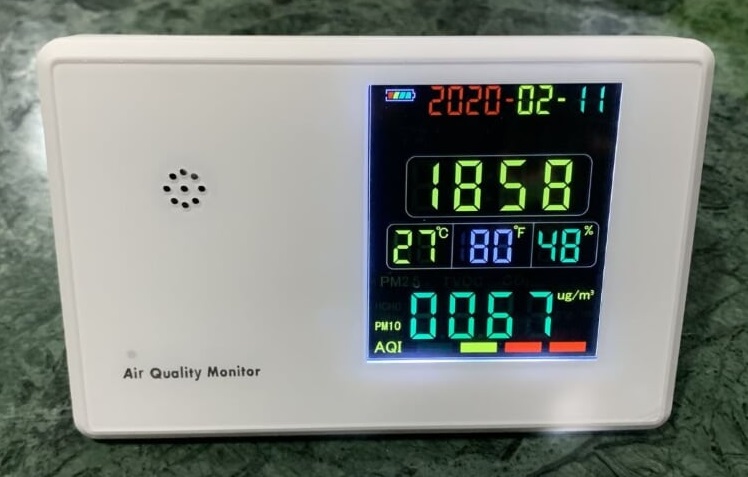
and 10 micrometers
In addition we have a HEPA air purifier running in the bedroom
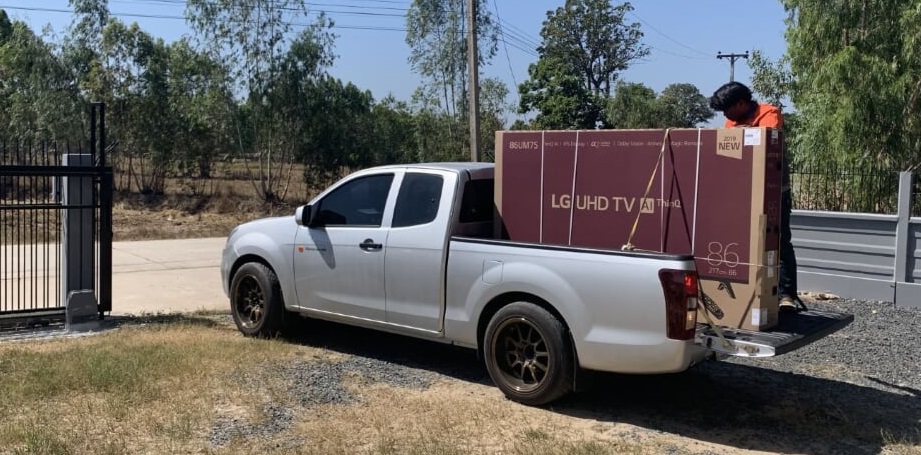
TV for the living-room being delivered.

TV setup in the living-room. LG 86 inch TV with with Denon AV amp; Castle Knight 4 left and right channel speakers and Klipsch R-34C center channel.
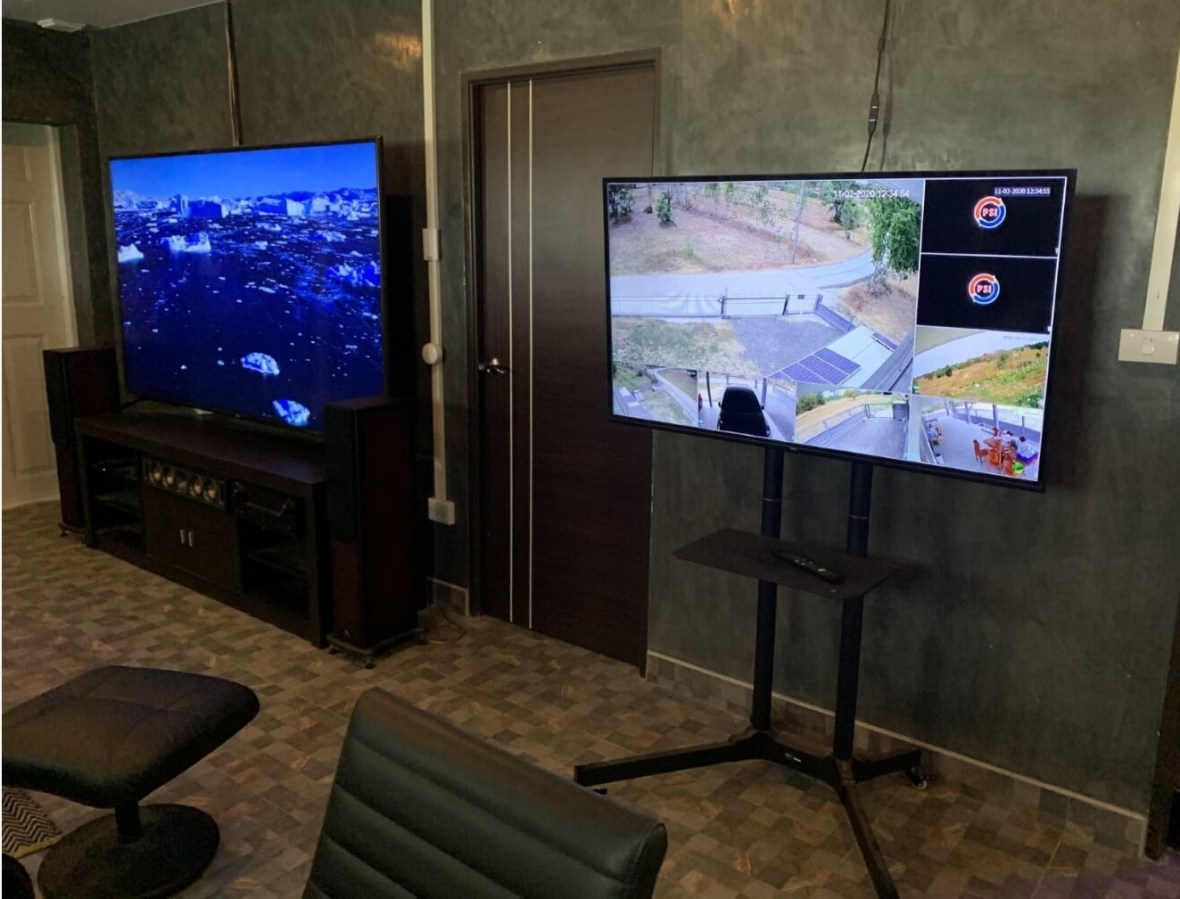
A 50 inch tv takes on the role of virtual window
My old 55 inch TV was wall mounted in the Bedroom and is used together with an Onkyo HT-S7805 5.1.2-Channel Network AV Receiver. The system currently has a 5 speaker surround sound system and sub-woofer. The AV amp is on the network and so is part of my multi-room system. Audio or Video can be sent to any room in the house with the appropriate end point.

Surface mounting the the electrical trunking allowed easy fitting of the surround sound speakers at the back of the room and the LED light strips in the dropped ceiling. The trunking will be painted to match the walls when all upgrades are done.
There is a Xiaomi MI BOX S 4K Ultra android tv box in both the living-room and the bedroom. The living-room also has an Apple TV box.

We use the TV boxes to access Netflix, YouTube and stream content from my PLEX media server.
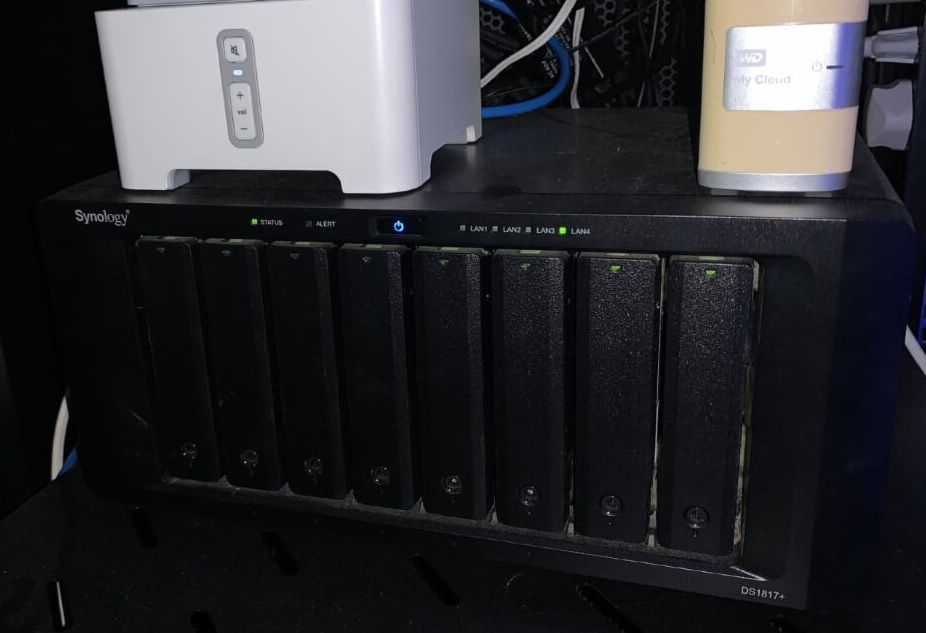
The PLEX media server is installed on my Synology Network-attached storage (NAS), which has 8 bays for drives into which I have installed 8 × 10.0 TB HDD SEAGATE IRONWOLF drives.
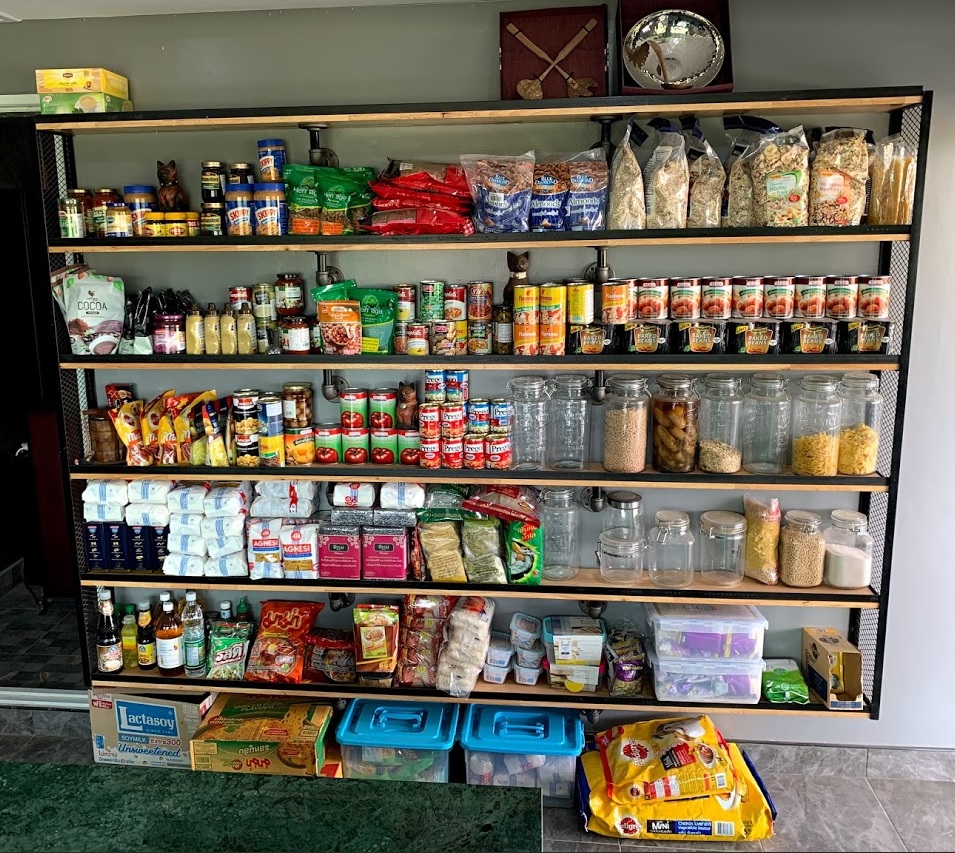
Starting to get the food pantry organised – lots more space in the kitchen to fill

We upgraded security when we rescued a black Labrador called Rambo.

He is about twice the size of any dogs in the village and he seems to terrify the locals.

Walking him twice a day with our Thai dog Panda is helping with cardio.
Another security device we have installed is a steel locked key box.


The box prevents the keys from being cloned:

or fished:

Any zombies that make it into the house will be in for a big surprise.
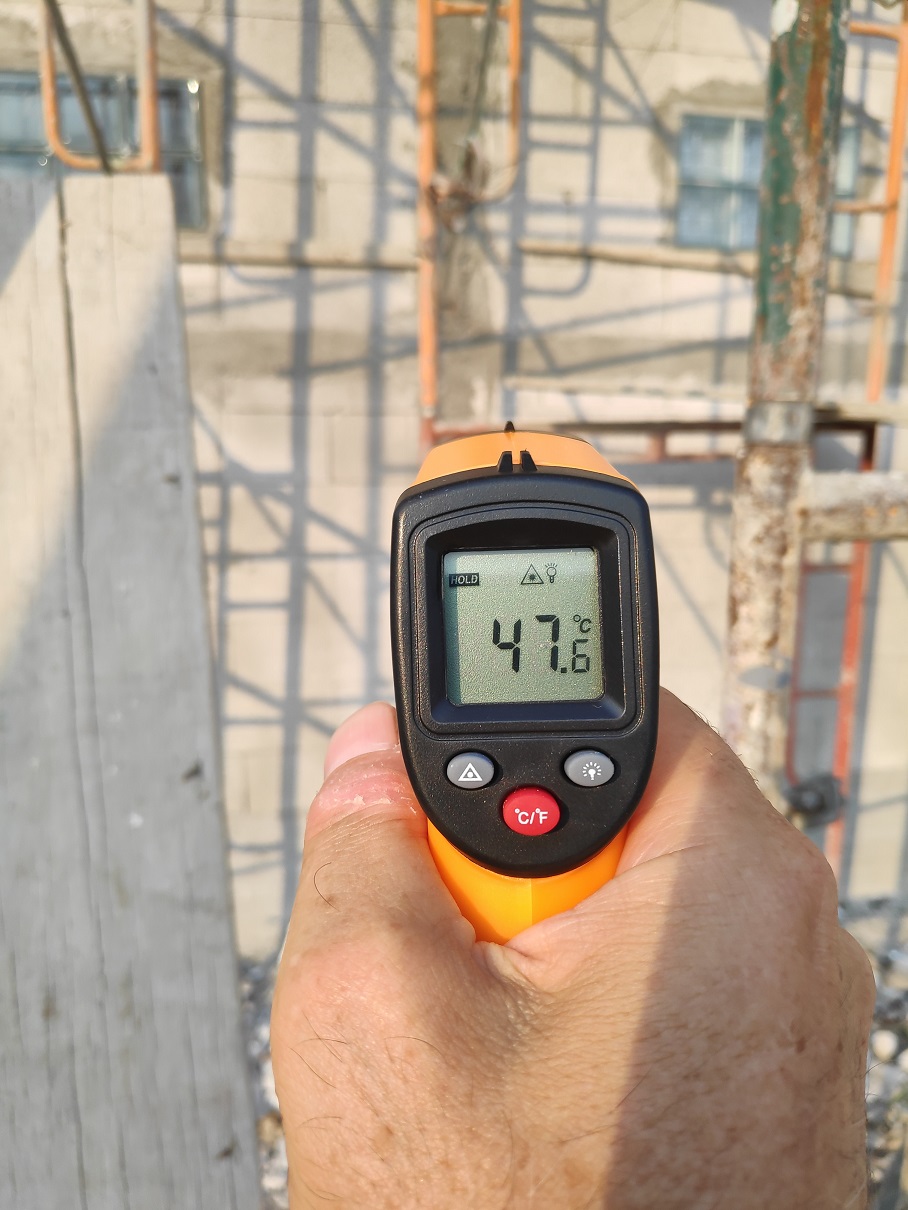
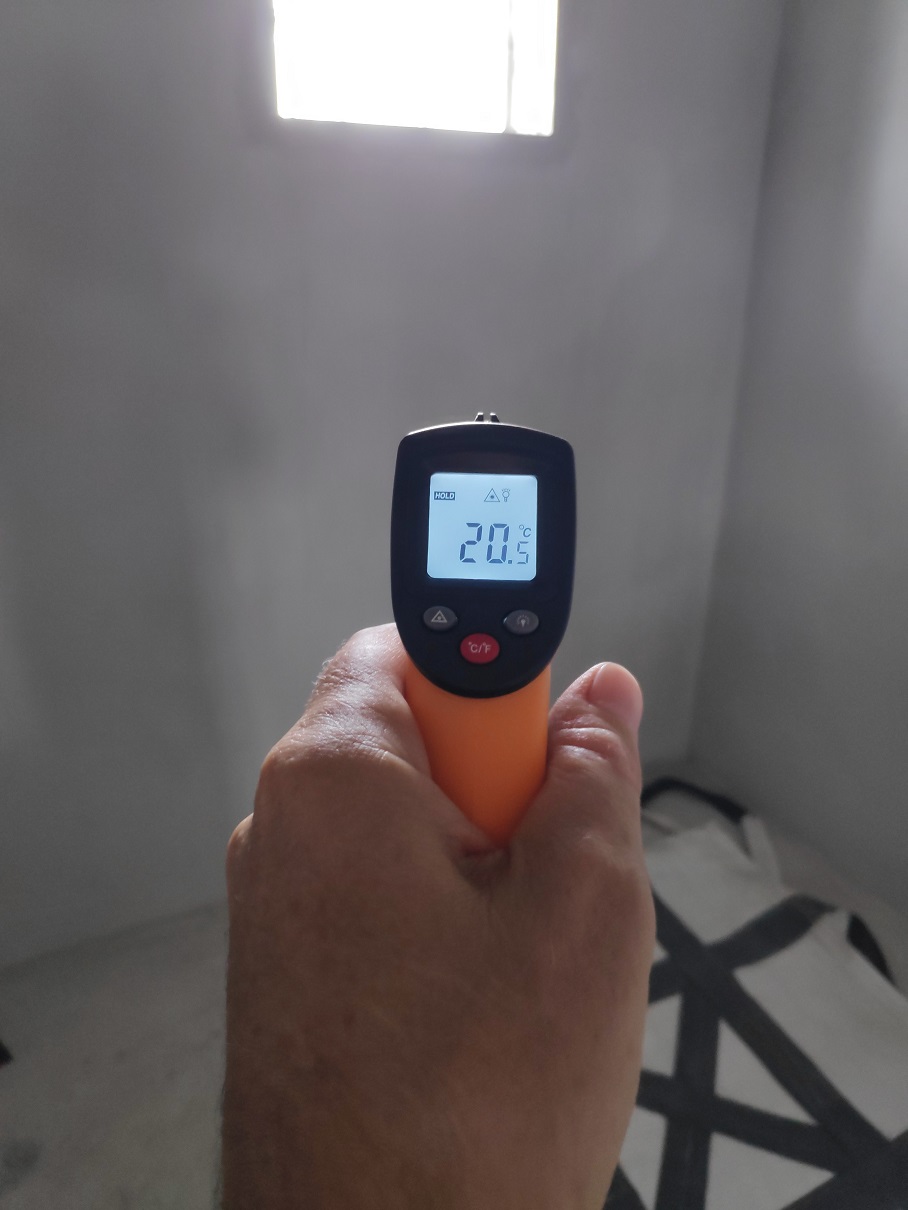
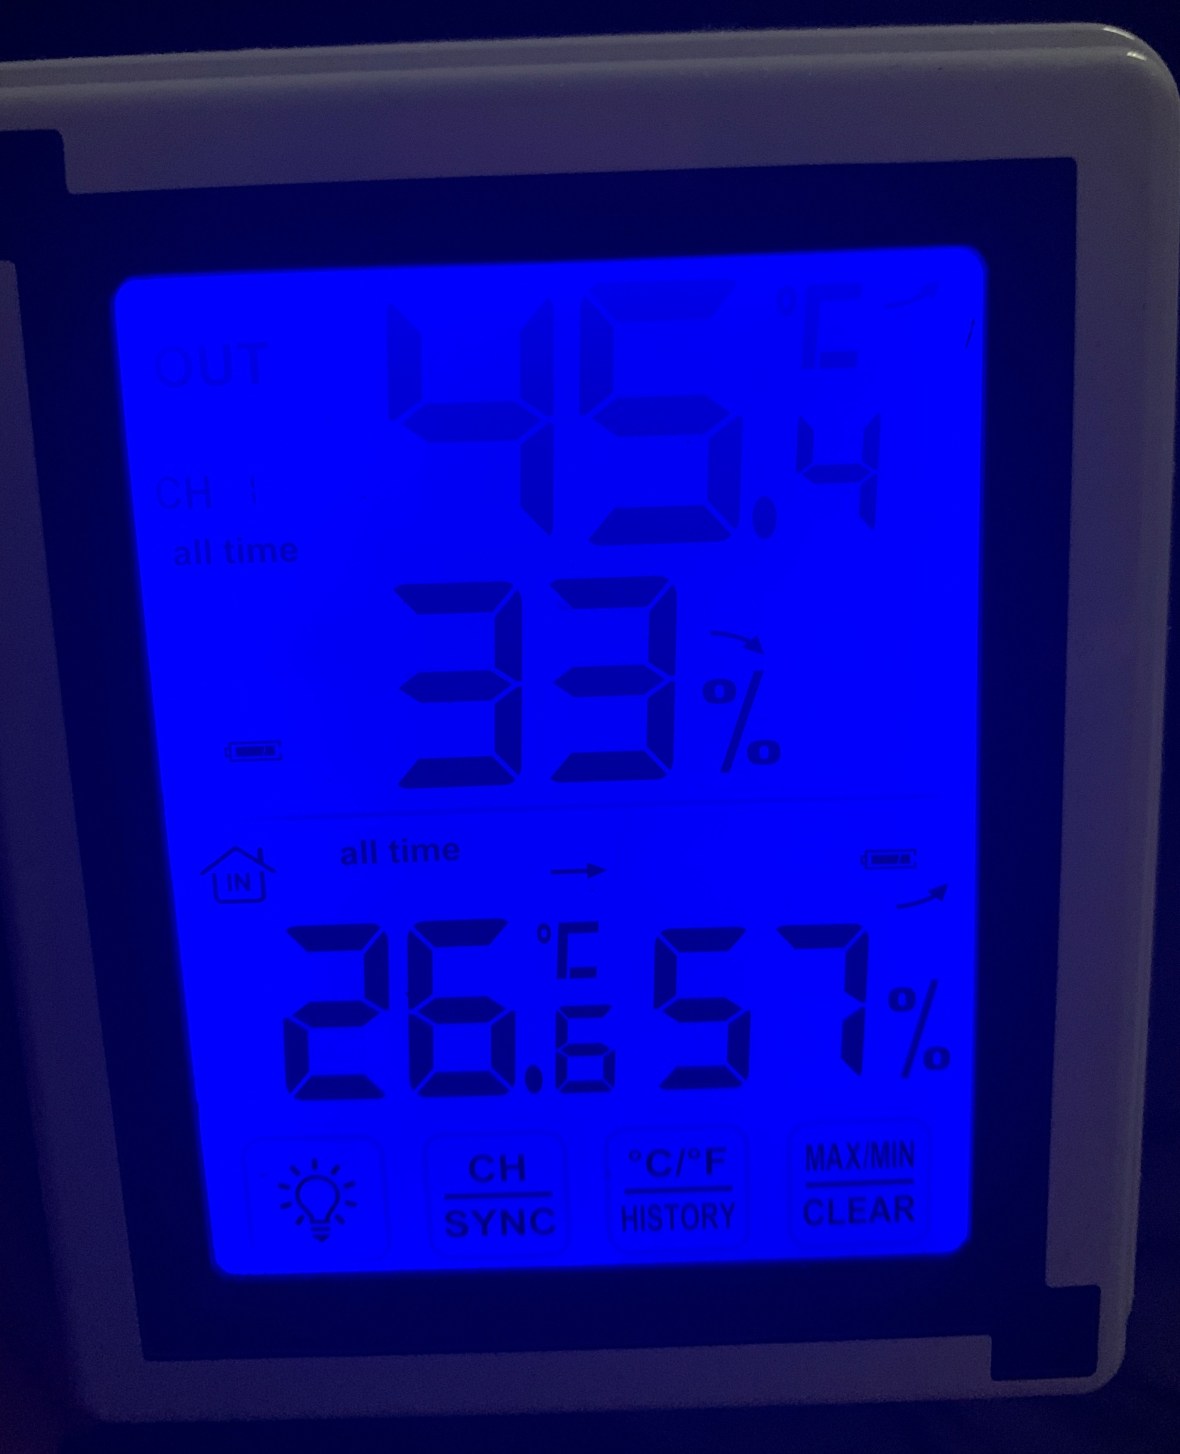
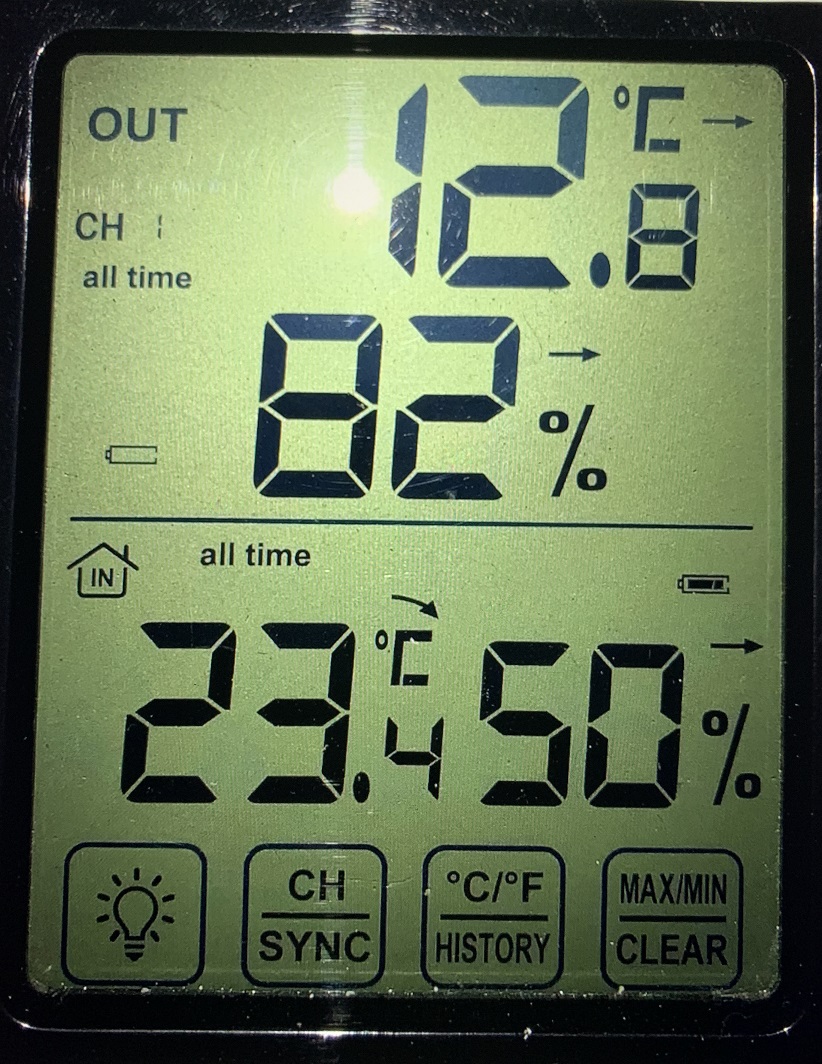
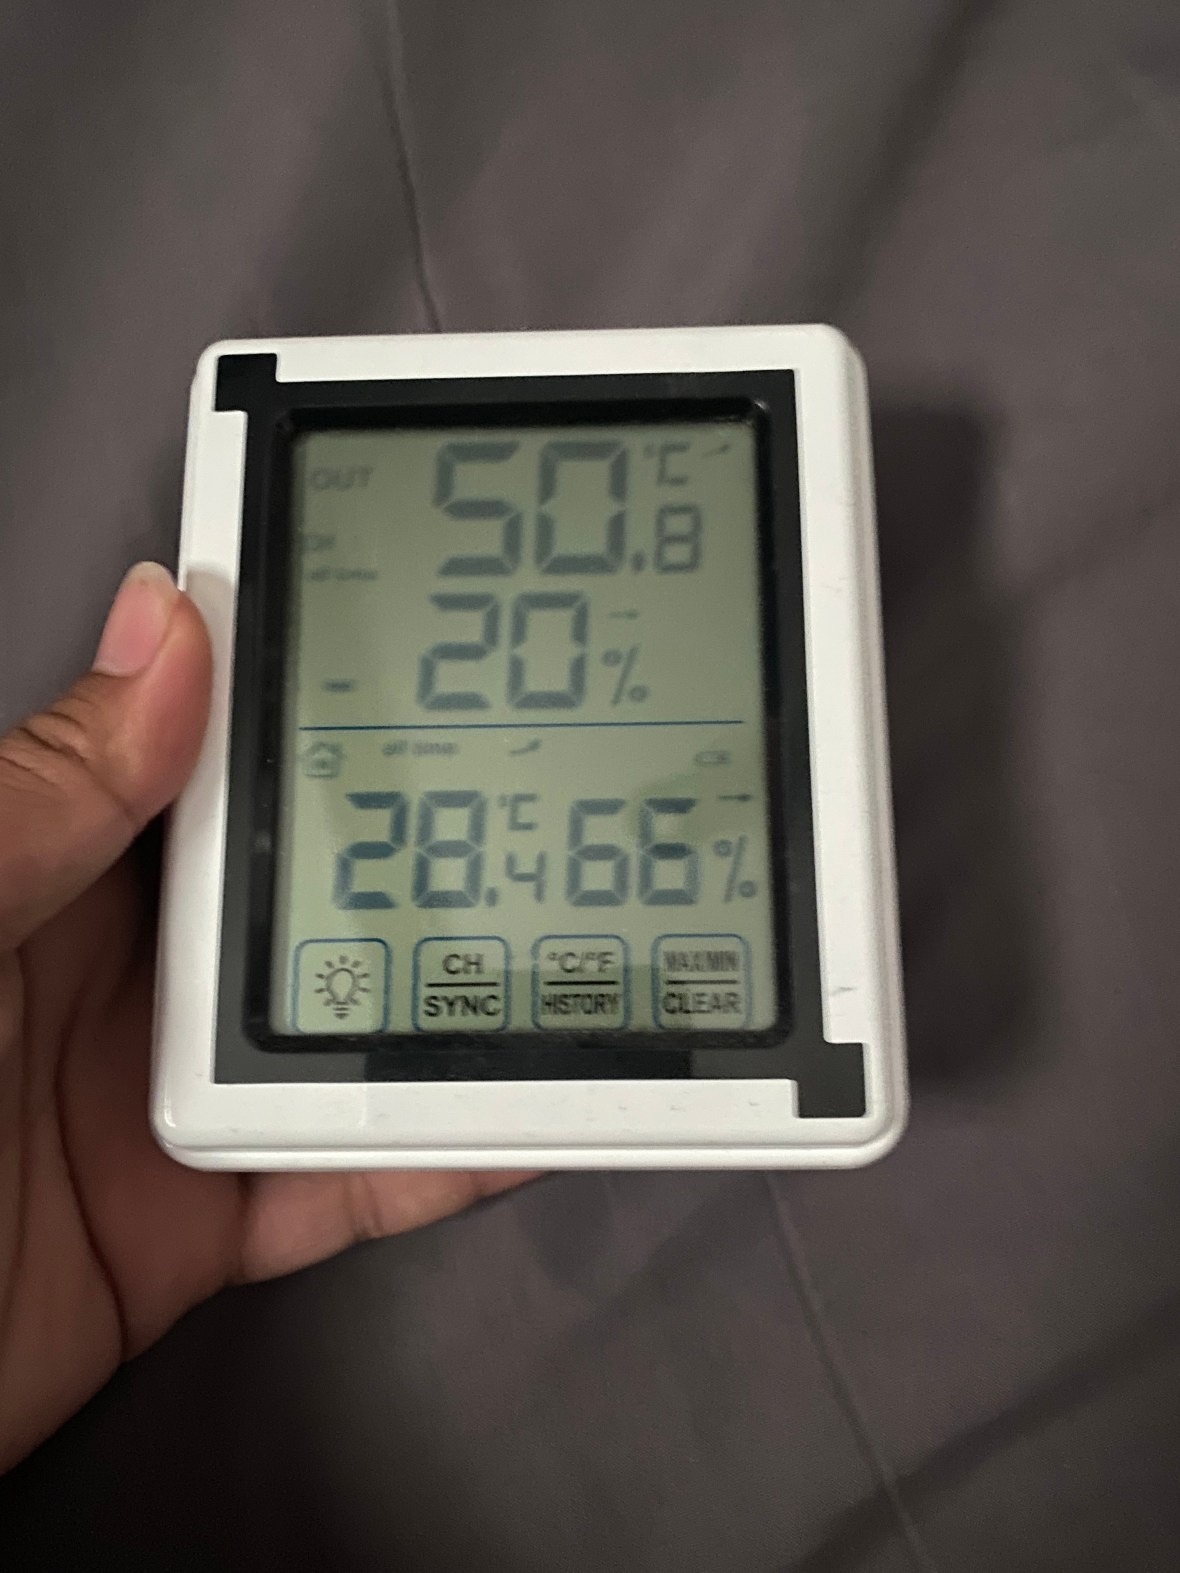
We knew that the house design had a cooling effect, but we wanted to know the difference between indoor and outdoor temperature without running the air-con. So we bought a indoor/outdoor temperature gauge. The outdoor sensor is not in direct sunlight but lives in the spirit house.
The opposite effect is seen in winter. Obviously as the house is located in the tropics it has no heating installed, just insulation.
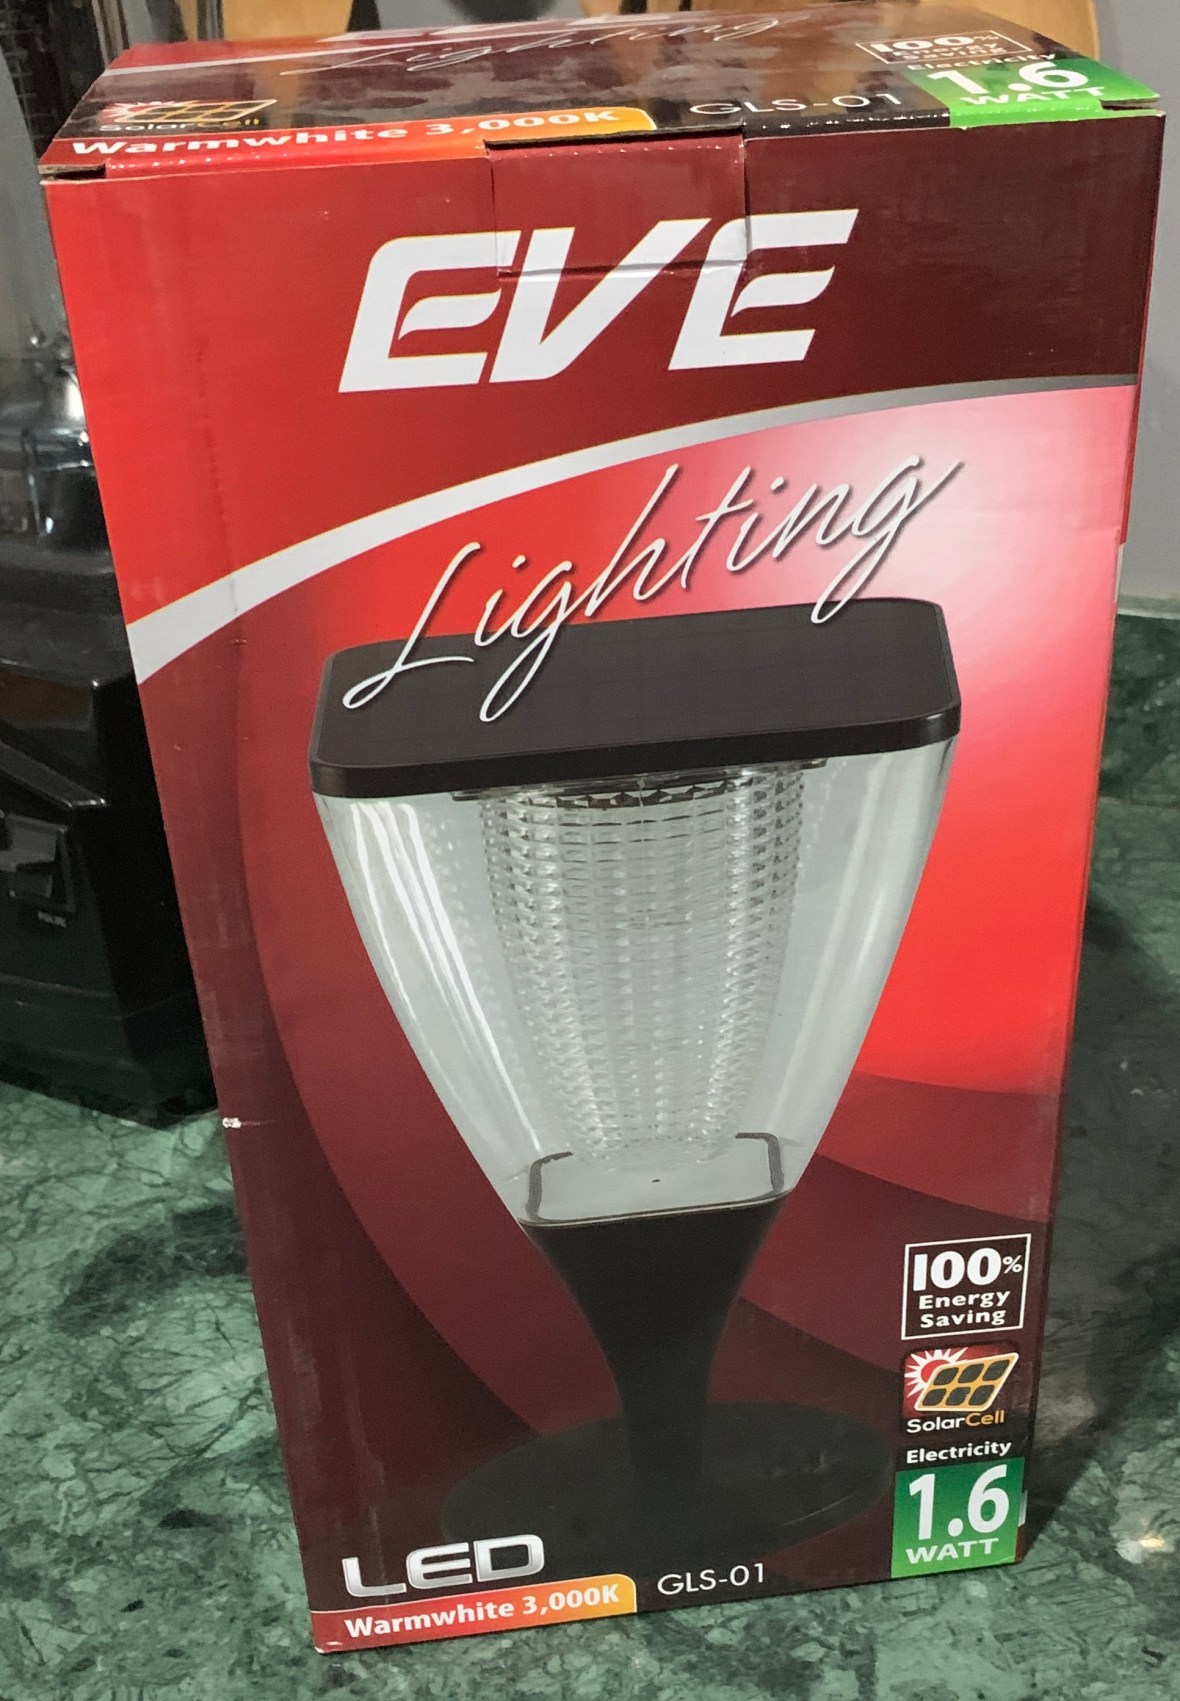
Latest project: Installing solar lights. In total we installed 6 lights around the property. @฿1,800 each they are far more expensive than some models I have seen online, but they have a large solar panel and the light lasts all night. There use saves running lights off the house batteries at night and they give enough light to greatly improve the quality of the security camera footage.


We have decided to replace our 160L upright freezer (purchased while I was living in a condo) with a 429L chest freezer. The freezer will run on a timer from 9am to 5pm (so powered only by solar and not running down the batteries) It will not be opened outside these times and it will be well stacked with ice to give it a good cold sink. Our fridge has a small freezer.
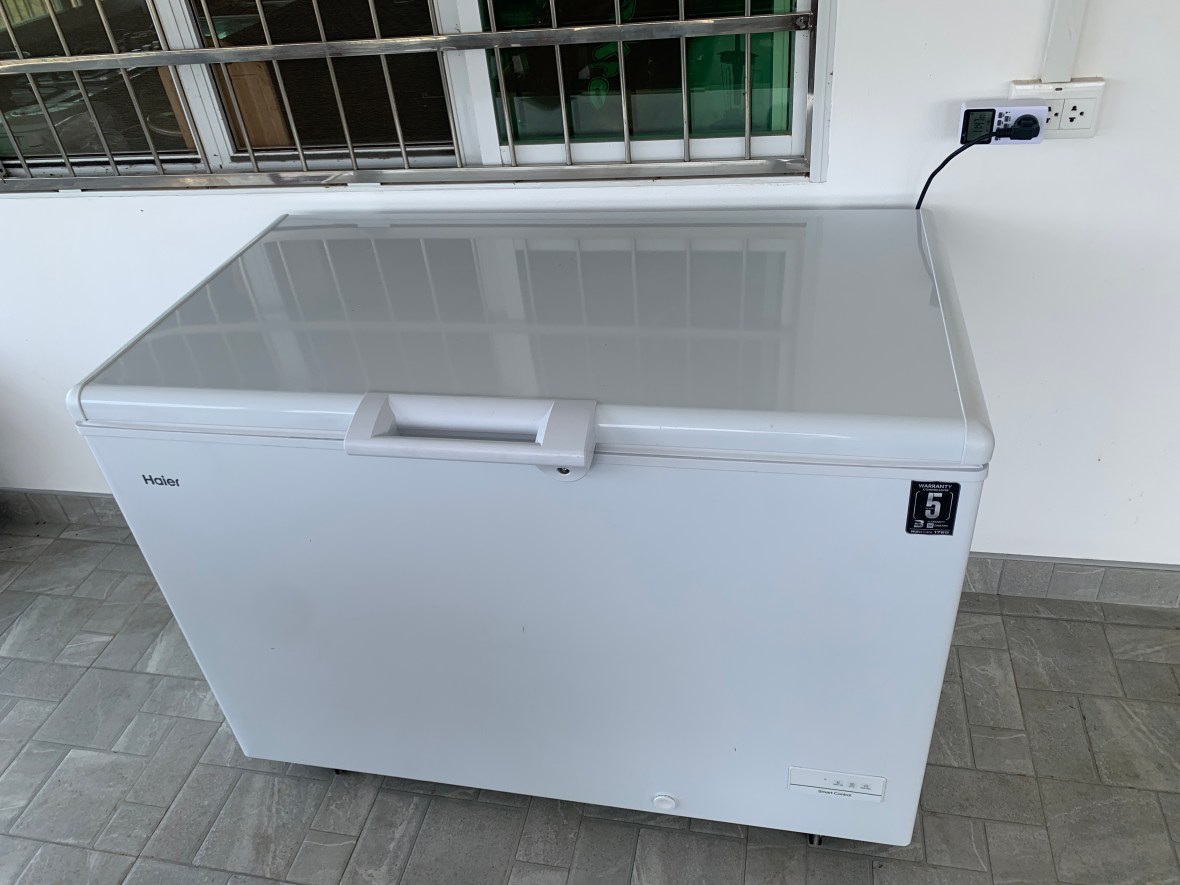
If you are interested in the efficiency of chest freezers, see the video below
Further upgrade for the kitchen is a commercial gas oven (฿15,000) for baking bread and pizzas.


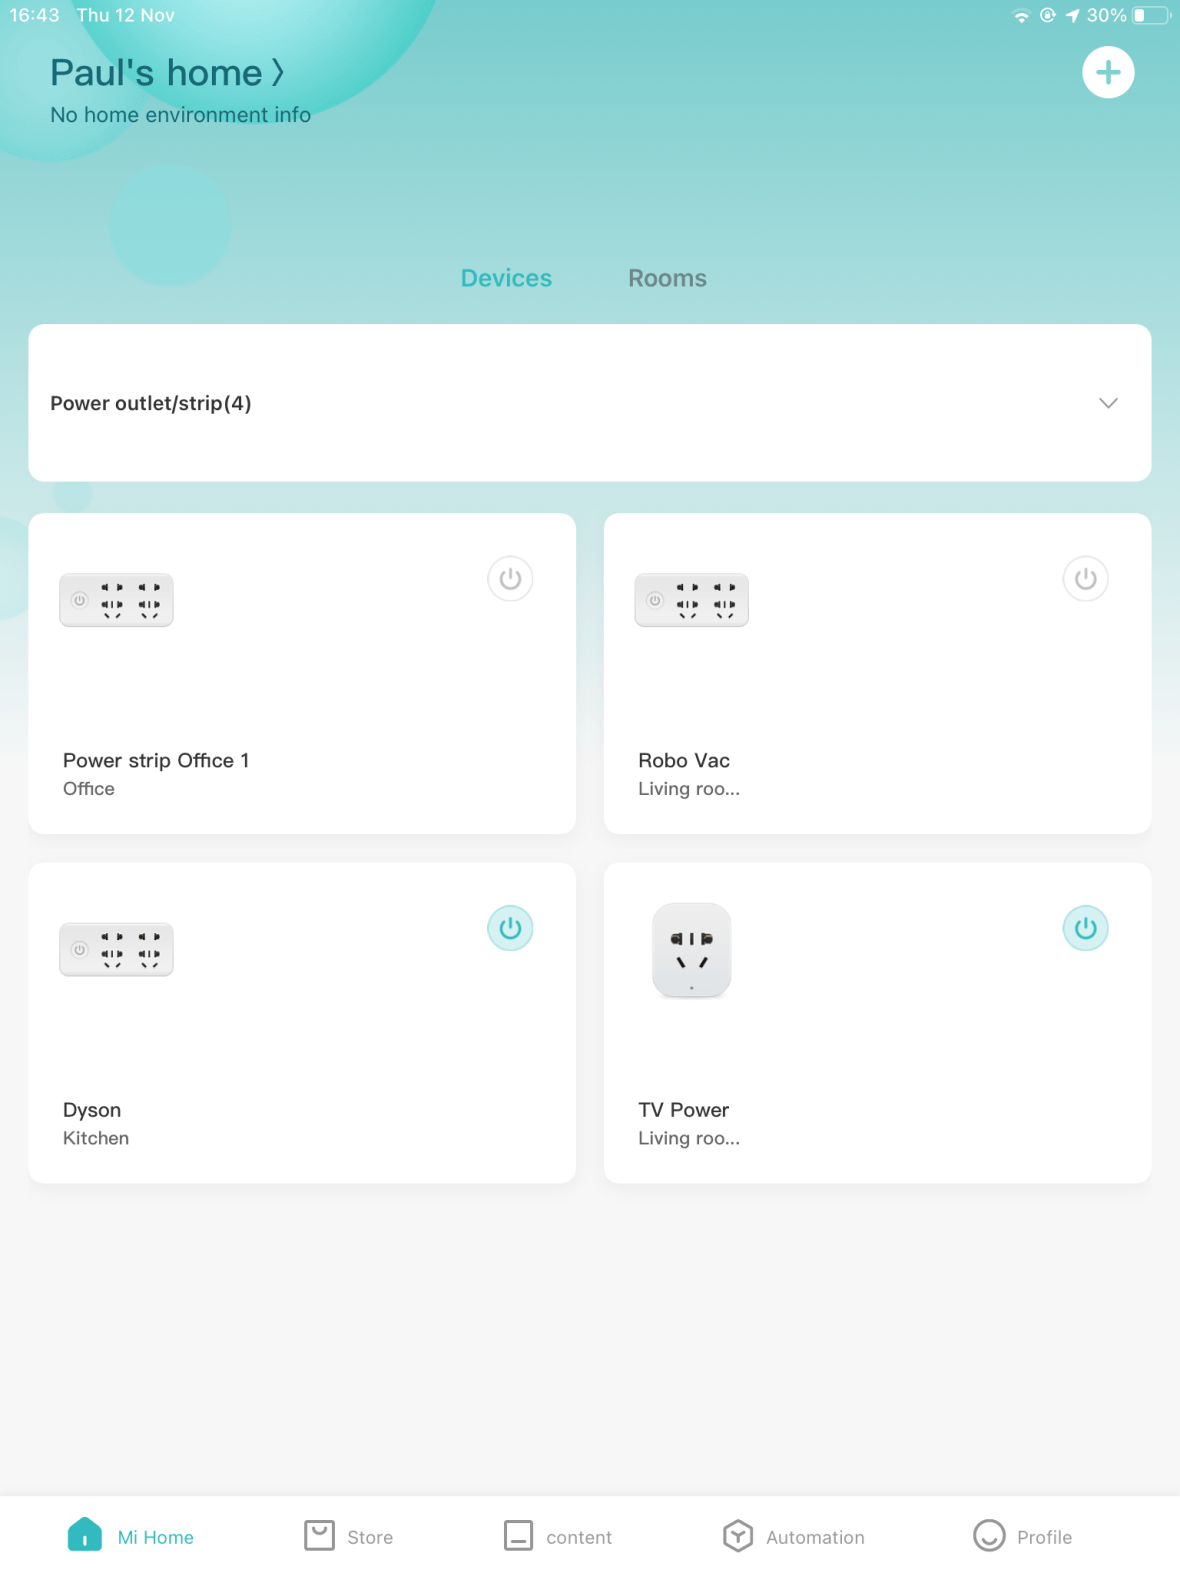
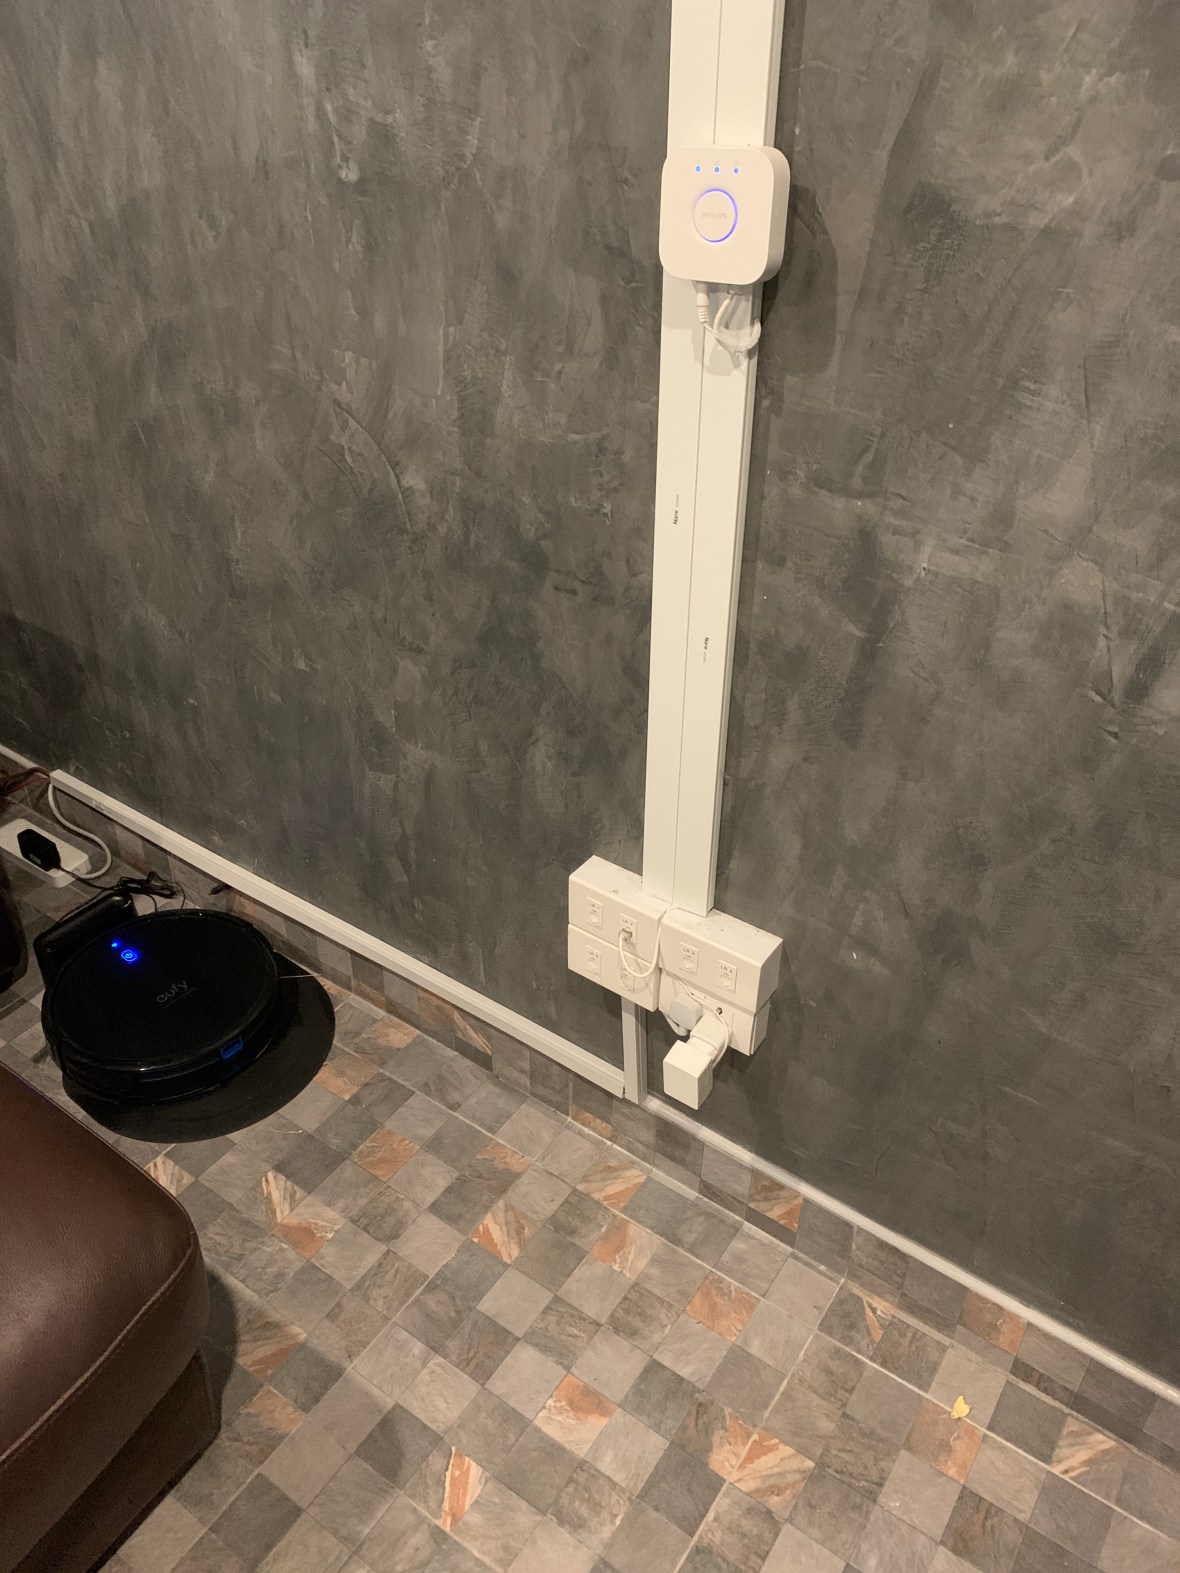
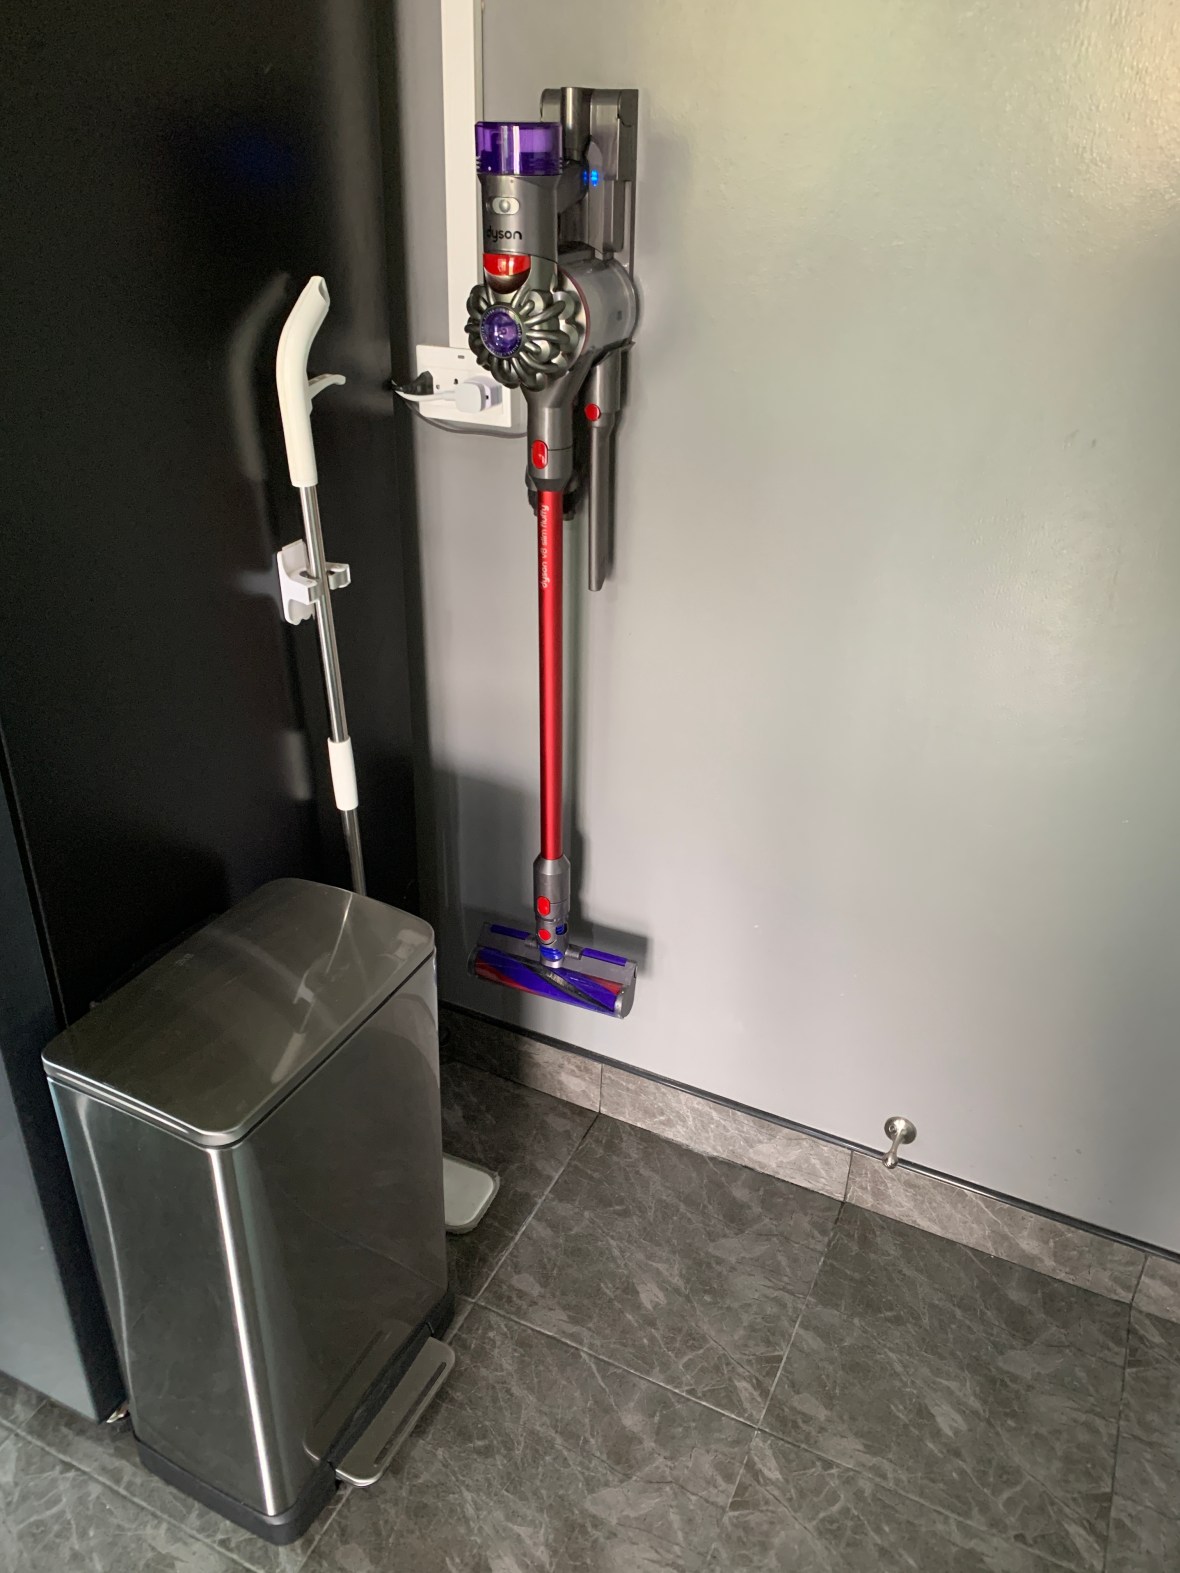
As we now have 2 dogs in the house we have added a Robot vacuum/mop:
One way we try to reduce the strain on the batteries at night is minimise standby power usage, the way electric power is consumed by appliances while they are switched off or in standby mode.
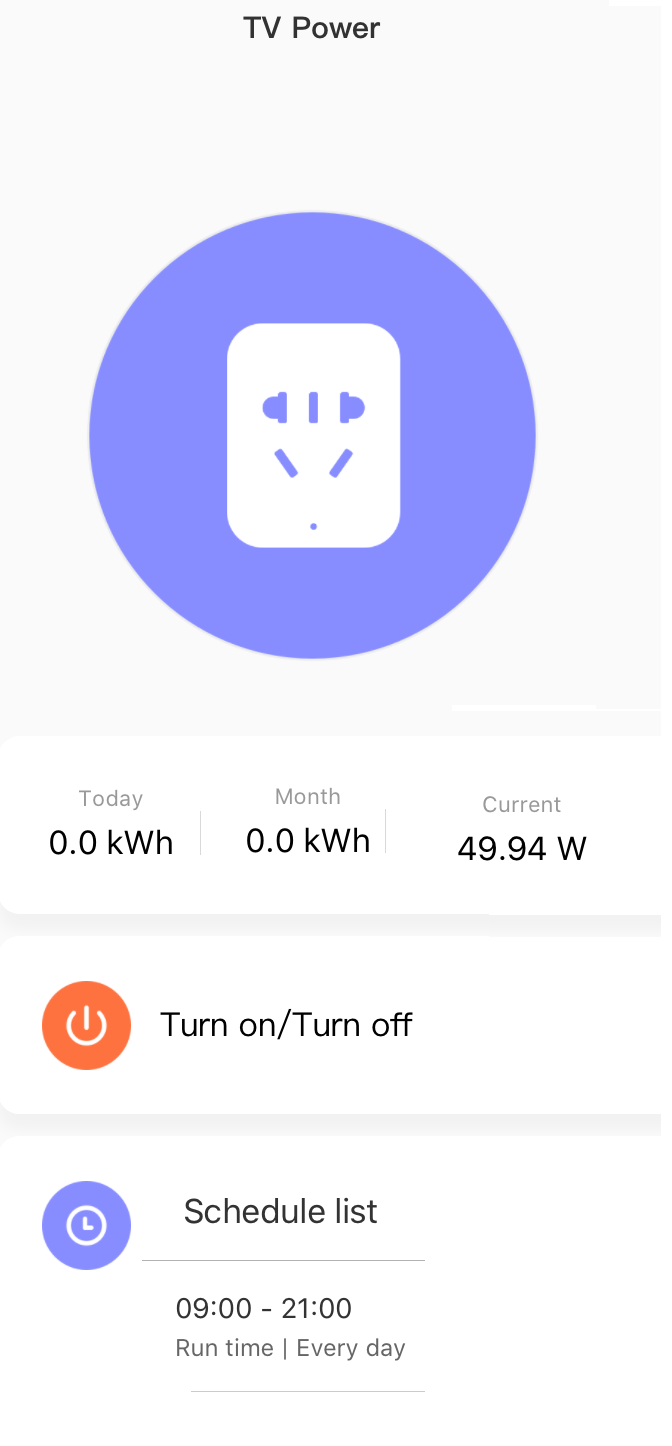
I have a number of smart home products in the house. One of the companies I use is Xiaomi. I have the Xiaomi Smart WiFi Socket plugged into the power outlet in my living room and the TV; AV Amp, Apple TV etc are plugged into it.

I can program the smart socket to switch off and on at certain times of the day. The socket also records how much power is being drawn through it and it is controlled through an app on my phone.
Using smart power strips anything with a battery such as the Robo Vac and the Dyson are charged between 11am and 1pm when the most power is being generated by the solar panels.
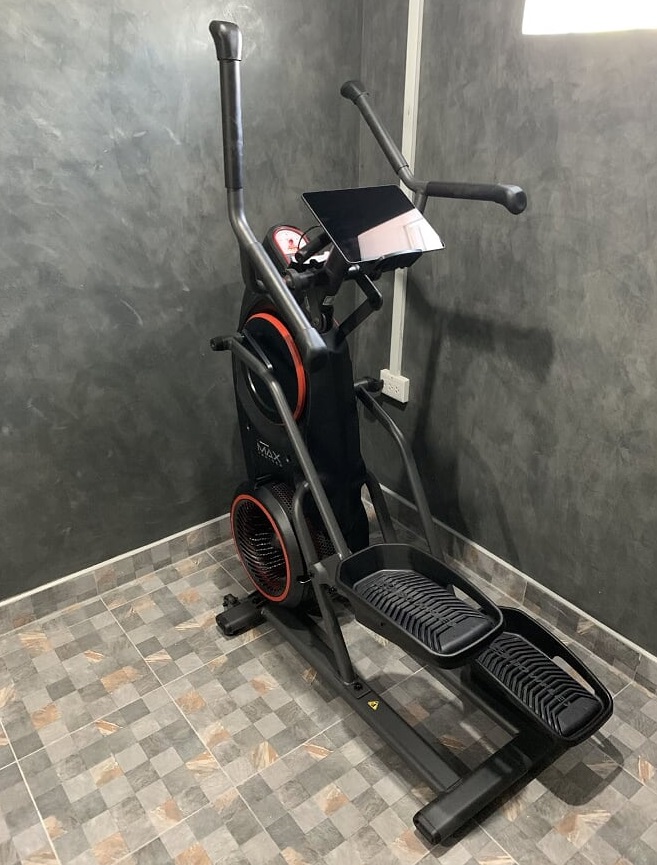
The Gym on the second floor has taken a leap forward. Firstly we installed Interlocking Foam Tiles.

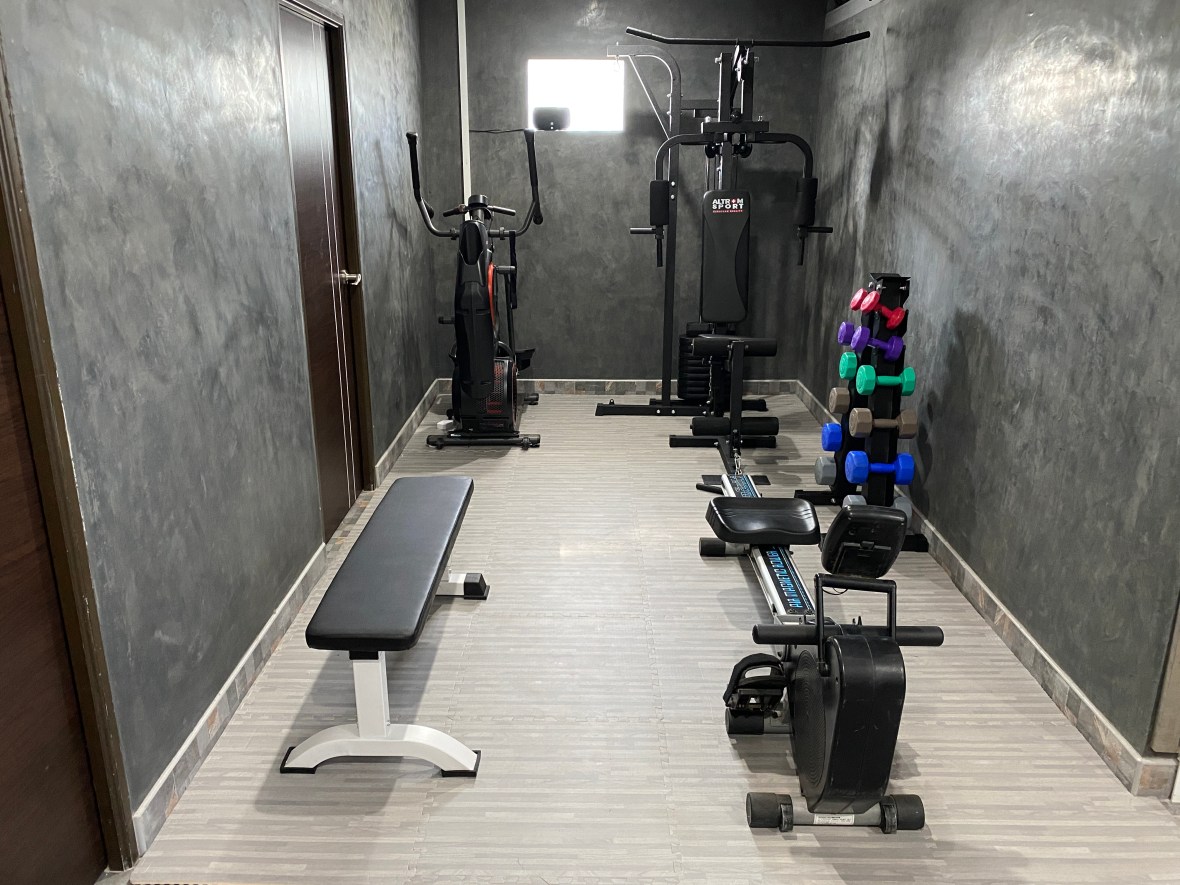

For cardio we have a BOWFLEX MAX TRAINER M3 which is a cross between an elliptical trainer and a StairMaster – a very good cardio workout.
On the third floor we have a spin bike with belt drive and contact-less magnetic breaking.

Some more smart home items:


The smart smoke and gas alarms in the kitchen works like conventional alarms with some added features:
- They are linked to the Xiaomi Gateway Hub in the Living Room, so not only do you get an alarm from the device but also from the Hub which also flashes a red warning.
- They send an alert to the app on your phone so it will notify you if you are away from home.
- The sensitivity can be adjusted if they give too many false alarms.
- They can be reset from the app, so you don’t have to hit them with a broom handle to turn off the alarm
- I have set them to auto self-test every month.

The water leak detector does not have an internal alarm as it is a much smaller device, but otherwise it has the same features as the gas and smoke detectors.

New year party 2020:

Cinema update:
Previously:
Currently:


The system now consists of
Speakers: TANNOY REVOLUTION XT-8F x2 front with TANNOY : REVOLUTION XT-C x1 center channel. TANNOY : REVOLUTION XT-6F x4 for side and surround.
B&W CCM-362 x2 IN-CEILING speakers to support Dolby Atmos
A/V Receiver: ONKYO : TX-RZ730
New additions:
Cambridge Audio CXA81 Integrated Stereo Amplifier 80w which will drive the front TANNOY REVOLUTION XT-8F speakers.

The Onkyo AV is an 9.2-Channel amp but it’s power is split across all channels. So using Line-Out for the front Left and Right Channels the CXA81 can take over the heavy lifting.
Q Acoustics B12 Subwoofer Speaker 12” with an integrated maximum 440 W Class D Amplifier again helps take the strain. By setting the crossover to the appropriate level, all low frequencies can be handled by the sub, allowing the the other speakers and amps to concentrate on mid and high frequencies.

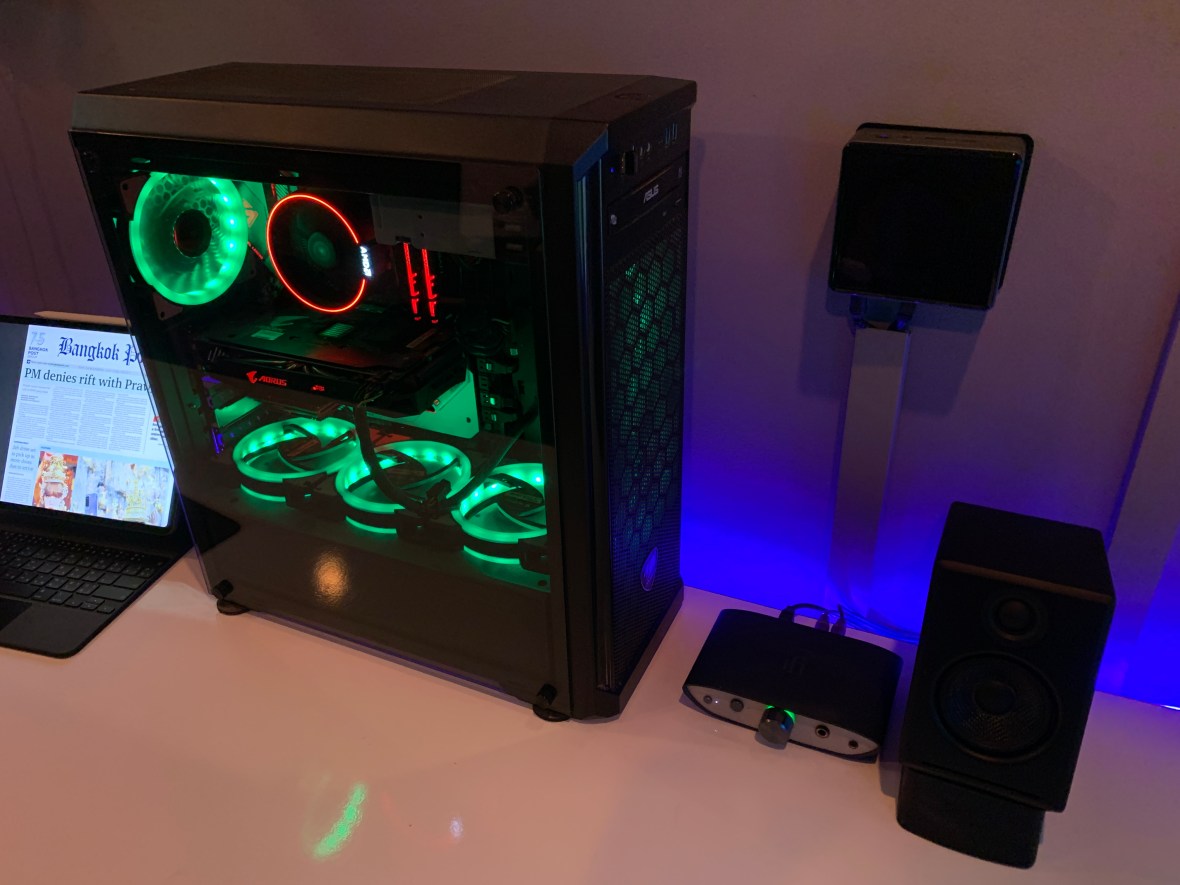
Home Theater PC (HTPC) This PC will live in the cinema and its primary roles are for gaming on the Steam gaming platform.

It’s secondary role will be to act as a music server. I have YouTube Music via my YouTube premium subscription which works well with the various smart speakers around the house for a “OK Google play…” but for serious audiophile music I subscribe to Tidal.

The highest quality on Tidal are Tidal Master which are better-than-CD stream courtesy of MQA (Master Quality Authenticated) To achieve the highest quality a MQA-enabled DAC is required (Digital-to-analog converter)
I have an AudioQuest DragonFly Red DAC.

It changes colour depending upon the quality of music streaming.

To manage my music collection on my NAS together with my TIDAL favorites I have a Roon server installed on my HTPC. Roon requires a subscription of $12.99 /month or lifetime for $699.99 which is the option I selected.

Roon is not easy to explain, but just let me say that if you take listening to digital music seriously and want the best possible experience, you should consider Roon.
whathifi.com/advice/roon-everything-you-need-to-know .
I also have a Xiaomi MI BOX S 4K Ultra android tv box to access Netflix Premium, YouTube Premium and stream my own movies and TV shows from my PLEX media server.
My original plan was to have a projector in the cinema and I spent 2 years researching the options available in Thailand. I was originally drawn to ultra short throw laser projectors, but most are shipped from China and there is no after sales support here. A traditional back of the room projector with native 4K resolution was a very expensive option. There is also the problem running 4k through very long HDMI cables and replacement bulbs are crazy expensive. So I settled for an 86 inch LG LCD TV.
The room which has no windows is 5m long by 4m wide. The concrete walls were covered in acoustic board and acoustic foam.
Solar update:
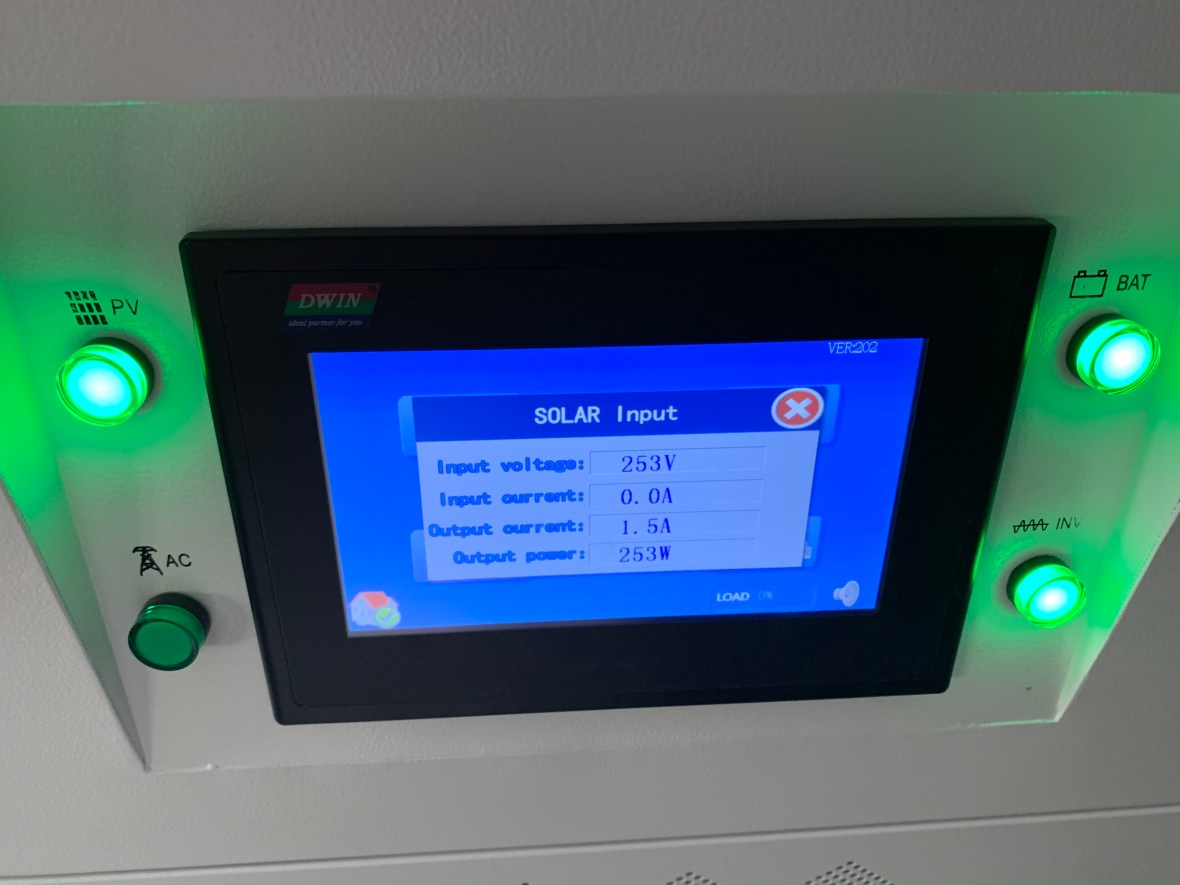
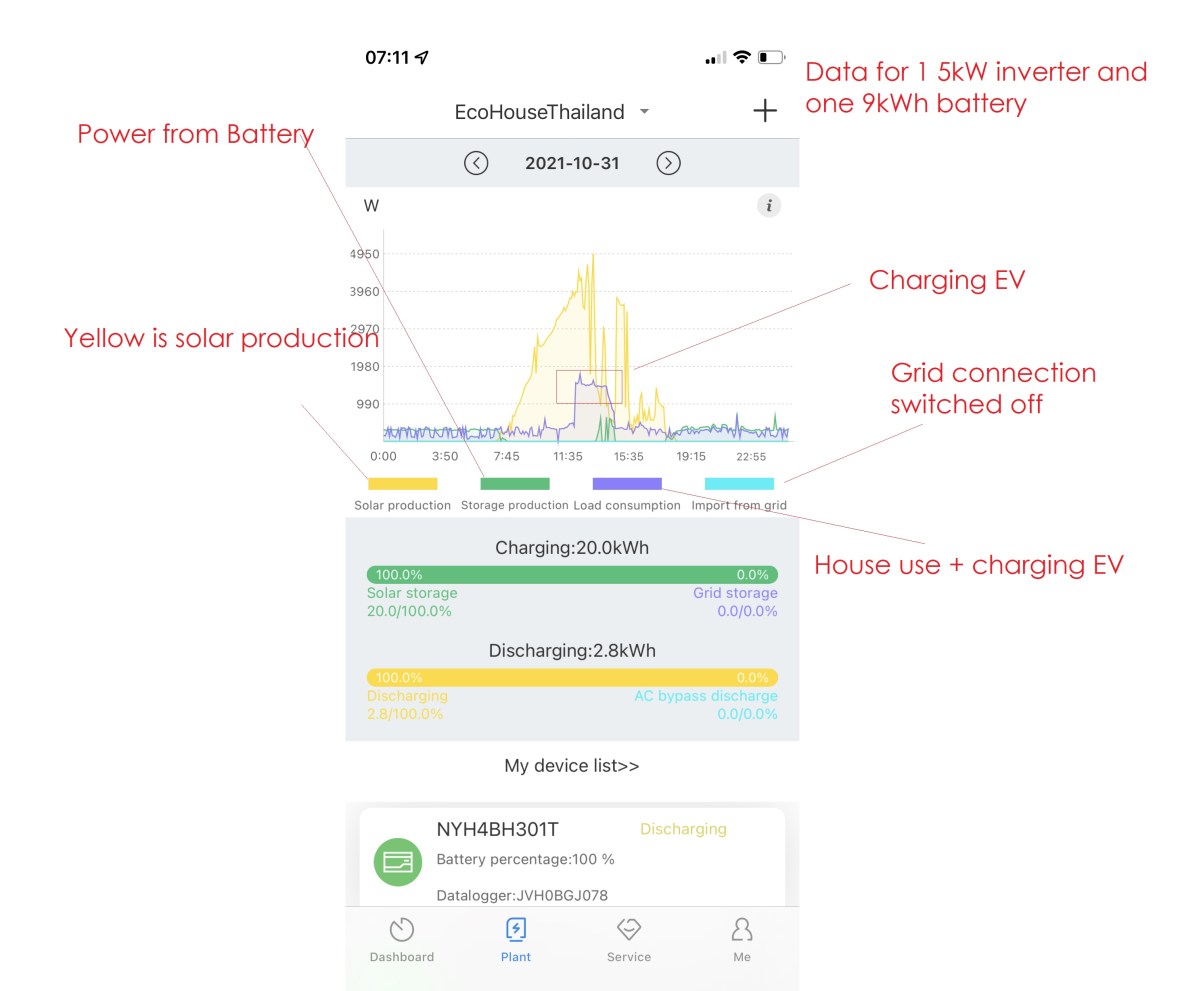
Since installing solar I have had many requests to see my statistics on power produced. The inverter came with a module that was not wifi enabled but required to have a network cable plugged in. The mechanical room is one of the few rooms in the house without internet sockets. So I had to run Cat 6 cable from the living-room into the roof space above the kitchen, then across the top of the bathroom and over to the far side of the mechanical room. Once plugged in I could see the device on the network but the supplied software could not detect it.

This has not been a problem for 9 months of the year when I can run the house completely off grid. However, in the 3 month rainy season the batteries can drop down to 50% capacity at which point the inverter calls for power from the grid. The problem is that can happen at 5 in the morning and the batteries can be at 80% when the sun comes up. For this reason I keep the grid switched off and and manually add a couple of kwh before going to bed, if I think it was needed. To monitor the state of charge of the batteries without a walk outside to the Mechanical Room, I have added a wifi camera and small USB powered LED lights, so I can monitor the battery state via my smart home app on my phone.


Latest Smart Home Project:
Managing the lighting in the cinema: I have installed Xiaomi smart color bulbs into the four wall light fittings in the cinema and a further Xiaomi smart color bulb backlighting the TV in a lamp which is plugged into a power outlet. In addition, I have 10m (5m x 2) of “dumb” color LED light strip plugged into 2 power outlets set up high on the wall. So how to control all of these lights with one switch?
- I created a Light Group in the Mi Home App which included all 5 Xiaomi smart color bulbs
- I changed the “dumb” light strips into smart ones by plugging them into 2 Xiaomi smart plugs
- I then added a Xiaomi programmable smart switch to the cinema
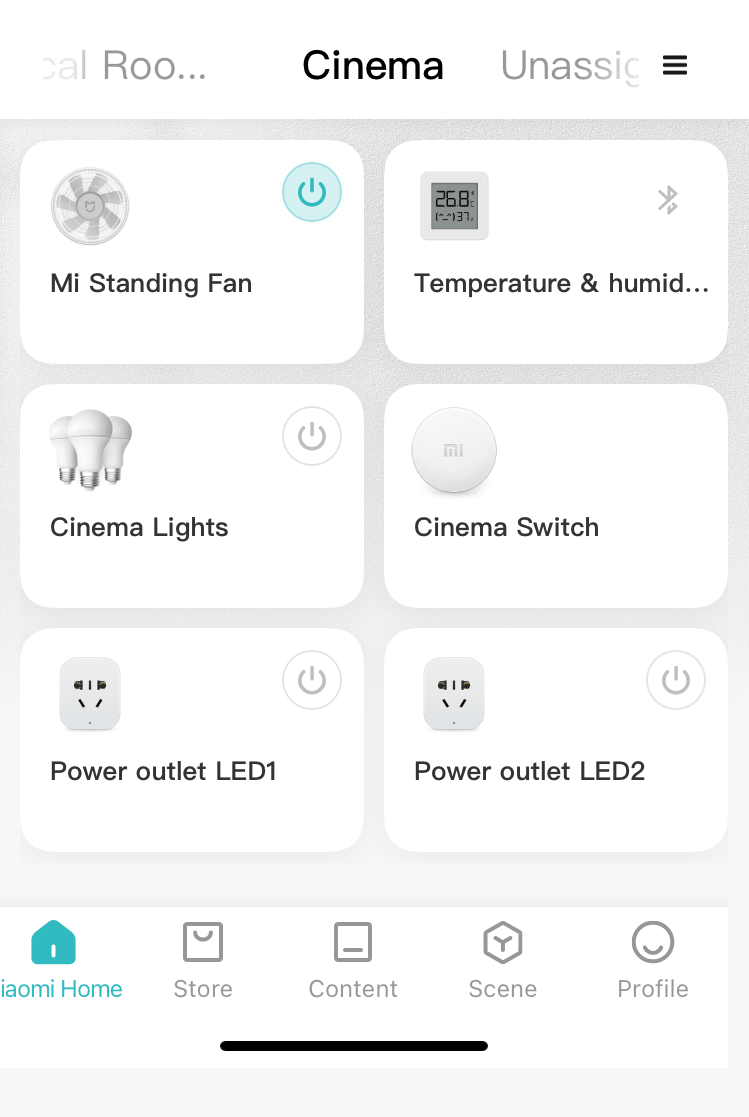
I then programmed the smart switch to turn on and off and all the light in the cinema with one click

The wired lights switches are now no longer used, just the smart wireless switch

I have set the cinema lights to the optimum cinema viewing colors and brightness which is remembered when they are switched off.

If I want to change the color or brightness of the 5 Xiaomi smart bulbs, because they are in a light group, I can change all 5 at the same time via the app.

Temperature is always measured in the shade as it is measuring air temperature, being in direct sunlight solar radiation raises the temperature by 10 to 15 degrees. However, when you go out you are exposed to solar radiation. It is a shame that both figures are not quoted.
My outdoor temperature sensor normally lives in the shade of the spirit house, but they must have kicked it out today as I found it cooking in the sun, which explains the crazy outdoor temperature reading.

The kitchen:
Latest addition for the Cinema: Cambridge Audio CX-C V2 CD Transport to match my Cambridge Audio CX-A81 Integrated Amp. What HiFi Best CD transport under £500. It is a CD transport and not a CD player as it sends the digital signal through a digital optical cable to be converted to analogue in the amp for a purer sound.

I have been very impressed with the sound and have decided to expand my CD collection, before they disappear forever. Music streaming is very convenient, but you never actually own the music, you are just renting it. When my newly purchased CDs arrive I make a lossless digital backup copy in FLAC format. I use dBpoweramp CD Ripper. Metadata and album artwork can be checked against 5 online databases and the resulting rip is verified error free using AccurateRip which compares the rip to rips done by others. In the example below my rip is confirmed accurate by comparing it to 30 others.
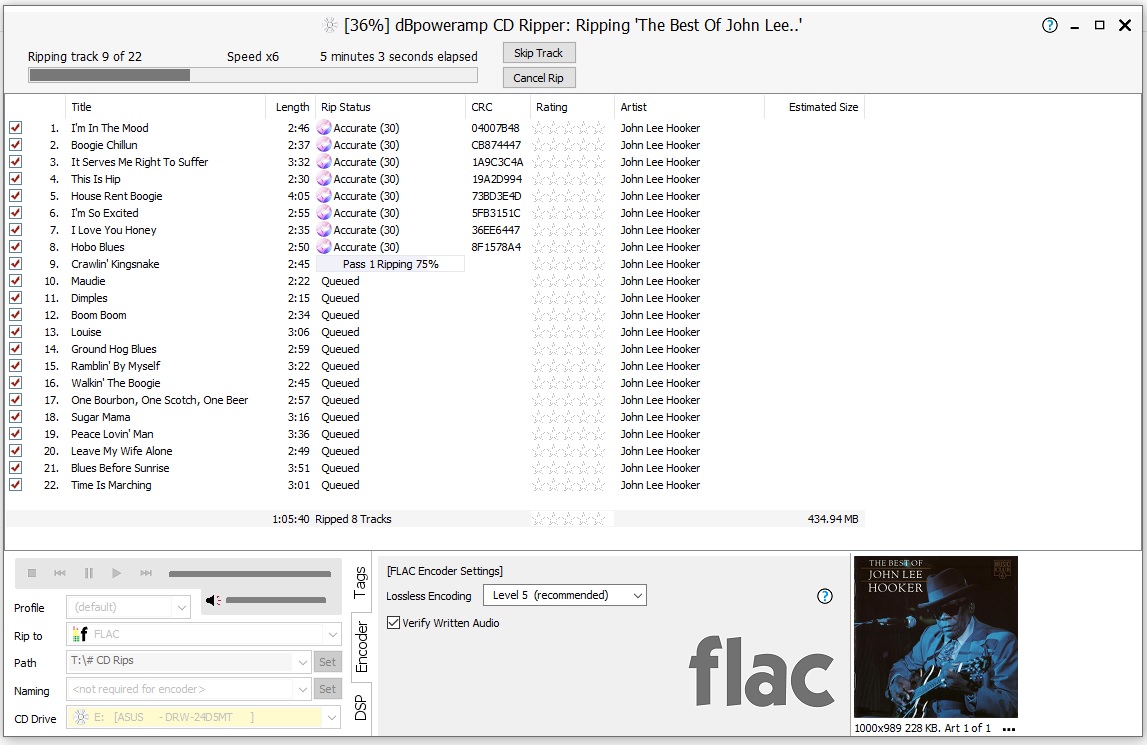
The digital copy lives on my NAS where it can be accessed by ROON so I can play the digital file if I want. Here the list of Albums is filtered by location on my NAS and the tag “Rip”

Purchased some CD storage units from IKEA before they are discontinued!


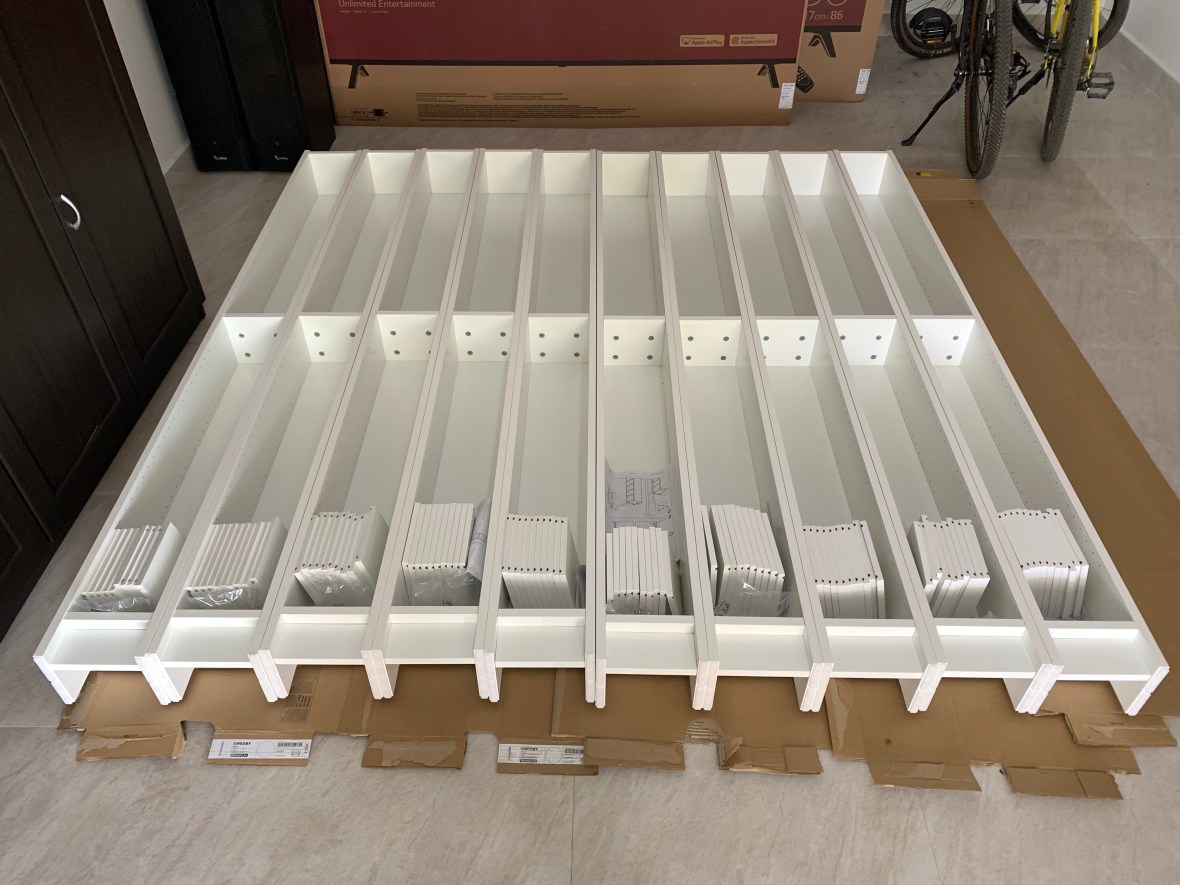
Unfortunately they all have to be sprayed black before they are moved to the cinema

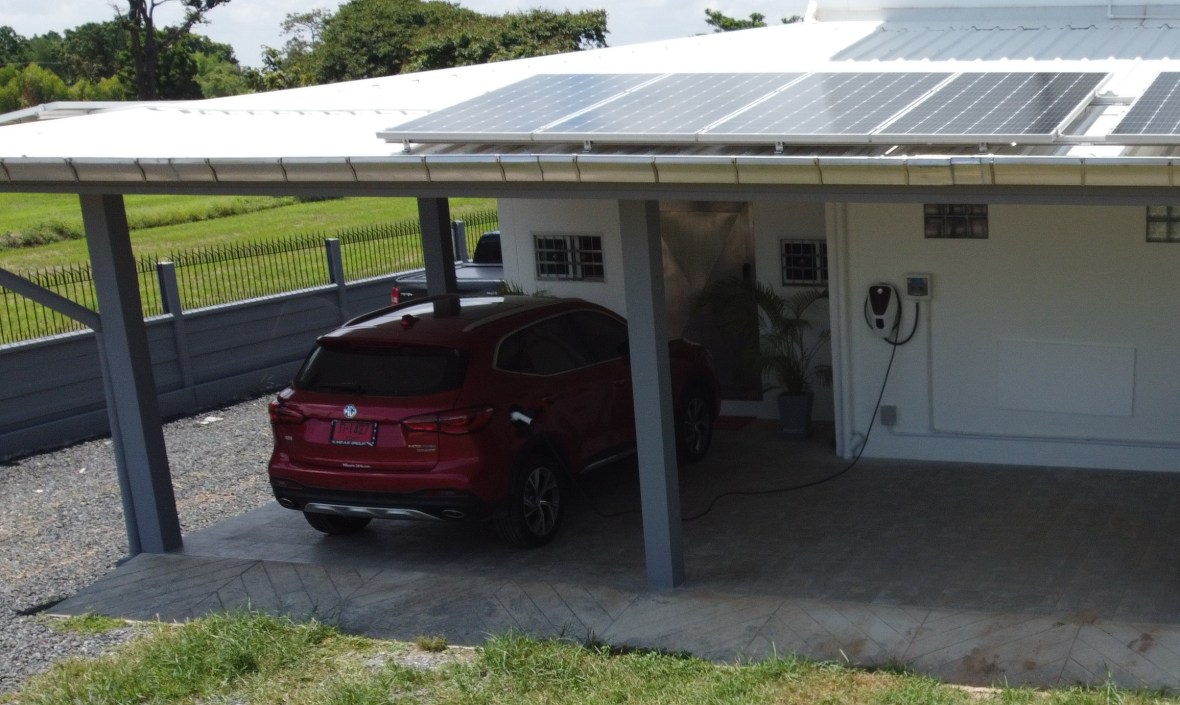
Electric Car:
The first thing people ask me about my solar system is “How long before you get your money back?” Mine is a big expensive system designed to be off-grid. Based on my estimated electric bill of ฿3,500/month it will take me over 10 years to get my money back. However, my system was also designed to produce excess solar in the middle of the day specifically for charging an electric car.
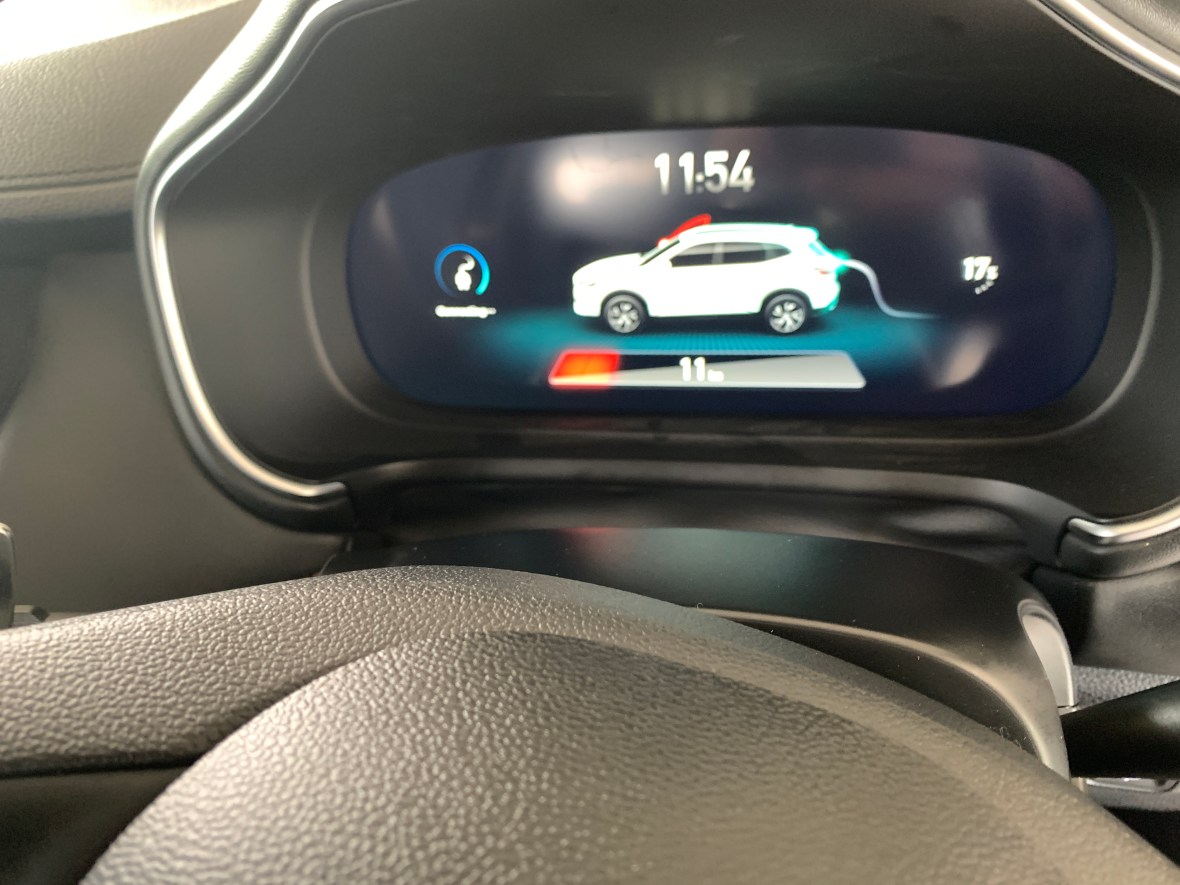
The choice of electric cars in Thailand is very limited, with any imports being heavily taxed. When I started looking 2 years ago the base level Nissan Leaf cost ฿732,161 in the USA and ฿1,990,000 in Thailand. Then MG imported the ZS EV for ฿1,200,000. I rushed to put down a deposit only to be told that I would have to a second meter installed to bring grid electric to charge the EV as “solar would not produce enough power to charge an EV” – I refused on principle.
MG have now released the HS PHEV, which takes 3 hours to charge the 16.7 kWh battery using the free wall charger. The PHEV’s onboard charger only draws 3.7kW so I thought maybe with a small battery and a low charge requirement I be allowed to charge it from solar. “No. Unstable voltage from the solar system could damage the wall charger” So I emailed the President of MG Thailand to ask for his help. He very kindly agreed to help negotiate with the install company and a compromise was arrived at where I get a wall charger with no warranty and if my solar system fails to charge the car I will upgrade my grid connection. When the wall charger install company came to to inspect my system they discovered that my pure sine wave inverter produced a perfect steady 220 volts. The electricity supplied from the grid here fluctuates widely anything from 190 to 250 volts!
The HS PHEV has 67km of EV only range. This might not sound much, but most of my driving would be less than that per trip. The Standard MG HS (non-electric) has a fuel economy of 6.9 L/100 km. If I drove HS (non-electric) 67km/day it would cost me ฿5,000 per month. So now my potential saving from installing solar is ฿8,500/month and a payback of less than 4 years!


I chose a PHEV to try and placate wall charger install company but I have since received some flack for not buying a full EV. One comment I got online was “a PHEV is a con with regard to sustainability” The EV owner who made the comment charges his EV from the grid. The 67km range of our PHEV is enough for our daily needs and as our solar system is off-grid we are charging the PHEV purely from solar. On a busy days we drive the car in the morning, charge it over lunch and drive it again in the afternoon. The maximum I have done is 130 solar generated EV kms in a day. On the other hand an EV charged from the grid in Thailand is basically powered by “burning stuff” as “Ninety percent of Thai electrical generating capacity is conventional thermal” https://en.wikipedia.org/wiki/Energy_in_Thailand

Another reason for owning an electric car that I can charge from my solar panels is that it increases my Self Sufficiency. Now not only do have lights on at home when the village is in darkness, but I can also make my own fuel at home.
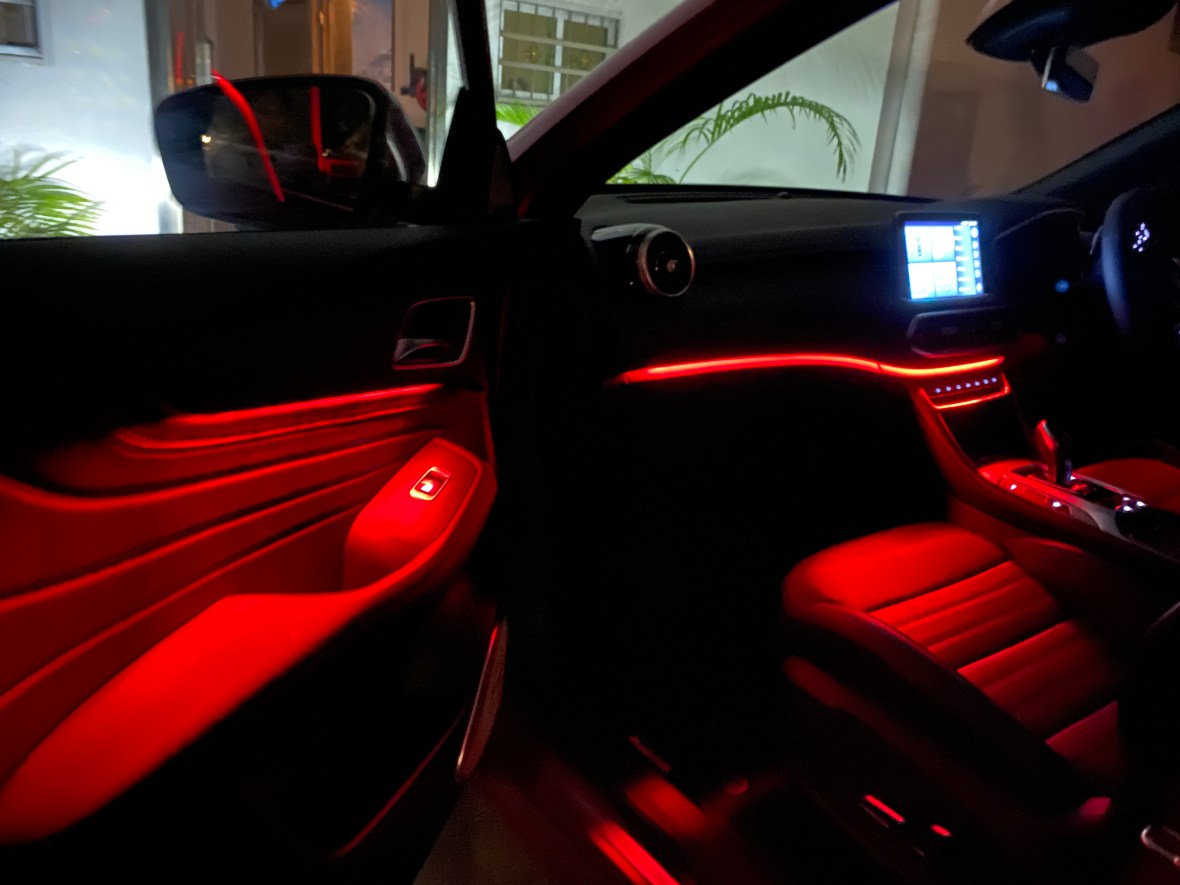
The first thing I did when I purchase the car is have some window film fitted. Most people are happy to have the dealer fit some privacy film, because it usually free, but I wanted a heat reflecting film, especially because of the large sunroof. I paid ฿9,000 for HI-KOOL CERAMIC BLACK NIGHT
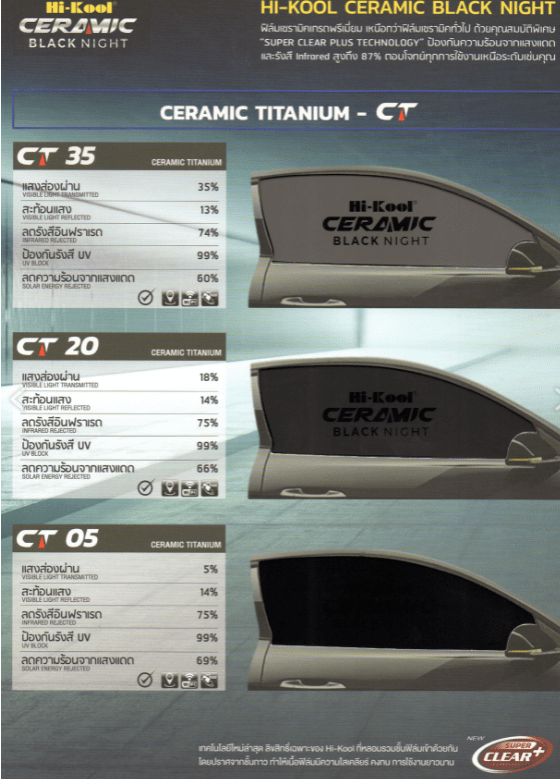
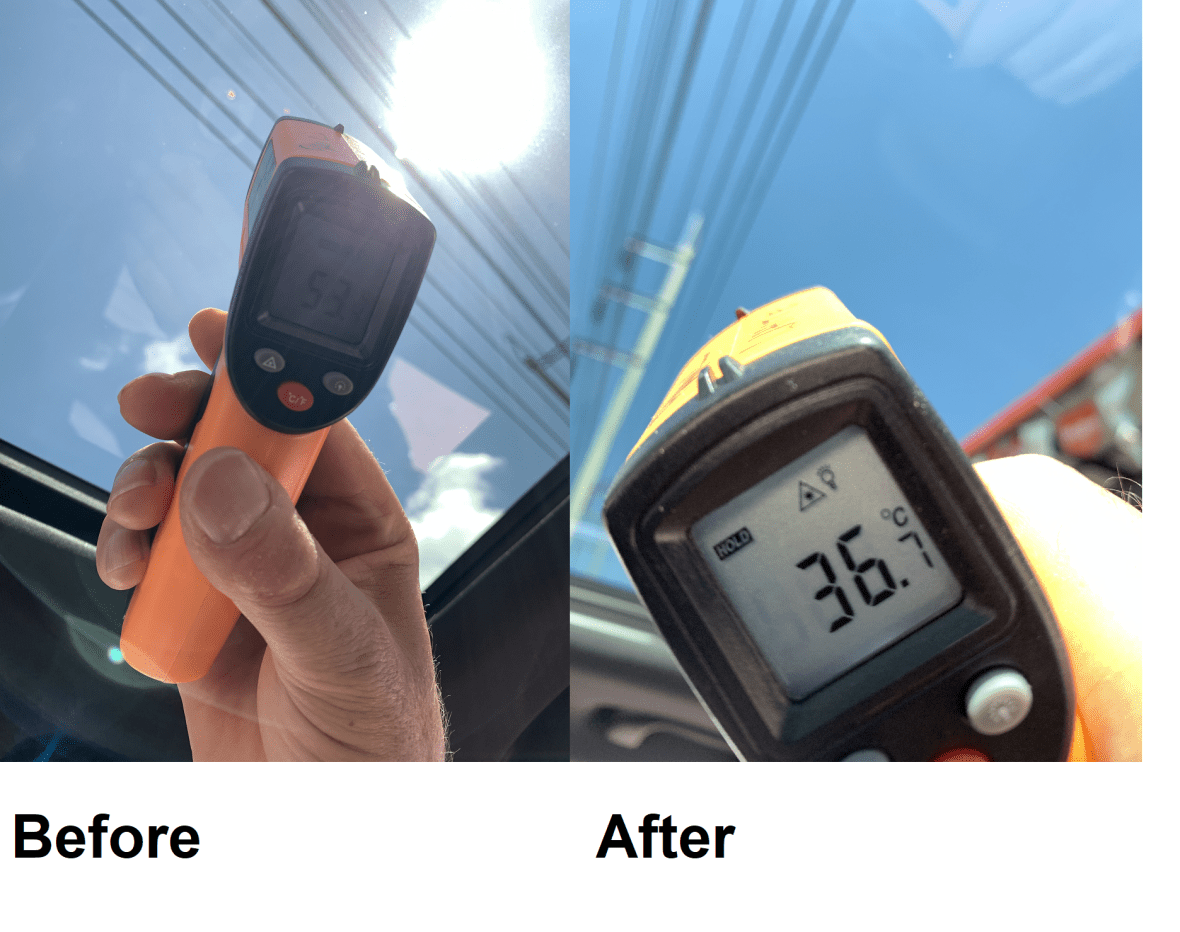
An alternative and cheaper solution I saw on line was: 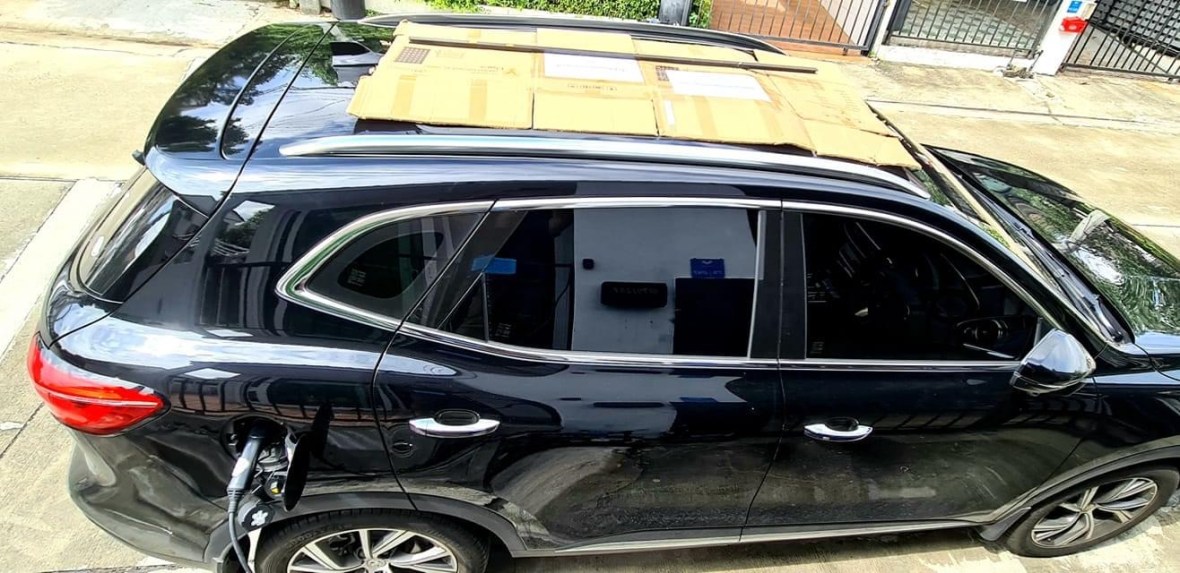
New Workshop Project:


Upgrade to my solar system.
Most people would think that my current solar system was already overkill:
32 x 350 watt = 11.2kw
10kW Hybrid off-grid Inverter
16 Deep Cycle Gel Batteries 12V 200AH = 38.4kWH
But I am trying to be Off-Grid and during the rainy season, which was much longer than usual this year, I am not. It is not possible to simple add more batteries to my existing system particularly as I want to use lithium batteries as they are now a more reasonable price than they were 3 years ago.
I plan to create a complete second system of panels, inverter and batteries. The panels only job will be to charge the new batteries which will then replace my grid connection on my primary inverter. I will set the primary inverter to a more conservative setting to put less stress on my gel batteries so both systems should have a much longer life.
New System:
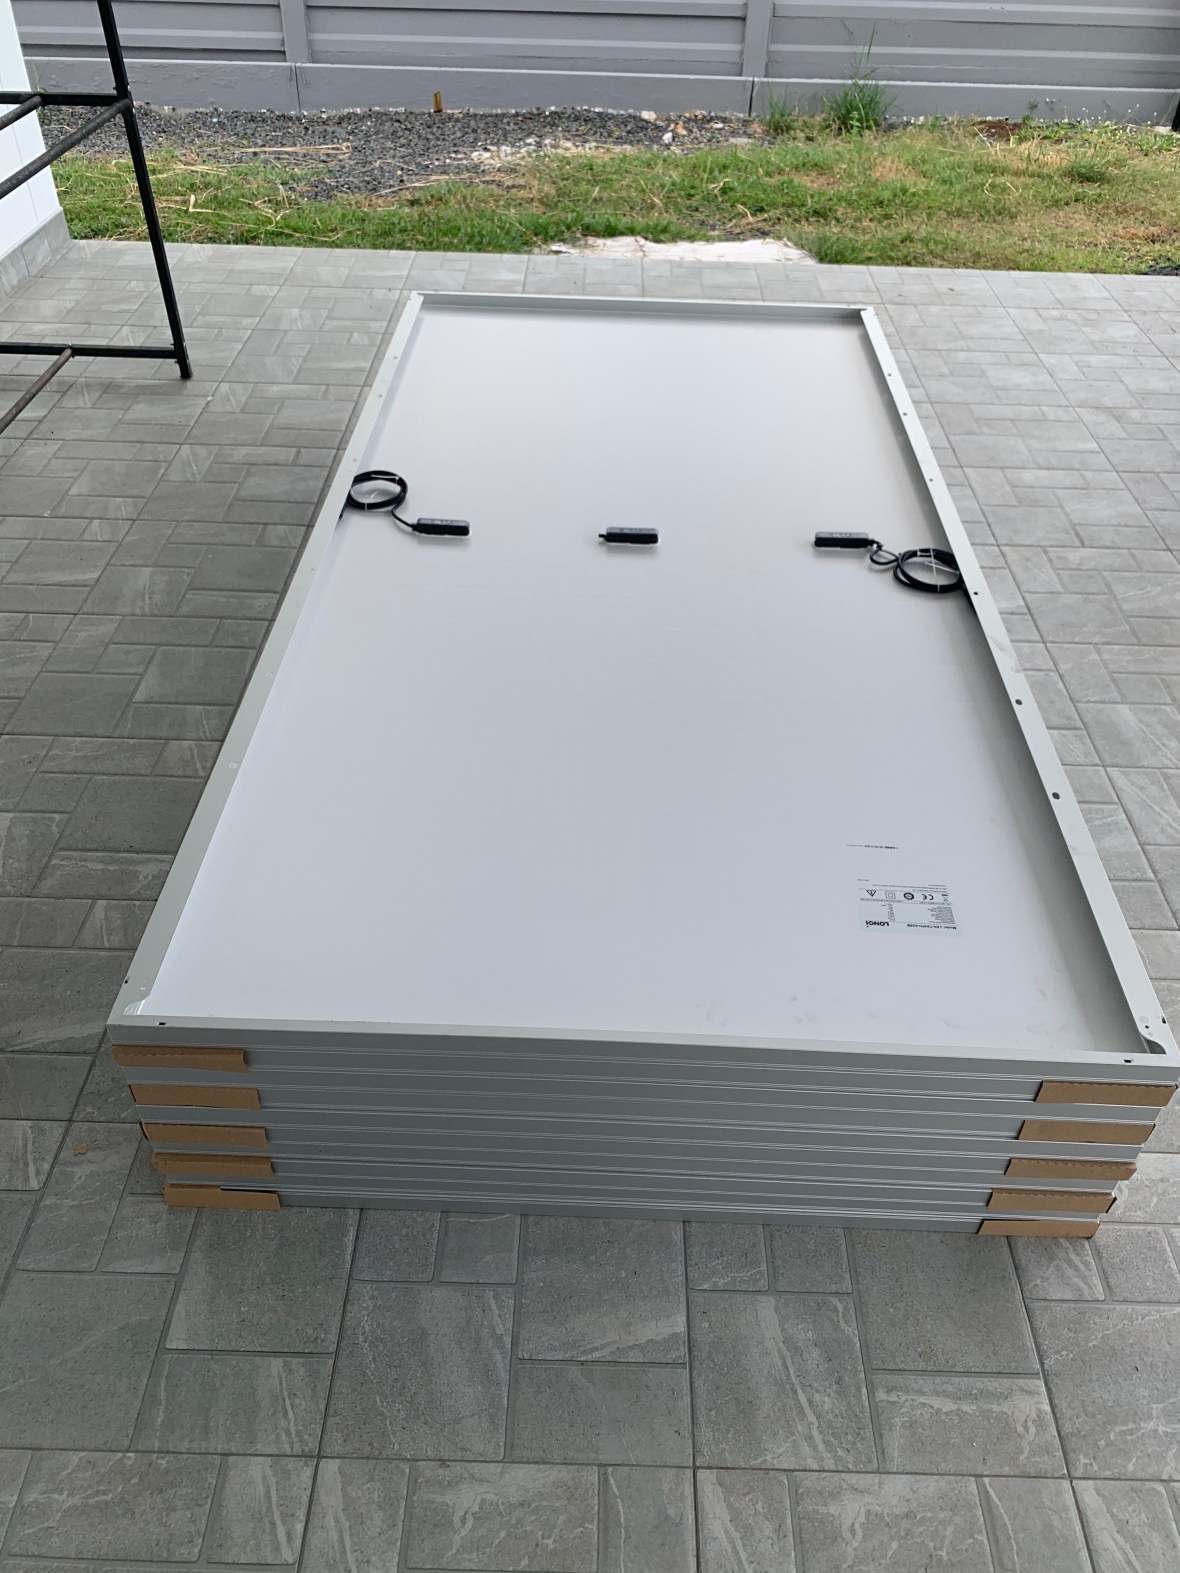
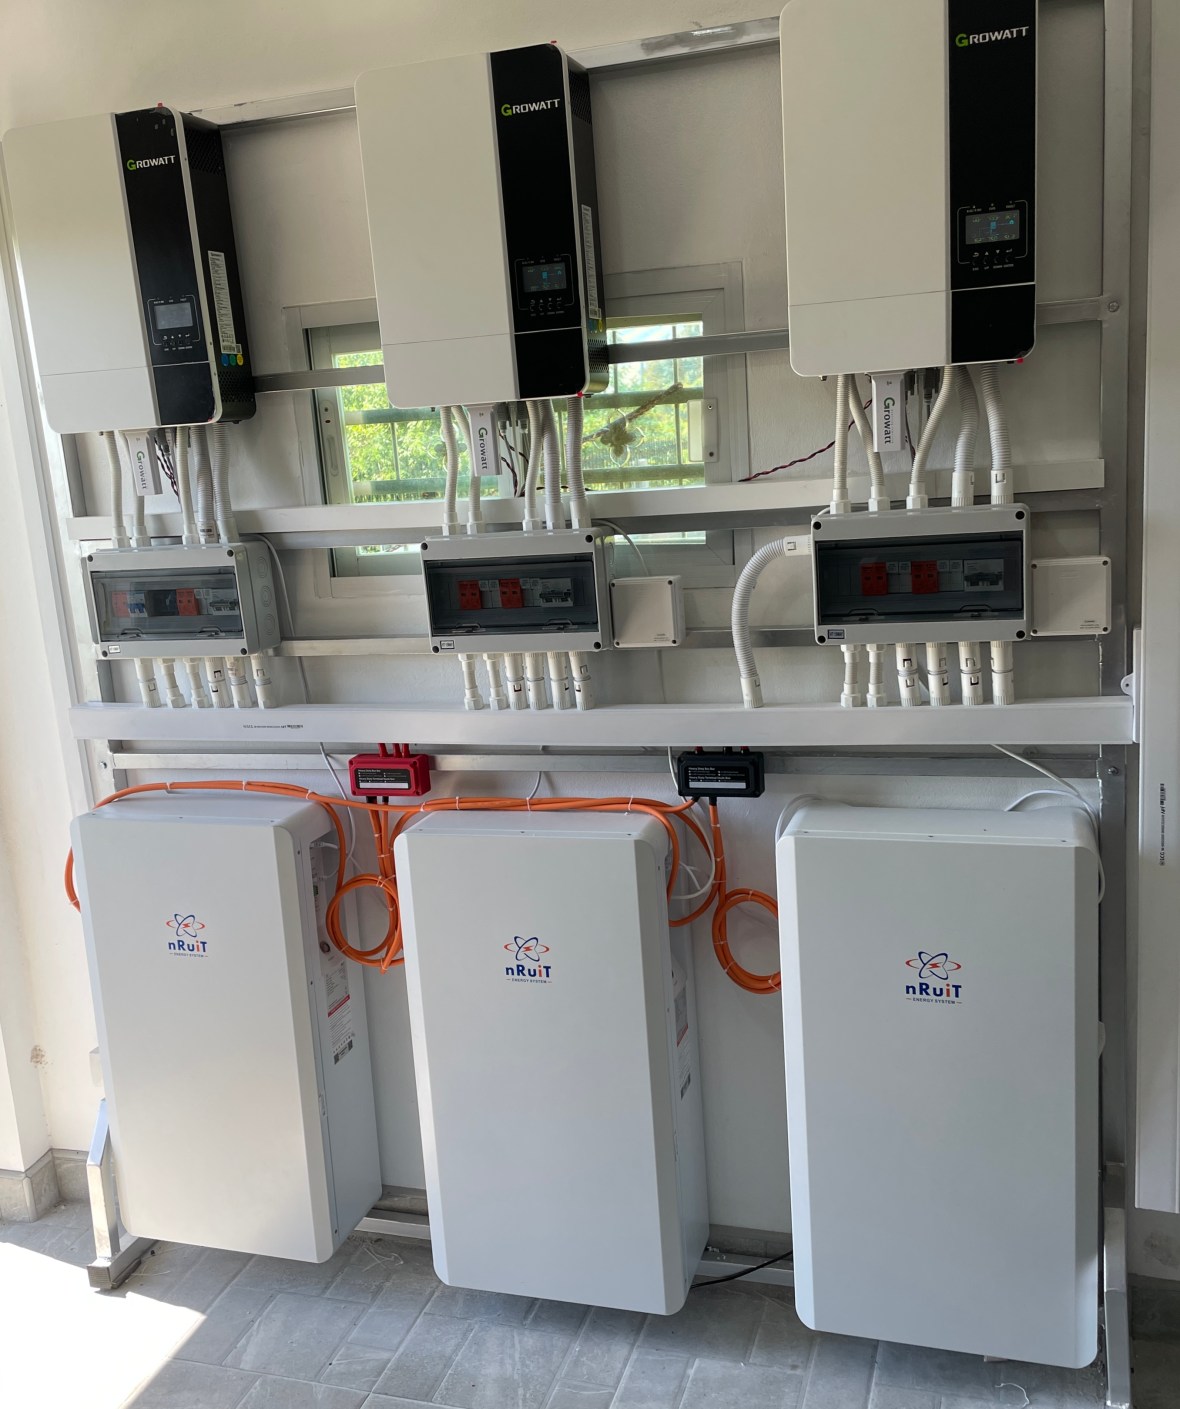
- Longi 535w PV x 10 purchased from Surin SolarShop – free delivery ฿52,800
- Inverter Growatt SPF 5000 ES ฿37,300 including delivery
- 2 set of Lithium battery 9 kwh ฿68,000/set = ฿136,000 www.nruitpower.com/product
- Combiner box for battery set ฿1,500
- Shipping cost for batteries is ฿2,000
GROWATT SPF 5000 ES https://www.ginverter.com/Off-Grid-Storage-Inverters/44-625.html

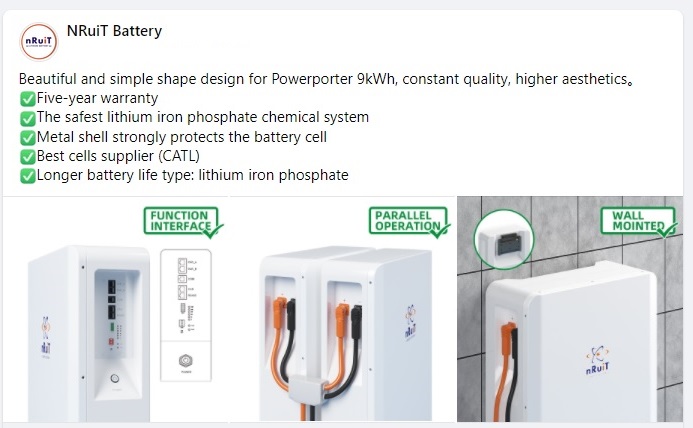

I am now paying ฿68,000 for a 9 kWh Lithium battery or ฿7,555/kWh. Four years ago I was quoted ฿150,000 for 5.6kWh or ฿26,785/kWh

Geothermal Revisited
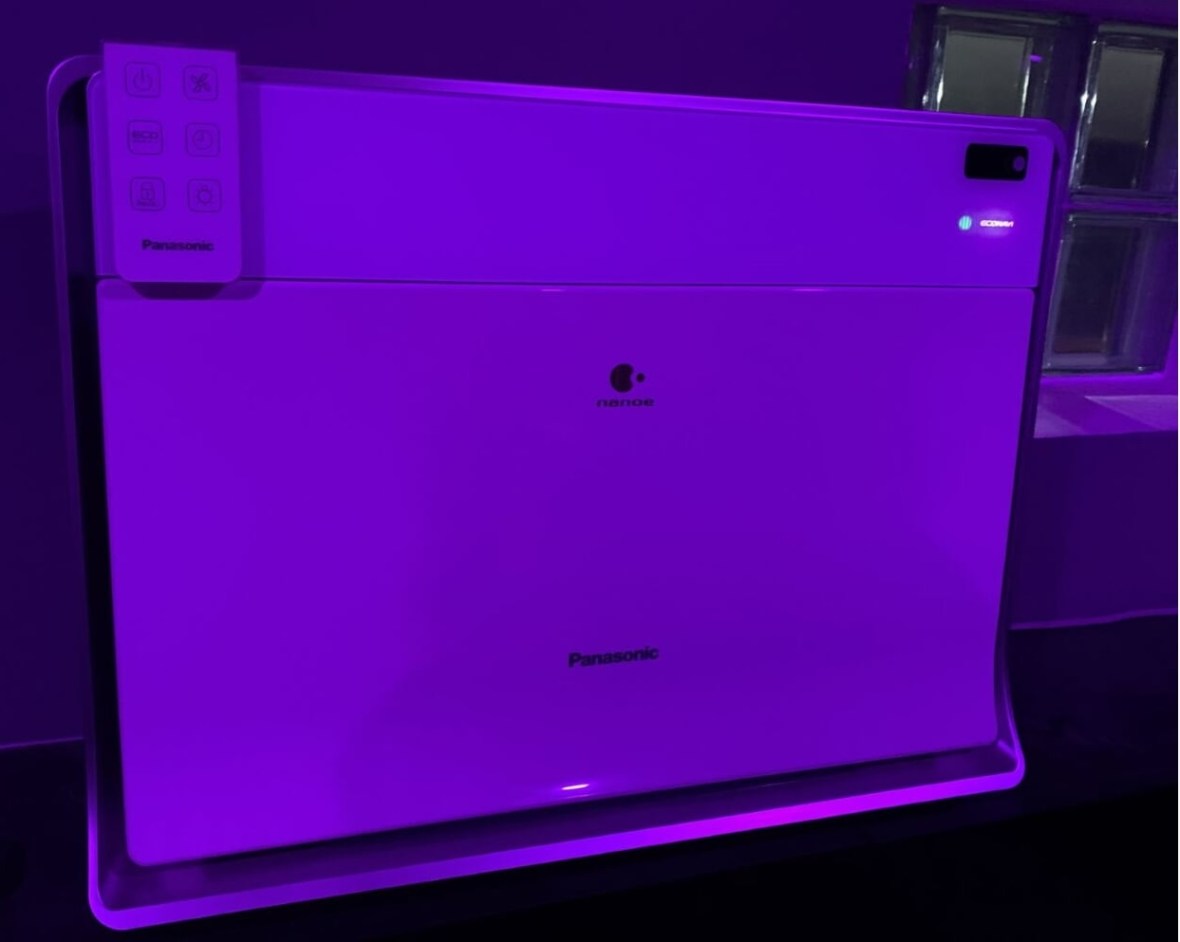
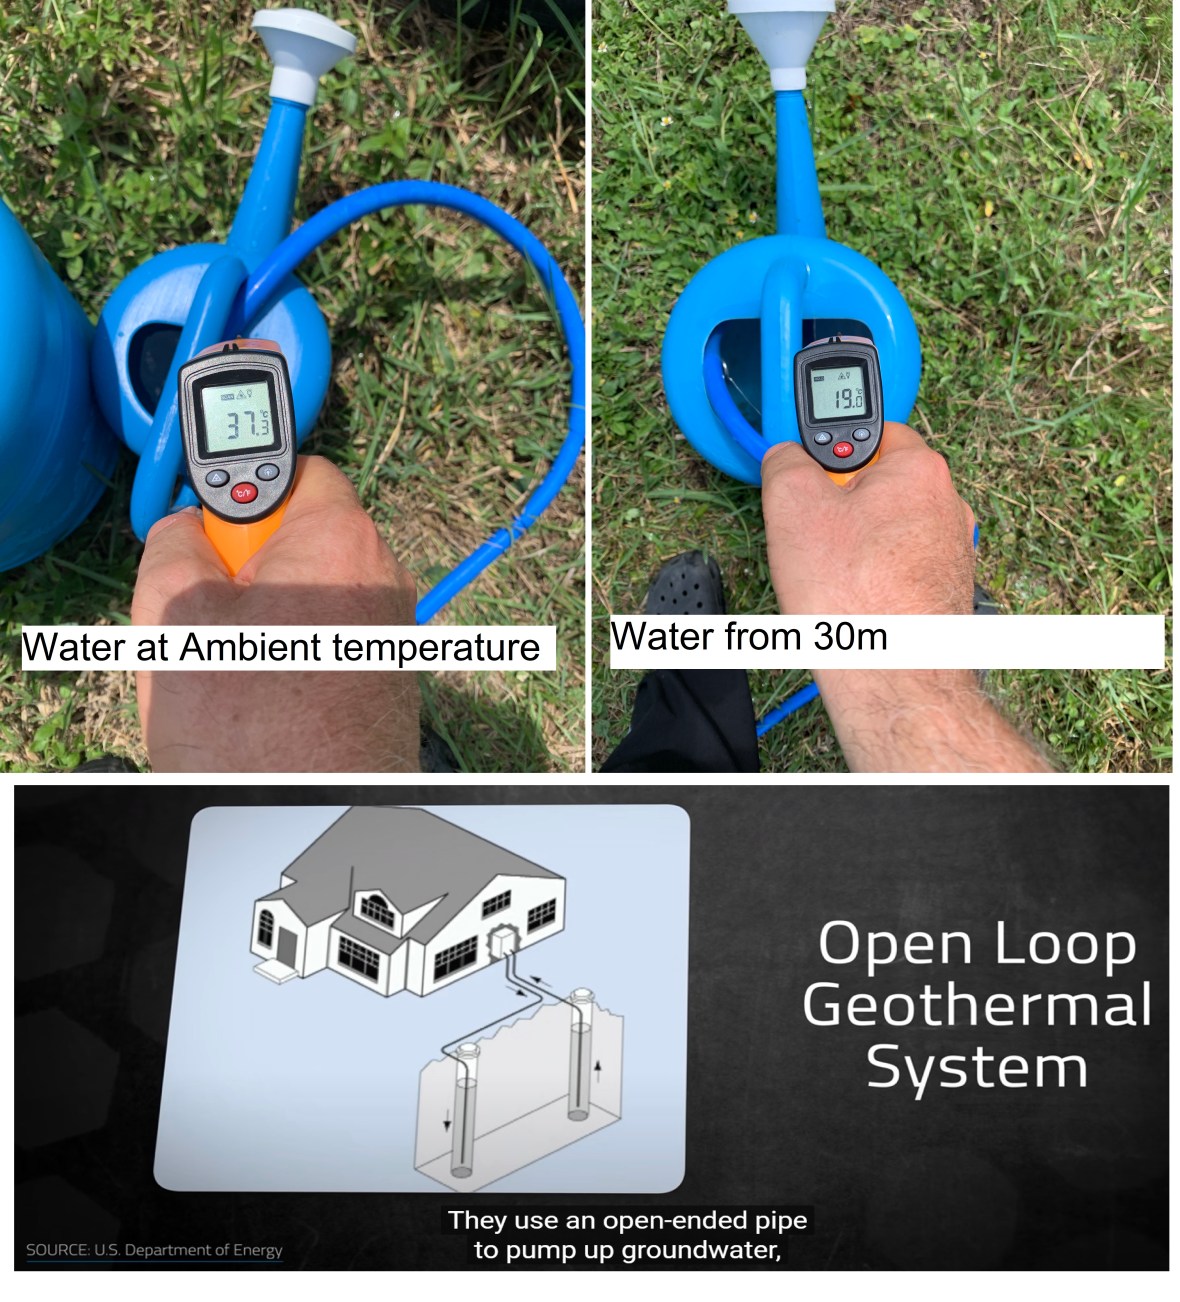
The biggest problem I have encountered in my quest to build an Eco House is sourcing the appropriate technology here in Thailand. When I purchased my Energy Recovery Ventilator from a company in Bangkok it came with very little in the way of instructions and I was initially unable to get it working. The company I purchased it from were no help as I was the first to purchase and knew more about it than they did. I was fortunate to meet a rep from Panasonic at an architect show in Bangkok who was able to sell me a control module for it. My plan for geothermal was to combine it with the air intake of my ERV, unfortunately the piping I used was not designed for geothermal.

I am still looking at Geothermal and think the way to go is either a closed or open loop groundwater system combined with a heat pump. Water has a far higher thermal conductivity than air (0.6 vs 0.025 Watts per m Kelvin) So it is far more efficient at moving cold into a warm house or heat into a cold house. Easy enough to drill a bore hole down to the water table. I have 3 solar well pumps and have tested the temperature of the water at 30m and it is a steady 19°C all year round.


Hi Fi Upgrade
This upgrade came about with the sad demise of 2 of my AV Amps

The top one, the Denon AVR-1911 I bought when I was working Hong Kong and is over 10 years old. It was powering the speakers in the Livingroom. The bottom one is Harman/Kardon AVR 7000 is over 20 years old and was given to me when I worked in Bangkok by an American friend when he returned to the states. This one was powering the 2 Yamaha outdoor speakers on the third floor terrace.
I decided to replace Harman/Kardon with a network player amp that would support 4 channels in surround mode, so I could increase the number of speakers to 4. I wanted an amp that would sleep when inactive drawing very little power in standby but would have a wake command when you wanted to use it. I decided to go for the Yamaha R N602 stereo-receiver and 2 more Yamaha outdoor speakers. The Yamaha comes with the excellent MusicCast app.


Rather than replace the AV amp in the living room, I decided to upgrade the AV amp in the cinema and move that amp to the bedroom and the bedroom amp to the Livingroom. That way we had the best equipment where we spent the most time.
The 10 speakers I have in the cinema and the Cambridge amp and CD transport are all British and have the warm relaxed British HiFi sound I like. So I really needed a British AV amp, so I went for the NAD T 778 AV Receiver with it’s touch screen. At $3,000 it was a bit of a luxury, but it is at the heart of Cinema setup and it looks and sound great.

At the same time I upgraded the speakers is the bedroom to KEF, another British speaker.

Building a Music Server
Music Server based on an Intel NUC mounted on the wall next to my Office PC
Video Doorbell
Just installed a Eufy Video Doorbell, battery powered with local video storage. No wires no fees. IP65 weatherproof and good from -20°C to 50°C (-4°F to 122°F)
Why are people so threatened by renewable energy?
Since getting solar I have had endure quite a bit of hostility online about it. I could understand if the comments came from people who worked in the fossil fuel industry or had millions of dollars invested in these businesses (not a good idea), but that is rarely the case. Most people start with the cost – it’s too expensive and a payback of more than a year or so seems to put people off. I often hear the phase, “What happens when the sun doesn’t shine or the wind doesn’t blow?” Of course these comments come from people that don’t have solar, because if they did have solar they would actually know what there were talking about. Cloud cover reduces solar radiation, but it does not block it completely
Major Solar Upgrade starting next week:
Adding 3 new 9kWh batteries, 3 x 5kW inverters and 10 x 535w panels to add to my existing system of 32 x 350 watt panels = 11.2kw and 16 Deep Cycle Gel Batteries 12V 200AH = 38.4kWh.
To give a total of 16.55kW of solar PV. Using a Depth of Discharge of 50% on the Gel batteries and 80% on the Lithium batteries giving 40.8 kWh of usable storage.


Now have 20kw of solar on the house
Solar Plan
Summary: 20kW PV. 3x5kW inverters, 1x10kW inverter. 27kWh Lithium, 38.4kWh Deep Cycle Gel
For those who want the details:

Due to the number of questions I have received about my solar panel placement, I have decided to make a video to explain the rational behind my decisions.
Showcasing new technology in Thailand.
I have always tried to showcase new technology in Thailand. I installed a solar pump at my local primary school to that students and parents could see the technology in action.
I have done my best to educate my electricity provider: The Provincial Electricity Authority (PEA) about solar. It has been an uphill battle as staff move on I have stat the process again. Over the last 3 years I have had 3 site visits to inspect my system. I think they finally understand that just because my meter isn’t turning doesn’t mean it’s broken!
I fought a hard battle with PRIME INTER HOLDING COMPANY LIMITED the company tasked with installing my EV Wall Box that in fact solar can charge an EV!
I have recently uploaded a video using my solar setup as an example to try to explain how an electric car charge your house.
What’s the carbon footprint of building a house?
I recently got challenged online regarding the Eco credentials of my house build. The argument goes like: A new built eco-homes requires far less energy to run than older properties, but building them generates plenty of CO2. So how quickly will an eco-home recoup it’s carbon footprint?
This is the answer I gave:
Climate Appropriate Building Design

I recently received a call from a friend who said he was having a house built. His Thai wife had chosen a design and they had discussed it with a local builder who said he could build it for under ฿3M. I asked him about the dark concrete roof tiles, the big picture windows and lack of any roof overhang to protect the walls and windows from the sun. I asked him what blocks and insulation would be used in the build. After a pause all he said was “This design is very popular in Thailand”. A Popular Design, but is it an Appropriate Design?

For the last year or so I have been answering questions from a guy I know who wants to have a house built. He recently chose one of the designs offered by a building company and sent me the picture. His first question was “what was the name of the block you recommended to build the walls from?” I answered that it wouldn’t make much difference what block was used as he had more glass than walls!
Why are houses in Thailand build like this? What are the architectural influences on building design here?
Thai houses are built to a very tight budget, money is spent on appearance rather than the bones of the building. House design has been copied from Northern Europe: Roofs with complex pitches, designed to shed snow, clad in heavy dark colored concrete tiles. Large windows and sliding glass doors designed to let light in if you live in a northern climate. Windows here are mostly single glazed, insulation is practically not existent. Walls are thin and buildings leak air like a sieve.
But what should they look like? I live in N.E Thailand so when I came to design my house I looked for inspiration from house designs from a similar latitude.

The 15th parallel north crosses SE Asia, Saharan Africa, India, Central America and the Caribbean. The 15th parallel south crosses South America, Southern Africa and Northern Australia. So I started to look at building design from Queensland in northeastern Australia, the Sunshine State.

This is what a “Classic Queenslander” looks like:


Building for Thermal Comfort in a warming world
“Passive House” certification is a leading standard in energy efficient construction passivehouse-international.org Passive House certification criteria requires a building to not exceed 120kWh annually per square meter for Primary Energy Demand. The standard for Airtightness is a maximum of 0.6 air changes per hour at 50 Pascals pressure. I found this impossible to test on my house in Thailand as blower door test equipment is not available here. The final criteria is Thermal comfort where not more than 10% of the hours in any given year are over 25°C.
As I write this in April 2022 in Surin Thailand the temperature in the shade is 38°C. The heat index is 43°C (Dangerous Heat) The heat index (HI) is an index that combines air temperature and relative humidity, in shaded areas.
To build a comfortable and resilient home for the future, we need think beyond our current climate to consider how it might be in 10, 20 or 50 years from now.
Potential climate change impacts:
Increased temperatures
Increased frequency of heatwaves
Possible responses:
Incorporating passive cooling principles in a design
Building a ‘cool retreat’ – a part of the building that can provide comfort during heatwaves
I have already discussed how I use passive cooling in my house design, but I also have incorporated 4 ‘cool retreat’ rooms in the house: 2 bedrooms, the office and cinema. These 4 rooms have small windows made of glass blocks. The internal doors are sealed to reduce loss of cool air. The tiny 8,500 BTU aircon units can easily keep these rooms cool even when the house is running on battery power alone.

Design considerations
Orientate the building to take advantage of cooling breezes, and design the building to funnel breezes over, under and through the building.
Make sure the design maximises night-time sleeping comfort. Locate sleeping spaces in lower levels.
Install ceiling fans in all rooms.
Use passive cooling measures; ventilate roof spaces well with fans or whirlybirds and design for condensation removal
Locate cooking areas and heat-generating appliances (for example, fridges) on external walls and away from sleeping areas.
Provide shaded outdoor living areas.
Use light colours on roofs and walls.
Maximise planted areas in landscapes.
Avoid overuse of glazing.
Condition only critical rooms rather than the entire house.
Design air-conditioned spaces to be sealed off, preventing loss of cooling when running.
Shade the outdoor unit of the air-conditioner. Locate the unit where its hot air output will be directed away from the house.
Windows and shading
Shade all windows and walls, include extended eaves where possible
Shade the home, especially windows, and outdoor spaces with planting and shade structures.
Consider shading the whole building with a fly roof.
Insulation
Ensure insulation is appropriate for the climate and installed correctly.
Roof Colour
It amazes me how many houses in Thailand are built with Black roofs. Many countries are pushing for white roofs to combat rising temperatures, but apparently that message hasn’t reached Thailand yet.. https://www.bbc.com/news/world-48395221

EVs and Solar – why do some many people hate them?
Trying to share my experiences online about Solar and EVs I am confronted by so many haters, I am really not sure why. They always know nothing about either technology yet they try to convert me to their way of thinking, by sharing links to poorly researched and factually inaccurate articles.
Around the world fuel to power homes and vehicles is increasing in price. Here in Thailand we do not have home heating, electricity is used to cool houses, powering fans and aircon. Last month I paid nothing to power my house or my car.
What is there to hate in that?


